
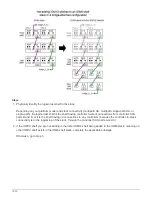
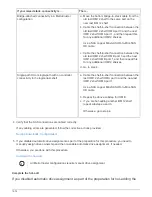


When two or more disk shelves have the same ID, the system assigns the duplicate disk shelf a soft ID
number equal to or greater than 100. You must change the soft ID (duplicate) number.
a. Run Active IQ Config Advisor to check for duplicate shelf ID alerts or run the
storage shelf show
-fields shelf-id
command to see a list of shelf IDs already in use including any duplicate IDs.
b. If your system has any duplicate shelf IDs, change the duplicate shelf IDs by repeating this procedure.
SAS cabling rules, worksheets, and examples
SAS cabling rules, worksheets, and examples overview - shelves with IOM12 modules
To help you cable your SAS drive shelves with IOM12 modules to your storage system,
you can use any of the available SAS cabling rules, worksheets, and examples content
as needed.
SAS cabling rules
•
•
•
•
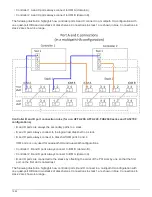
Controller-to-stack connections
•
Mini-SAS HD SAS optical cables
Cabling worksheets and examples
•
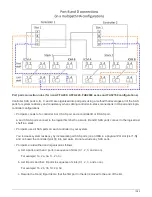
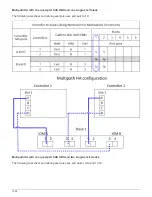
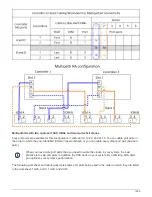
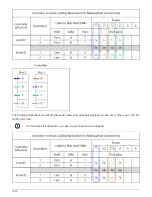
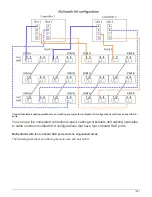
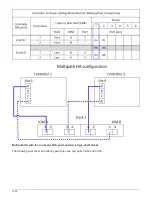
Common multipath HA configurations
•
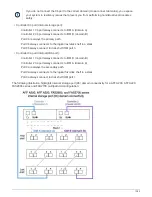
Common AFF A200, AFF A220, FAS2600, and FAS2700 configurations
•
Cabling worksheet templates
•
•
•
How to read a worksheet for multipathed connectivity
•
How to read a worksheet for quad-pathed connectivity
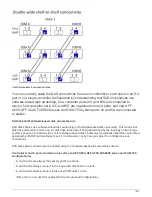
SAS cabling rules - shelves with IOM12 modules
Disk shelves with IOM12 modules can be cabled in HA pair and single-controller
configurations (for supported platforms) by applying the SAS cabling rules: configuration
rules, controller slot numbering rules, shelf-to-shelf connection rules, controller-to-stack
connection rules, and if applicable, mini-SAS HD SAS optical cable rules.
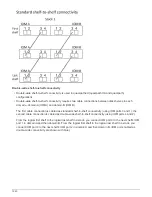
The SAS cabling rules regarding controller slot numbering rules, shelf-to-shelf connection rules,
and controller-to-stack connection rules described in this guide are the same rules that apply to
all SAS disk shelves, whether they have IOM12, IOM6, or IOM3 modules. However, the
information in this guide is specific to the unique characteristics of disk shelves with IOM12
modules and their use in supported configurations.
1577
Summary of Contents for AFF A700
Page 4: ...AFF and FAS System Documentation 1...
Page 208: ...3 Close the controller module cover and tighten the thumbscrew 205...
Page 248: ...2 Close the controller module cover and tighten the thumbscrew 245...
Page 308: ...Power supply Cam handle release latch Power and Fault LEDs Cam handle 305...
Page 381: ...Power supply Cam handle release latch Power and Fault LEDs Cam handle 378...
Page 437: ...1 Locate the DIMMs on your controller module 434...
Page 605: ...602...
Page 1117: ...3 Close the controller module cover and tighten the thumbscrew 1114...
Page 1157: ...2 Close the controller module cover and tighten the thumbscrew 1154...
Page 1228: ...Power supply Cam handle release latch Power and Fault LEDs Cam handle 1225...
Page 1300: ...Power supply Cam handle release latch Power and Fault LEDs Cam handle 1297...
Page 1462: ...Installing SuperRail to round hole four post rack 1459...
Page 1602: ...1599...
Page 1630: ...1627...
Page 1634: ...Orange ring on horizontal bracket Cable chain 1631...
Page 1645: ...Guide rail 1642...
Page 1669: ...Attention LED light on 1666...


