


If the output shows…
Then…
All disk drives in the stack are connected through
path A and path B except for the ones in the disk
shelves you disconnected, which are only
connected through path B
Go to the next step.
You successfully bypassed the disk shelves you are
removing and reestablished path A on the
remaining disk drives in the stack.
Anything other than the above
Repeat Step 5 and Step 6.
You must correct the cabling.
6. Complete the following substeps for the disk shelves (in the stack) you are removing:
a. Repeat Step 5 through Step 7 for path B.
When you repeat Step 7 and if you have recabled the stack correctly, you should only
see all remaining disk drives connected through path A and path B.
b. Repeat Step 1 to confirm that your system configuration is the same as before you removed one or
more disk shelves from a stack.
c. Go to the next step.
7. If when you removed ownership from the disk drives (as part of the preparation for this procedure), you
disabled disk ownership automatic assignment, reenable it by entering the following command; otherwise,
go to the next step:
storage disk option modify -autoassign on
For HA pair configurations, you run the command from the clustershell of both controllers.
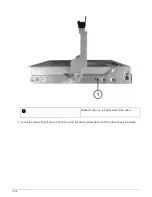
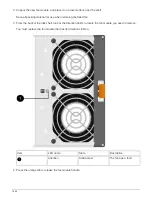
8. Power off the disk shelves you disconnected and unplug the power cords from the disk shelves.
9. Remove the disk shelves from the rack or cabinet.
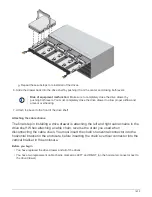
To make a disk shelf lighter and easier to maneuver, remove the power supplies and I/O modules (IOMs).
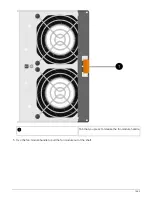
For DS460C disk shelves, you can also use the four detachable handles that shipped with your disk shelf.
Handles (two on each side of the chassis) are installed by pushing up until they click into place. As you
slide the disk shelf onto the rails, detach handles using the thumb latch.
It is recommended that you use a mechanical hoist or lift if you are moving a fully loaded DS460C disk
shelf.
A fully loaded DS460C disk shelf can weigh approximately 247 lbs (112 kg).
1652
Summary of Contents for AFF A700
Page 4: ...AFF and FAS System Documentation 1...
Page 208: ...3 Close the controller module cover and tighten the thumbscrew 205...
Page 248: ...2 Close the controller module cover and tighten the thumbscrew 245...
Page 308: ...Power supply Cam handle release latch Power and Fault LEDs Cam handle 305...
Page 381: ...Power supply Cam handle release latch Power and Fault LEDs Cam handle 378...
Page 437: ...1 Locate the DIMMs on your controller module 434...
Page 605: ...602...
Page 1117: ...3 Close the controller module cover and tighten the thumbscrew 1114...
Page 1157: ...2 Close the controller module cover and tighten the thumbscrew 1154...
Page 1228: ...Power supply Cam handle release latch Power and Fault LEDs Cam handle 1225...
Page 1300: ...Power supply Cam handle release latch Power and Fault LEDs Cam handle 1297...
Page 1462: ...Installing SuperRail to round hole four post rack 1459...
Page 1602: ...1599...
Page 1630: ...1627...
Page 1634: ...Orange ring on horizontal bracket Cable chain 1631...
Page 1645: ...Guide rail 1642...
Page 1669: ...Attention LED light on 1666...


