

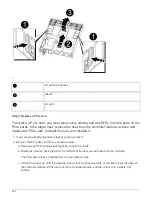

a. From the healthy node, give back the replaced node’s storage:
storage failover giveback
-ofnode
replacement_node_name
the
replacement
node takes back its storage and completes booting.
If you are prompted to override the system ID due to a system ID mismatch, you should enter
y
.
If the giveback is vetoed, you can consider overriding the vetoes.
Find the High-Availability Configuration Guide for your version of ONTAP 9
b. After the giveback has been completed, confirm that the HA pair is healthy and that takeover is
possible: storage failover show
The output from the
storage failover show
command. should not include the System ID changed
on partner message.
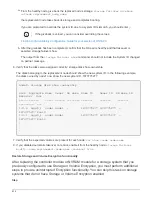
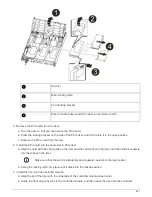
6. Verify that the disks were assigned correctly: storage disk show -ownership
The disks belonging to the
replacement
node should show the new system ID. In the following example,
the disks owned by node1 now show the new system ID, 1873775277:
node1> storage disk show -ownership
Disk Aggregate Home Owner DR Home Home ID Owner ID DR Home ID
Reserver Pool
----- ------ ----- ------ -------- ------- ------- -------
--------- ---
1.0.0 aggr0_1 node1 node1 - 1873775277 1873775277 -
1873775277 Pool0
1.0.1 aggr0_1 node1 node1 1873775277 1873775277 -
1873775277 Pool0
.
.
.
7. Verify that the expected volumes are present for each node:
vol show -node node-name
8. If you disabled automatic takeover on reboot, enable it from the healthy node:
storage failover
modify -node replacement-node-name -onreboot true
Restore Storage and Volume Encryption functionality
After replacing the controller module or NVRAM module for a storage system that you
previously configured to use Storage or Volume Encryption, you must perform additional
steps to provide uninterrupted Encryption functionality. You can skip this task on storage
systems that do not have Storage or Volume Encryption enabled.
Step
816
Summary of Contents for AFF A700
Page 4: ...AFF and FAS System Documentation 1...
Page 208: ...3 Close the controller module cover and tighten the thumbscrew 205...
Page 248: ...2 Close the controller module cover and tighten the thumbscrew 245...
Page 308: ...Power supply Cam handle release latch Power and Fault LEDs Cam handle 305...
Page 381: ...Power supply Cam handle release latch Power and Fault LEDs Cam handle 378...
Page 437: ...1 Locate the DIMMs on your controller module 434...
Page 605: ...602...
Page 1117: ...3 Close the controller module cover and tighten the thumbscrew 1114...
Page 1157: ...2 Close the controller module cover and tighten the thumbscrew 1154...
Page 1228: ...Power supply Cam handle release latch Power and Fault LEDs Cam handle 1225...
Page 1300: ...Power supply Cam handle release latch Power and Fault LEDs Cam handle 1297...
Page 1462: ...Installing SuperRail to round hole four post rack 1459...
Page 1602: ...1599...
Page 1630: ...1627...
Page 1634: ...Orange ring on horizontal bracket Cable chain 1631...
Page 1645: ...Guide rail 1642...
Page 1669: ...Attention LED light on 1666...


