background image

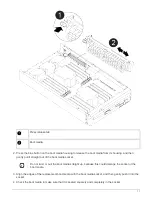
If necessary, remove the boot media and reseat it into the socket.

5. Push the boot media down to engage the locking button on the boot media housing.

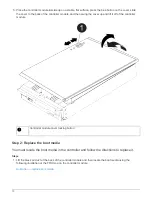
6. Reinstall the controller module lid by aligning the pins on the lid with the slots on the motherboard carrier,

and then slide the lid into place.

Step 3: Transfer the boot image to the boot media

You can install the system image to the replacement boot media using a USB flash drive
with the image installed on it. However, you must restore the var file system during this
procedure.

Before you begin

• You must have a USB flash drive, formatted to FAT32, with at least 4GB capacity.

• A copy of the same image version of ONTAP as what the impaired controller was running. You can

download the appropriate image from the Downloads section on the NetApp Support Site

If NVE is enabled, download the image with NetApp Volume Encryption, as indicated in the download
button.

If NVE is not enabled, download the image without NetApp Volume Encryption, as indicated in the
download button.

• If your system is a stand-alone system you do not need a network connection, but you must perform an

additional reboot when restoring the var file system.

Steps

1. Align the end of the controller module with the opening in the chassis, and then gently push the controller

module halfway into the system.

2. Recable the controller module, as needed.

3. Insert the USB flash drive into the USB slot on the controller module.

Make sure that you install the USB flash drive in the slot labeled for USB devices, and not in the USB
console port.

4. Push the controller module all the way into the system, making sure that the cam handle clears the USB

flash drive, firmly push the cam handle to finish seating the controller module, and then push the cam
handle to the closed position.

The controller begins to boot as soon as it is completely installed into the chassis.

5. Interrupt the boot process to stop at the LOADER prompt by pressing Ctrl-C when you see Starting

AUTOBOOT press Ctrl-C to abort….

If you miss this message, press Ctrl-C, select the option to boot to Maintenance mode, and then halt the
controller to boot to LOADER.

6. Set your network connection type at the LOADER prompt:

If you are configuring DHCP: 

ifconfig e0a -auto

12

Summary of Contents for AFF A900

Page 1: ...media ONTAP Systems NetApp May 13 2022 This PDF was generated from https docs netapp com us en ontap systems a900 bootmedia_replace_overview html on May 13 2022 Always check docs netapp com for the la...

Page 2: ...ryption keys AFF A900 1 Shut down the impaired controller AFF A900 5 Remove the controller replace the boot media and transfer the boot image AFF A900 8 Boot the recovery image AFF A900 13 Post boot m...

Page 3: ...ly the commands in these steps on the correct controller The impaired controller is the controller on which you are performing maintenance The healthy controller is the HA partner of the impaired cont...

Page 4: ...SE is configured and you need to verify the NSE configuration and in use If no disks are shown NSE is not configured If NVE and NSE are not configured no drives are protected with NSE keys it s safe t...

Page 5: ...other than yes a Enter the onboard security key manager sync command security key manager onboard sync Enter the customer s onboard key management passphrase at the prompt If the passphrase cannot be...

Page 6: ...display the key management information security key manager onboard show backup c Copy the contents of the backup information to a separate file or your log file You ll need it in disaster scenarios w...

Page 7: ...formation security key manager onboard show backup f Copy the contents of the backup information to a separate file or your log file You ll need it in disaster scenarios where you might need to manual...

Page 8: ...in quorum If the cluster is not in quorum or a healthy controller shows false for eligibility and health you must correct the issue before shutting down the impaired controller see the Administration...

Page 9: ...ealthy controller shows false for eligibility and health you must correct the issue before shutting down the impaired controller see the Administration overview with the CLI If you have a MetroCluster...

Page 10: ...nd open the controller module locate and replace the boot media in the controller and then transfer the image to the replacement boot media Step 1 Remove the controller module To access components ins...

Page 11: ...e the cam handle so that it completely disengages the controller module from the chassis and then slide the controller module out of the chassis Make sure that you support the bottom of the controller...

Page 12: ...t off of the controller module Controller module cover locking button Step 2 Replace the boot media You must locate the boot media in the controller and follow the directions to replace it Steps 1 Lif...

Page 13: ...raight out of the boot media socket Do not twist or pull the boot media straight up because this could damage the socket or the boot media 3 Align the edges of the replacement boot media with the boot...

Page 14: ...If your system is a stand alone system you do not need a network connection but you must perform an additional reboot when restoring the var file system Steps 1 Align the end of the controller module...

Page 15: ...rver URL You need only the server s host name Other parameters might be necessary for your interface You can enter help ifconfig at the firmware prompt for details 7 If the controller is in a stretch...

Page 16: ...nced f Run the restore backup command system node restore backup node local target address impaired_node_IP_address g Return the impaired controller to admin level set privilege admin h Press y when p...

Page 17: ...anged to Connected for the target iSCSI target type dr_auxiliary address ip address date and time node name iscsi session stateChanged notice iSCSI session state is changed to Connected for the target...

Page 18: ...version v command to check the ONTAP versions 11 Restore automatic giveback if you disabled it by using the storage failover modify node local auto giveback true command Post boot media replacement s...

Page 19: ...ACKUP TmV0QXBwIEtleSBCbG9iAAEAAAAEAAAAcAEAAAAAAADuD byAAAAACEAAAAAAAAA QAAAAAAAAABvOlH0AAAAAMh7qDLRyH1DBz12piVdy9ATSFMT0C0TlYFss4PDjTaV dzRYkLd1PhQLxAWJwOIyqSr8qY1SEBgm1IWgE5DLRqkiAAAAAAAAACgAAAAAAAAA...

Page 20: ...ed b Enter the security key manager key query command to see a detailed view of all keys stored in the onboard key manager and verify that the Restored column yes true for all authentication keys If t...

Page 21: ...an NDMP SnapMirror or SnapVault process disable the process See the appropriate content for more information 5 Wait 3 minutes and check the failover status with the storage failover show command 6 At...

Page 22: ...true for all authentication keys 11 Connect the console cable to the partner controller 12 Give back the controller using the storage failover giveback fromnode local command 13 Restore automatic giv...

Page 23: ...WHETHER IN CONTRACT STRICT LIABILITY OR TORT INCLUDING NEGLIGENCE OR OTHERWISE ARISING IN ANY WAY OUT OF THE USE OF THIS SOFTWARE EVEN IF ADVISED OF THE POSSIBILITY OF SUCH DAMAGE NetApp reserves the...

Reviews: