62
NetApp AltaVault Cloud Integrated Storage Installation and Service Guide for Physical Appliances
Beta Draft
System maintenance
Replacing controllers
5.
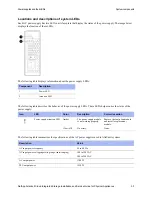
Loosen the thumbscrew on the cam handle.
6.
Identify components as described in this table:
7.
Pull the cam handle downward to unseat the controller and slide the controller module out of the chassis until it
catches. Then, press the release latch on the left side of the controller module and slide the controller module
completely out of the chassis, making sure that you support the base of the module with your free hand.
8.
Place the controller module on a clean, flat surface.
Moving working FRUs from the controller
Remove all the working field replaceable units (FRUs) from the impaired controller and move them to the new
controller module. To reduce the possibility of damage to the components that are being moved, you should minimize
the handling of the components by installing them in the replacement controller as soon as they are removed from the
impaired controller. Then, install the replacement controller module in the system chassis.
To move all the working FRUs from the impaired controller to the new controller module
1.
Place the replacement controller module next to the impaired module and open the CPU cover and the left and
right side panels to install system components.
Note:
Do not power on your system until you have moved all the internal FRUs to the replacement module.
2.
Move the eight system DIMMs to the replacement controller module.
For instructions on replacing the system DIMMs, see
“Replacing system DIMMs” on page 79
.
Install the eight DIMMs using the steps described in the procedure,
“Installing system DIMMs” on page 81
3.
Move the boot device to the replacement controller module
a. For instructions on removing the boot media from the impaired module, see
component
Description
1
Thumbscrew
2
Cam Handle
Summary of Contents for AltaVault Cloud Integrated Storage 4.1
Page 2: ......


