background image

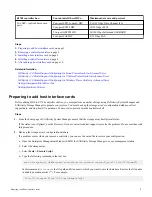
E5700 controller has...

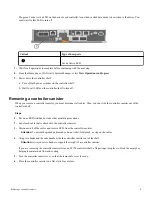
You can install these HICs...

Maximum data rate and protocol

Two SFP+ (optical) baseboard
ports

Four-port SFP+ (optical) HIC

8/16/32 Gbps Fibre Channel (FC)

Four-port SFP28 HIC

10/25 Gbps iSCSI

Two-port QSFP28 HIC

56/100 Gbps Infiniband (iSER/SRP)

Four-port SAS HIC

6/12 Gbps SAS

Steps

1. 

Preparing to add host interface cards

 on page 3

2. 

Removing a controller canister

 on page 5

3. 

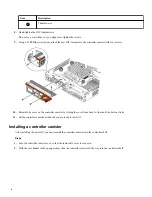
Installing a host interface card

 on page 6

4. 

Installing a controller canister

 on page 8

5. 

After adding a host interface card

 on page 10

Related information

SANtricity 11.40 Installing and Configuring for Linux Power Guide for Advanced Users
SANtricity 11.40 Installing and Configuring for VMware Power Guide for Advanced Users
SANtricity 11.40 Installing and Configuring for Windows Power Guide for Advanced Users
NetApp Interoperability Matrix Tool
NetApp Hardware Universe

Preparing to add host interface cards

Before adding HICs to E5700 controller shelves, you must perform a number of steps using SANtricity System Manager and
SANtricity Storage Manager to prepare your system. You must back up the storage array's configuration database, collect
support data, and stop host I/O operations. You must also power down the controller shelf.

Steps

1.  From the home page of SANtricity System Manager, ensure that the storage array has Optimal status.

If the status is not Optimal, use the Recovery Guru or contact technical support to resolve the problem. Do not continue with
this procedure.

2.  Back up the storage array's configuration database.

If a problem occurs when you remove a controller, you can use the saved file to restore your configuration.

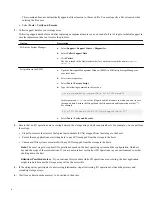
a.  Open the Enterprise Management Window (EMW) for SANtricity Storage Manager on your management station.

b.  Select the storage array.

c.  Select Tools > Execute Script.

d.  Type the following command in the text box.

save storageArray dbmDatabase sourceLocation=onboard contentType=all file="filename";

In this command, 

filename

 is the file path and file name to which you want to save the database. Enclose the file name

in double quotation marks (" "). For example:

 file="C:\Program Files\CLI\logs\dbmdata.zip" 

Preparing to add host interface cards

3

Summary of Contents for E Series

Page 1: ...t compatible hardware refer to the NetApp Interoperability Matrix Tool and the NetApp Hardware Universe You have an ESD wristband or you have taken other antistatic precautions You have a 1 Phillips screwdriver You have labels to identify the new host cables You have installed SANtricity Storage Manager on a management station so you can use the storage array s command line interface CLI Note If t...

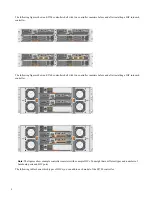
Page 2: ...s show an E5760 controller shelf with two controller canisters before and after installing a HIC into each controller Note The figures show example controller canisters with example HICs You might have different types and numbers of baseboard ports and HIC ports The following table shows which types of HICs you can add to each model of the E5700 controller 2 ...

Page 3: ...of steps using SANtricity System Manager and SANtricity Storage Manager to prepare your system You must back up the storage array s configuration database collect support data and stop host I O operations You must also power down the controller shelf Steps 1 From the home page of SANtricity System Manager ensure that the storage array has Optimal status If the status is not Optimal use the Recover...

Page 4: ...th and the file name in double quotation marks For example file C Program Files CLI logs support data 7z e Select Tools Verify and Execute 4 Ensure that no I O operations are occurring between the storage array and all connected hosts For example you can perform these steps Stop all processes that involve the logical unit numbers LUNs mapped from the storage to the hosts Ensure that no application...

Page 5: ...roller canister out of the controller shelf Steps 1 Put on an ESD wristband or take other antistatic precautions 2 Label each cable that is attached to the controller canister 3 Disconnect all of the cables and remove SFPs from the controller canister Attention To prevent degraded performance do not twist fold pinch or step on the cables 4 Using two hands and the cam handle slide the controller ca...

Page 6: ...ver off 3 Confirm that the green LED inside the controller between the battery and the DIMMs is off If this green LED is on the controller is still using battery power You must wait for this LED to go off before removing any components Item Description 1 Internal Cache Active LED 2 Battery 4 Using a 1 Phillips screwdriver remove the screws that attach the HIC faceplate to the controller canister T...

Page 7: ...eful not to scratch or bump the components on the bottom of the HIC or on the top of the controller card 7 Carefully lower the HIC into place and seat the HIC connector by pressing gently on the HIC Attention Possible equipment damage Be very careful not to pinch the gold ribbon connector for the controller LEDs between the HIC and the thumbscrews Item Description 1 Host interface card HIC Install...

Page 8: ...ller canister by sliding the cover from back to front until the button clicks 11 Set the controller canister aside until you are ready to install it Installing a controller canister After installing the new HIC you can reinstall the controller canister into the controller shelf Steps 1 Turn the controller canister over so that the removable cover faces down 2 With the cam handle in the open positi...

Page 9: ... example of an E5724 controller shelf Item Description 1 Controller canister 2 Cam handle The following figure is an example of an E5760 controller shelf Item Description 1 Controller canister Installing a controller canister 9 ...

Page 10: ... new host ports such as switches or host bus adapters HBAs Steps 1 Turn on the two power switches at the back of the controller shelf Do not turn off the power switches during the power on process which typically takes 90 seconds or less to complete The fans in each shelf are very loud when they first start up The loud noise during start up is normal 2 As the controller boots check the controller ...

Page 11: ...ower Guide for Advanced Users SANtricity 11 40 Installing and Configuring for Windows Power Guide for Advanced Users SANtricity System Manager 11 40 Installing and Configuring for Linux Express Guide SANtricity System Manager 11 40 Installing and Configuring for VMware Express Guide SANtricity System Manager 11 40 Installing and Configuring for Windows Express Guide Upgrading Host Interface Cards ...

Page 12: ...ave successfully completed this procedure About this procedure Use this procedure to change the host protocol by replacing the HIC currently installed in an E5700 controller canister with a different type of HIC The table shows which types of HICs you can install in each E5700 controller model E5700 controller has You can install these HICs Maximum data rate and protocol Two SFP optical baseboard ...

Page 13: ...information SANtricity 11 40 Installing and Configuring for Linux Power Guide for Advanced Users SANtricity 11 40 Installing and Configuring for VMware Power Guide for Advanced Users SANtricity 11 40 Installing and Configuring for Windows Power Guide for Advanced Users SANtricity Storage Manager 11 40 Installing and Configuring for Linux Express Guide SANtricity Storage Manager 11 40 Installing an...

Page 14: ...e Manager on your management station b Select the storage array c Select Tools Execute Script d Type the following command in the text box save storageArray dbmDatabase sourceLocation onboard contentType all file filename In this command filename is the file path and file name to which you want to save the database Enclose the file name in double quotation marks For example file C Program Files CL...

Page 15: ...o the hosts Ensure that no applications are writing data to any LUNs mapped from the storage to the hosts Unmount all file systems associated with any LUNs mapped from the storage to the hosts Note The exact steps to stop host I O operations depend on the host operating system and the configuration which are beyond the scope of these instructions If you are not sure how to stop host I O operations...

Page 16: ...ing mirroring you receive an error Asynchronous Mirroring supported for iSCSI and Fibre Channel only a In the Array Management Window access the online help and search for the topics related to Asynchronous Mirroring b Follow the instructions in the online help to remove all asynchronous mirrored pairs from the asynchronous mirror groups Note When removing each pair select the Delete all repositor...

Page 17: ...e Cache Active LED on the back of the controller is off The green Cache Active LED on the back of the controller is on when cached data needs to be written to the drives You must wait for this LED to turn off before removing the controller shelf Note The figure shows an example controller canister Your controller might have a different number and a different type of host ports Callout Type of host...

Page 18: ...n LED inside the controller between the battery and the DIMMs is off If this green LED is on the controller is still using battery power You must wait for this LED to go off before removing any components Item Description 1 Internal Cache Active LED 2 Battery 3 Using a 1 Phillips screwdriver remove the screws that attach the HIC faceplate to the controller canister There are four screws one on the...

Page 19: ... the controller card 6 Carefully detach the HIC from the controller card by lifting the card up and sliding it back Attention Be careful not to scratch or bump the components on the bottom of the HIC or on the top of the controller card Item Description 1 Host interface card HIC 2 Thumbscrews Removing a host interface card 19 ...

Page 20: ...om of the HIC or on the top of the controller card 3 Carefully lower the HIC into place and seat the HIC connector by pressing gently on the HIC Attention Possible equipment damage Be very careful not to pinch the gold ribbon connector for the controller LEDs between the HIC and the thumbscrews Item Description 1 Host interface card HIC 2 Thumbscrews 4 Hand tighten the HIC thumbscrews Do not use a...

Page 21: ...fore you begin You have installed any new host hardware needed for the new host ports such as switches or host bus adapters HBAs Steps 1 Turn on the two power switches at the back of the controller shelf Do not turn off the power switches during the power on process which typically takes 90 seconds or less to complete The fans in each shelf are very loud when they first start up The loud noise dur...

Page 22: ... a new host protocol download the SANtricity Storage Manager Express Guide or SANtricity Power Guide for Advanced Users for your operating system 7 Follow the instructions in that document to perform any additional steps such as the following Adding or updating the host mappings for the new host ports Configuring the controller s settings Related information SANtricity 11 40 Installing and Configu...

Page 23: ... so you can use the storage array s command line interface CLI Note If this software has not yet been installed follow the instructions in the SANtricity Storage Manager Express Guide or the SANtricity Power Guide for Advanced Users for your operating system to download and install it About this procedure Use this procedure to change the host protocol by replacing the HIC currently installed in an...

Page 24: ...nstalling and Configuring for VMware Express Guide SANtricity Storage Manager 11 40 Installing and Configuring for Windows Express Guide Preparing to remove a host interface card If a HIC has failed you must back up the configuration and collect support data Then you can take the controller offline About this task If a HIC has failed the Recovery Guru in SANtricity System Manager directs you to re...

Page 25: ...ve the problem Option Description SANtricity System Manager a Select Support Support Center Diagnostics b Select Collect Support Data c Click Collect The file is saved in the Downloads folder for your browser with the name support data 7z Script editor in the EMW a Open the Enterprise Management Window EMW in SANtricity Storage Manager on your local host b Select the storage array c Select Tools E...

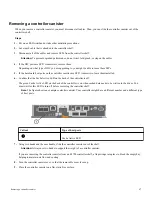
Page 26: ...oller B set controller b availability offline e Select Tools Verify and Execute 6 Wait for System Manager to update the controller s status to offline Attention Do not begin any other operations until after the status has been updated Removing a controller canister When you remove a controller canister you must disconnect all cables Then you can slide the controller canister out of the controller ...

Page 27: ... LED 6 Squeeze the latch on the cam handle until it releases and then open the cam handle to the right to release the controller canister from the shelf The following figure is an example of an E5724 controller shelf Item Description 1 Controller canister 2 Cam handle The following figure is an example of an E5760 controller shelf Removing a controller canister 27 ...

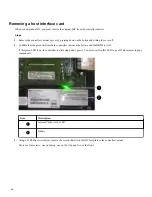
Page 28: ...urn the controller canister over so that the removable cover faces up 9 Place the controller canister on a flat static free surface Removing a host interface card When you replace a HIC you must remove the original HIC from the controller canister Steps 1 Remove the controller canister s cover by pressing down on the button and sliding the cover off 2 Confirm that the green LED inside the controll...

Page 29: ...anister There are four screws one on the top one on the side and two on the front 4 Remove the HIC faceplate 5 Using your fingers or a Phillips screwdriver loosen the three thumbscrews that secure the HIC to the controller card 6 Carefully detach the HIC from the controller card by lifting the card up and sliding it back Removing a host interface card 29 ...

Page 30: ...t be identical If the replacement HIC is not identical to the HIC you are replacing do not attempt this procedure The presence of mismatched HICs will cause the controller with the replacement HIC to lock down when you bring it online 2 Align the three thumbscrews on the HIC with the corresponding holes on the controller and align the connector on the bottom of the HIC with the HIC interface conne...

Page 31: ... Hand tighten the HIC thumbscrews Do not use a screwdriver or you might over tighten the screws 5 Using a 1 Phillips screwdriver attach the HIC faceplate to the controller canister with the four screws you removed previously Installing a host interface card 31 ...

Page 32: ...from back to front until the button clicks 2 Turn the controller canister over so that the removable cover faces down 3 With the cam handle in the open position slide the controller canister all the way into the controller shelf The following figure is an example of an E5724 controller shelf Item Description 1 Controller canister 2 Cam handle The following figure is an example of an E5760 controll...

Page 33: ...er replacing a HIC After replacing a HIC you must bring the controller online and confirm the storage array is working correctly Then you can collect support data and resume operations Steps 1 As the controller boots check the controller LEDs and the seven segment display When communication with the other controller is reestablished The seven segment display shows the repeating sequence OS OL blan...

Page 34: ...form the operation Enterprise Management Window EMW a Open the Enterprise Management Window EMW in SANtricity Storage Manager on your local host b Select the storage array c Select Tools Execute Script d Type one of the following commands in the text box For controller A set controller a availability online For controller B set controller b availability online e Select Tools Verify and Execute The...

Page 35: ...k Collect The file is saved in the Downloads folder for your browser with the name support data 7z Script editor in the EMW a Open the Enterprise Management Window EMW in SANtricity Storage Manager on your local host b Select the storage array c Select Tools Execute Script d Type the following command in the text box save storageArray supportData file filename In this command filename is the file ...

Page 36: ...atents or pending applications RESTRICTED RIGHTS LEGEND Use duplication or disclosure by the government is subject to restrictions as set forth in subparagraph c 1 ii of the Rights in Technical Data and Computer Software clause at DFARS 252 277 7103 October 1988 and FAR 52 227 19 June 1987 Trademark information NETAPP the NETAPP logo and the marks listed on the NetApp Trademarks page are trademark...

Reviews: