Troubleshooting
44
NETGEAR Wireless Cable Gateway
Basic Functions
After you have turned on power to the gateway, you should do the following:
1.
Check to see that the Power LED is on.
2.
Check that the numbered Ethernet LEDs come on momentarily.
3.
After a few seconds, check that the local port link LEDs are lit for any local ports that are
connected.
If any of these conditions does not occur, refer to the appropriate following section.
Using LEDs to Troubleshoot
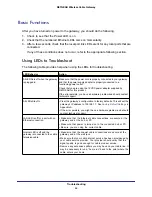
The following table provides help when using the LEDs for troubleshooting.
LED Behavior
Action
All LEDS are off when the gateway
is plugged in.
Make sure that the power cord is properly connected to your gateway
and that the power supply adapter is properly connected to a
functioning power outlet.
Check that you are using the 12VDC power adapter supplied by
NETGEAR for this product.
If the error persists, you have a hardware problem and should contact
technical support.
All LEDs Stay On
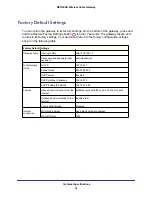
• Clear the gateway’s configuration to factory defaults. This will set the
gateway’s IP address to 192.168.1.1. See
Factory Default Settings
in
Appendix
A.
• If the error persists, you might have a hardware problem and should
contact technical support.
LAN LED is off for a port with an
Ethernet connection.
• Make sure that the Ethernet cable connections are secure at the
gateway and at the hub or PC.
• Make sure that power is turned on to the connected hub or PC.
• Be sure you are using the correct cable.
Internet LED is off and the
gateway is connected to the cable
television cable.
• Make sure that the coaxial cable connections are secure at the
gateway and at the wall jack.
• Make sure that your cable internet service has been provisioned by
your cable service provider. Your provider should verify that the
signal quality is good enough for cable modem service.
• Remove any excessive splitters you may have on your cable line. It
may be necessary to run a “home run” back to the point where the
cable enters your home.

