background image

Virtual Private Networking Using IPSec and L2TP Connections 

260

NETGEAR ProSAFE VPN Firewall FVS318G v2 

Use lowercase letters. If you changed the password, enter your personalized 
password. Leave the domain as it is (geardomain).

c. 

Click the 

Login

 button.

The Router Status screen displays. After five minutes of inactivity, which is the default 
login time-out, you are automatically logged out.

2. 

Select 

VPN > IPSec VPN > RADIUS Client

.


3. 

Complete the settings as described in the following table:

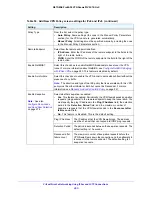
Table 55.  RADIUS Client screen settings  

Setting

Description

Primary RADIUS Server

To enable and configure the primary RADIUS server, select the 

Yes

 radio button, and enter the settings for 

the three fields to the right. The default setting is that the 

No

 radio button is selected.

Primary Server IP Address The IPv4 address of the primary RADIUS server.

Secret Phrase

A shared secret phrase to authenticate the transactions between the client 
and the primary RADIUS server. The same secret phrase must be configured 
on both the client and the server. 

Primary Server NAS 
Identifier

The primary Network Access Server (NAS) identifier that must be present in a 
RADIUS request.

Note:

The VPN firewall functions as an NAS, allowing network access to 

external users after verification of their authentication information. In a 
RADIUS transaction, the NAS must provide some NAS identifier information to 
the RADIUS server. Depending on the configuration of the RADIUS server, the 
VPN firewall’s IP address might be sufficient as an identifier, or the server 
might require a name, which you must enter in this field.

Backup RADIUS Server

Summary of Contents for FVS318G - ProSafe Gigabit VPN Firewall Data Sheet Router

Page 1: ...350 East Plumeria Drive San Jose CA 95134 USA October 2014 202 11465 01 NETGEAR ProSAFE VPN Firewall FVS318G v2 Reference Manual ...

Page 2: ... NETGEAR Phone Other Countries Check the list of phone numbers at http support netgear com general contact default aspx Compliance For regulatory compliance information visit http www netgear com about regulatory See the regulatory compliance document before connecting the power supply Trademarks NETGEAR the NETGEAR logo and Connect with Innovation are trademarks and or registered trademarks of NE...

Page 3: ...nterface Menu Layout 21 Requirements for Entering IP Addresses 22 IPv4 Addresses 23 IPv6 Addresses 23 Chapter 2 IPv4 and IPv6 Internet and Broadband Settings Internet and WAN Configuration Tasks 25 IPv4 Internet Connections 25 IPv6 Internet Connections 25 Configure the IPv4 Internet Connection and WAN Settings 26 Configure the IPv4 WAN Mode 26 Let the VPN Firewall Automatically Detect and Configur...

Page 4: ...ess Reservation 78 Manage the IPv6 LAN 78 DHCPv6 Server Options 79 Configure the IPv6 LAN 80 Configure the IPv6 Router Advertisement Daemon and Advertisement Prefixes for the LAN 88 Configure IPv6 Multihome LAN IP Addresses on the Default VLAN 93 Enable and Configure the DMZ Port for IPv4 and IPv6 Traffic 96 DMZ Port for IPv4 Traffic 96 DMZ Port for IPv6 Traffic 100 Configure the IPv6 Router Adver...

Page 5: ... Specific Traffic 195 Enable Source MAC Filtering 196 Set Up IP MAC Bindings 199 Configure Port Triggering 206 Configure Universal Plug and Play 210 Chapter 5 Virtual Private Networking Using IPSec and L2TP Connections Use the IPSec VPN Wizard for Client and Gateway Configurations 213 Create an IPv4 Gateway to Gateway VPN Tunnel with the Wizard 213 Create an IPv6 Gateway to Gateway VPN Tunnel with...

Page 6: ...306 Manage Digital Certificates for VPN Connections 308 VPN Certificates 309 Manage VPN CA Certificates 309 Manage VPN Self Signed Certificates 311 Manage the VPN Certificate Revocation List 316 Chapter 7 Network and System Management Performance Management 320 Bandwidth Capacity 320 Features That Reduce Traffic 320 Features That Increase Traffic 322 Use QoS and Bandwidth Assignment to Shift the T...

Page 7: ...ment Interface 388 When You Enter a URL or IP Address a Time Out Error Occurs 389 Troubleshoot the ISP Connection 389 Troubleshooting the IPv6 Connection 391 Troubleshoot a TCP IP Network Using a Ping Utility 395 Test the LAN Path to Your VPN Firewall 395 Test the Path from Your Computer to a Remote Device 396 Restore the Default Configuration and Password 397 Address Problems with Date and Time 3...

Page 8: ...e VPN Firewall with the Mounting Kit Log In to the VPN Firewall Web Management Interface Menu Layout Requirements for Entering IP Addresses For more information about the topics covered in this manual visit the support website at http support netgear com Firmware updates with new features and bug fixes are made available from time to time on downloadcenter netgear com Some products can regularly c...

Page 9: ...e connections The use of Gigabit Ethernet WAN and LAN ports ensures high data transfer speeds Key Features and Capabilities The VPN firewall provides the following key features and capabilities A single 10 100 1000 Mbps Gigabit Ethernet WAN port Built in eight port 10 100 1000 Mbps Gigabit Ethernet LAN switch for fast data transfer between local network resources Both IPv4 and IPv6 support Advance...

Page 10: ...gure the firewall to email the log to you at specified intervals Security Features The VPN firewall is equipped with several features designed to maintain security Computers hidden by NAT NAT opens a temporary path to the Internet for requests originating from the local network Requests originating from outside the LAN are discarded preventing users outside the LAN from finding and directly access...

Page 11: ...tion of computers on your local network DNS proxy When DHCP is enabled and no DNS addresses are specified the firewall provides its own address as a DNS server to the attached computers The firewall obtains actual DNS addresses from the ISP during connection setup and forwards DNS requests from the LAN PPP over Ethernet PPPoE PPPoE is a protocol for connecting remote hosts to the Internet over a D...

Page 12: ...management interface from a remote location on the Internet For security you can limit remote management access to a specified remote IP address or range of addresses Visual monitoring The VPN firewall s front panel LEDs provide an easy way to monitor its status and activity Maintenance and Support NETGEAR offers the following features to help you maximize your use of the VPN firewall Flash memory...

Page 13: ...ETGEAR dealer Hardware Features The front panel ports and LEDs rear panel ports and bottom label of the VPN firewall are described in the following sections Front Panel Rear Panel Bottom Panel with Product Label Front Panel Viewed from left to right the VPN firewall front panel contains the following ports LAN Ethernet ports Eight switched N way automatic speed negotiating Auto MDI MDIX Gigabit Et...

Page 14: ...n green Power is supplied to the VPN firewall Off Power is not supplied to the VPN firewall Test LED On amber during startup Test mode The VPN firewall is initializing After approximately two minutes when the VPN firewall completes its initialization the Test LED turns off On amber during any other time The initialization failed or a hardware failure occurred Blinking amber The VPN firewall is wri...

Page 15: ... green Port 8 is operating as a dedicated hardware DMZ port WAN Port Left LED Off The WAN port does not detect a physical link that is no Ethernet cable is plugged into the VPN firewall On green The WAN port is connected with a device that provides an Internet connection Blinking green Data is being transmitted or received by the WAN port Right LED Off The WAN port is operating at 10 Mbps On amber...

Page 16: ...an optional console terminal The port provides a DB9 male connector The default baud rate is 9600 K The pinouts are 2 Tx 3 Rx 5 and 7 Gnd 3 Factory default Reset button Using a sharp object press and hold this button for about eight seconds until the front panel Test LED blinks To reset the VPN firewall to factory default settings All configuration settings are lost and the default password is res...

Page 17: ... in a wiring closet or equipment room Consider the following when deciding where to position the VPN firewall The unit is accessible and cables can be connected easily Cabling is away from sources of electrical noise These include lift shafts microwave ovens and air conditioning units Water or moisture cannot enter the case of the unit Airflow around the unit and through the vents in the side of t...

Page 18: ...g Kit Use the mounting kit for the VPN firewall to install the appliance on a wall Attach the mounting brackets using the hardware that is supplied with the mounting kit Figure 5 Wall mounting Before mounting the VPN firewall to a wall verify the following You are using the correct screws supplied with the installation kit The wall on which you plan to mount the VPN firewall is suitably located ...

Page 19: ...ter Mozilla Firefox 4 0 or later or Apple Safari 3 0 or later with JavaScript cookies and SSL enabled To log in to the VPN firewall 1 Open any of the qualified web browsers 2 In the address field enter https 192 168 1 1 The NETGEAR Configuration Manager Login screen displays The VPN firewall factory default IP address is 192 168 1 1 If you change the IP address you must use the IP address that you...

Page 20: ...word that you might use to log in to your Internet connection Leave the domain as it is geardomain 5 Click the Login button The figure shows the top part of the Router Status screen For more information see View the System Status on page 361 After five minutes of inactivity which is the default login time out you are automatically logged out ...

Page 21: ... the gray menu bar When you select a submenu tab the text is displayed in white against a blue background Option arrows If additional screens for the submenu item are available links to the screens display on the right side in blue letters against a white background preceded by a white arrow in a blue circle IP radio buttons The IPv4 and IPv6 radio buttons let you select the IP version for the fea...

Page 22: ...ermines which table buttons are shown The following figure shows an example Figure 8 Table buttons Any of the following table buttons might display onscreen Select All Select all entries in the table Delete Delete the selected entry or entries from the table Enable Enable the selected entry or entries in the table Disable Disable the selected entry or entries in the table Add Add an entry to the t...

Page 23: ...he web management interface IPv6 Addresses IPv6 addresses are denoted by eight groups of hexadecimal quartets that are separated by colons Any four digit group of zeros within an IPv6 address can be reduced to a single zero or altogether omitted The following errors invalidate an IPv6 address More than eight groups of hexadecimal quartets More than four hexadecimal characters in a quartet More tha...

Page 24: ...WAN settings The chapter contains the following sections Internet and WAN Configuration Tasks Configure the IPv4 Internet Connection and WAN Settings Configure the IPv6 Internet Connection and WAN Settings Configure Advanced WAN Options and Other Tasks Additional WAN Related Configuration Tasks What to Do Next ...

Page 25: ...are available These tasks are described in the following sections Let the VPN Firewall Automatically Detect and Configure an IPv4 Internet Connection on page 28 Manually Configure an IPv4 Internet Connection on page 31 3 Optional Configure Dynamic DNS on the WAN port If necessary configure your fully qualified domain names This task is described in Configure Dynamic DNS on page 35 4 Optional Confi...

Page 26: ...Pv4 addresses to communicate with IPv4 only devices For more information see Configure Stateless IP ICMP Translation on page 51 5 Optional Configure the WAN options If necessary change the factory default MTU size port speed and MAC address of the VPN firewall These are advanced features and you usually do not need to change the settings For more information Configure Advanced WAN Options and Othe...

Page 27: ...one to one inbound mapping is configured using an inbound firewall rule Classical Routing In classical routing mode the VPN firewall performs routing but without NAT To gain Internet access each computer on your LAN must be assigned a valid static Internet IP address If your ISP allocated a number of static IP addresses to you and you assigned one of these addresses to each computer you can choose...

Page 28: ...ernet Connection To automatically configure the WAN port for an IPv4 connection to the Internet 1 Log in to the unit a In the address field of any of the qualified web browsers enter https 192 168 1 1 The NETGEAR Configuration Manager Login screen displays b In the Username field enter admin and in the Password Passcode field enter password Use lowercase letters If you changed the password enter y...

Page 29: ...SP Broadband Settings screen displays the IPv4 settings 3 Click the Auto Detect button at the bottom of the screen The autodetect process probes the WAN port for a range of connection methods and suggests one that your ISP is most likely to support The autodetect process returns one of the following results If the autodetect process is successful a status bar at the top of the screen displays the ...

Page 30: ...our VPN firewall s MAC address For more information see Configure Advanced WAN Options and Other Tasks on page 52 and Troubleshoot the ISP Connection on page 389 4 To verify the connection click the Broadband Status option arrow Table 2 IPv4 Internet connection methods Connection Method Manual Data Input Required DHCP Dynamic IP No manual data input is required PPPoE The following fields are requi...

Page 31: ...ngs 1 Log in to the unit a In the address field of any of the qualified web browsers enter https 192 168 1 1 The NETGEAR Configuration Manager Login screen displays b In the Username field enter admin and in the Password Passcode field enter password Use lowercase letters If you changed the password enter your personalized password Leave the domain as it is geardomain c Click the Login button The ...

Page 32: ...o button and enter the following settings Account Name The account name is also known as the host name or system name Enter the valid account name for the PPTP connection usually your email ID assigned by your ISP Some ISPs require you to enter your full email address here Domain Name Your domain name or workgroup name assigned by your ISP or your ISP s domain name You can leave this field blank I...

Page 33: ... one You can leave this field blank Idle Timeout Select the Keep Connected radio button to keep the connection always on To log out after the connection is idle for a period select the Idle Timeout radio button and in the Idle Timeout field enter the number of minutes to wait before disconnecting This is useful if your ISP charges you based on the period that you are logged in Connection Reset Sel...

Page 34: ...lect the Client Identifier check box Vendor Class Identifier If your ISP requires the vendor class identifier information to assign an IP address using DHCP select the Vendor Class Identifier check box Use Static IP Address If your ISP assigned you a fixed static or permanent IP address select the Use Static IP Address radio button and enter the following settings IP Address The static IP address ...

Page 35: ... DDNS you must set up an account with a DDNS provider such as Dyn TZO Oray or 3322 Links to Dyn TZO Oray and 3322 are provided for your convenience as option arrows on the DDNS configuration screens The VPN firewall firmware includes software that notifies DDNS servers of changes in the WAN IP address so that the services running on this network can be accessed by others on the Internet If your ne...

Page 36: ...ivate WAN IP address such as 192 168 x x or 10 x x x the DDNS service does not work because private addresses are not routed on the Internet To configure DDNS 1 Log in to the unit a In the address field of any of the qualified web browsers enter https 192 168 1 1 The NETGEAR Configuration Manager Login screen displays b In the Username field enter admin and in the Password Passcode field enter pas...

Page 37: ...on the DDNS service provider that you selected Enter the following settings Host and Domain Name The host and domain name for the DDNS service Username or User Email Address The user name or email address for DDNS server authentication Password or User Key The password that is used for DDNS server authentication Use wildcards If your DDNS provider allows the use of wildcards in resolving your URL ...

Page 38: ... tunneling see Configure ISATAP Automatic Tunneling on page 48 A network can be both an isolated IPv6 network and a mixed network with IPv4 and IPv6 devices After you configure the IPv6 routing mode you must configure the WAN port with a global unicast address to enable secure IPv6 Internet connections on your VPN firewall A global unicast address is a public and routable IPv6 WAN address that can...

Page 39: ...sses IPv6 always functions in classical routing mode between the WAN interface and the LAN interfaces NAT does not apply to IPv6 To configure the IPv6 routing mode 1 Log in to the unit a In the address field of any of the qualified web browsers enter https 192 168 1 1 The NETGEAR Configuration Manager Login screen displays b In the Username field enter admin and in the Password Passcode field ente...

Page 40: ...refix through prefix delegation The VPN firewall s own stateless DHCPv6 server can assign this prefix to its IPv6 LAN clients For more information about prefix delegation see Stateless DHCPv6 Server with Prefix Delegation on page 79 Stateful address autoconfiguration The VPN firewall obtains an interface address configuration information such as DNS server information and other parameters from a D...

Page 41: ...to Configuration radio button you can select the Prefix Delegation check box Prefix delegation check box is selected A prefix is assigned by the ISP s stateful DHCPv6 server through prefix delegation for example 2001 db8 64 The VPN firewall s own stateless DHCPv6 server can assign this prefix to its IPv6 LAN clients For more information about prefix delegation see Stateless DHCPv6 Server with Pref...

Page 42: ...ection you must enter the IPv6 address information that you received from your ISP To configure static IPv6 broadband ISP settings 1 Log in to the unit a In the address field of any of the qualified web browsers enter https 192 168 1 1 The NETGEAR Configuration Manager Login screen displays b In the Username field enter admin and in the Password Passcode field enter password Use lowercase letters ...

Page 43: ... a static IPv6 address Setting Description IPv6 Address The IP address that your ISP assigned to you Enter the address in one of the following formats all four examples specify the same IPv6 address 2001 db8 0000 0000 020f 24ff febf dbcb 2001 db8 0 0 20f 24ff febf dbcb 2001 db8 20f 24ff febf dbcb 2001 db8 0 0 20f 24ff 128 141 49 32 IPv6 Prefix Length The prefix length that your ISP assigned to you...

Page 44: ...dvanced WAN Options and Other Tasks on page 52 Configure a PPPoE IPv6 Internet Connection To configure a PPPoE IPv6 Internet connection you must enter the PPPoE IPv6 information that you received from your ISP To configure PPPoE IPv6 broadband ISP settings 1 Log in to the unit a In the address field of any of the qualified web browsers enter https 192 168 1 1 The NETGEAR Configuration Manager Logi...

Page 45: ...he IPv6 list select PPPoE 5 In the PPPoE IPv6 enter the settings as described in the following table Your IPv6 ISP gave you your PPPoE IPv6 information Table 8 Broadband ISP Settings screen settings for a PPPoE IPv6 connection Setting Description User Name The PPPoE user name that is provided by your ISP Password The PPPoE password that is provided by your ISP ...

Page 46: ...rom the ISP DHCPv6 StatelessMode The VPN firewall generates its own IP address by using a combination of locally available information and router advertisements but receives DNS server information from the ISP s DHCPv6 server Router advertisements include a prefix that identifies the subnet that is associated with the WAN port The IP address is formed from a combination of this prefix and the MAC ...

Page 47: ...work make sure that the VPN firewall uses a static IPv4 address see Manually Configure an IPv4 Internet Connection on page 31 A dynamic IPv4 address can cause routing problems on the 6to4 tunnels If you do not use a stateful DHCPv6 server in your LAN you must configure the Router Advertisement Daemon RADVD and set up 6to4 advertisement prefixes for 6to4 tunneling to function correctly For more inf...

Page 48: ... Manage the IPv6 LAN on page 78 If you do not use a stateful DHCPv6 server in your LAN you must configure the Router Advertisement Daemon RADVD and set up ISATAP advertisement prefixes which are referred to as Global Local ISATAP prefixes for ISATAP tunneling to function correctly For more information see Manage the IPv6 LAN on page 78 The VPN firewall determines the link local address by concaten...

Page 49: ...P Tunnels 3 Click the Add table button under the List of Available ISATAP Tunnels table 4 Specify the tunnel settings as described in the following table 5 Click the Apply button Your changes are saved To edit an ISATAP tunnel 1 Log in to the unit Table 9 Add ISATAP Tunnel screen settings Setting Description ISATAP Subnet Prefix The IPv6 prefix for the tunnel Local End Point Address From the list ...

Page 50: ... displays This screen is identical to the Add ISATAP Tunnel screen 4 Modify the settings as described in Table 9 on page 49 5 Click the Apply button Your changes are saved To delete one or more tunnels 1 Log in to the unit a In the address field of any of the qualified web browsers enter https 192 168 1 1 The NETGEAR Configuration Manager Login screen displays b In the Username field enter admin a...

Page 51: ...uter Status Tunnel Status 3 View the IPv6 Tunnel Status table fields Tunnel Name The tunnel name for the 6to4 tunnel is always sit0 WAN1 SIT stands for simple Internet transition the tunnel name for an ISATAP tunnel is isatapx LAN in which x is an integer IPv6 Address The IPv6 address of the local tunnel endpoint Configure Stateless IP ICMP Translation Stateless IP ICMP Translation SIIT is a trans...

Page 52: ...on The Router Status screen displays After five minutes of inactivity which is the default login time out you are automatically logged out 2 Select Network Configuration SIIT 3 Select the Enable SIIT check box 4 In the SIIT Address fields enter the IPv4 address to be used in the IPv4 translated address for IPv6 devices 5 Click the Apply button Your changes are saved Configure Advanced WAN Options ...

Page 53: ...r Status screen displays After five minutes of inactivity which is the default login time out you are automatically logged out 2 Select Network Configuration WAN Settings Broadband ISP Settings The Broadband ISP Settings screen displays the IPv4 settings 3 Click the Advanced option arrow in the upper right of the screen 4 Enter the settings as described in the following table Table 10 Broadband Ad...

Page 54: ...er or router on your network is assigned a unique 48 bit local Ethernet address This is also referred to as the computer s Media Access Control MAC address By default the Use Default Address radio button is selected Make one of the following selections Use Default Address Each computer or router on your network is assigned a unique 32 bit local Ethernet address This is also referred to as the comp...

Page 55: ...ify that network traffic can pass through the VPN firewall Ping an Internet URL Ping the IP address of a device on either side of the VPN firewall What to Do Next You completed setting up the WAN connection for the VPN firewall The following chapters and sections describe important tasks that you must address before you deploy the VPN firewall in your network Chapter 3 LAN Configuration Configure ...

Page 56: ...Virtual LANs and DHCP Options Configure IPv4 Multihome LAN IP Addresses on the Default VLAN Manage IPv4 Groups and Hosts IPv4 LAN Groups Manage the IPv6 LAN Configure IPv6 Multihome LAN IP Addresses on the Default VLAN Enable and Configure the DMZ Port for IPv4 and IPv6 Traffic Manage Static IPv4 Routing Manage Static IPv6 Routing Configure Quality of Service ...

Page 57: ...sible only to specified individuals depending on how the IT manager sets up the VLANs VLANs offer a number of advantages It is easy to set up network segmentation Users who communicate most frequently with each other can be grouped into common VLANs regardless of physical location Each group s traffic is contained largely within the VLAN reducing extraneous traffic and improving the efficiency of ...

Page 58: ...h tagged and untagged packets Untagged packets that enter these LAN ports are assigned to the default PVID 1 packets that leave these LAN ports with the same default PVID 1 are untagged All other packets are tagged according to the VLAN ID that you assigned to the VLAN when you created the VLAN profile This is a typical scenario for a configuration with an IP phone that includes two Ethernet ports...

Page 59: ...elds display in the VLAN Profiles table Check box Allows you to select the VLAN profile in the table Status icon Indicates the status of the VLAN profile Green circle The VLAN profile is enabled Gray circle The VLAN profile is disabled Profile Name The unique name assigned to the VLAN profile VLAN ID The unique ID or tag assigned to the VLAN profile Subnet IP The subnet IP address for the VLAN pro...

Page 60: ...by default For most applications the default DHCP server and TCP IP settings of the VPN firewall are satisfactory The VPN firewall delivers the following settings to any LAN device that requests DHCP An IP address from the range that you defined Subnet mask Gateway IP address the VPN firewall s LAN IP address Primary DNS server the VPN firewall s LAN IP address WINS server if you entered a WINS se...

Page 61: ...ch VLAN you can specify an LDAP server and a search base that defines the location in the directory that is the directory tree from which the LDAP search begins Configure a VLAN Profile For each VLAN on the VPN firewall you can configure its profile port membership LAN TCP IP settings DHCP options DNS server and inter VLAN routing capability After you complete the LAN setup all outbound traffic is...

Page 62: ...NETGEAR ProSAFE VPN Firewall FVS318G v2 2 Select Network Configuration LAN Setup For information about how to manage VLANs see Port Based VLANs on page 57 The following information describes how to configure a VLAN profile ...

Page 63: ...ng table Table 11 Add VLAN Profile screen settings Setting Description VLAN Profile Profile Name Enter a unique name for the VLAN profile VLAN ID Enter a unique ID number for the VLAN profile No two VLANs can use the same VLAN ID number Note You can enter VLAN IDs from 2 to 4089 VLAN ID 1 is reserved for the default VLAN VLAN ID 4094 is reserved for the DMZ interface ...

Page 64: ...P address and log in again For example if you change the default IP address 192 168 1 1 to 10 0 0 1 you now must enter https 10 0 0 1 in your browser to reconnect to the web management interface Subnet Mask Enter the IP subnet mask The subnet mask specifies the network number portion of an IP address Based on the IP address that you assign the VPN firewall automatically calculates the subnet mask ...

Page 65: ...end IP address is 192 168 1 254 The start and end DHCP IP addresses must be in the same network as the LAN IP address of the VPN firewall that is the IP address in the IP Setup section as described earlier in this table Primary DNS Server This setting is optional If an IP address is specified the VPN firewall provides this address as the primary DNS server IP address If no address is specified the...

Page 66: ...l unit O for organization C for country DC for domain For example to search the Netgear net domain for all last names of Johnson you would enter cn Johnson dc Netgear dc net Port The port number for the LDAP server The default setting is 0 zero DNS Proxy Enable DNS Proxy This setting is optional To enable the VPN firewall to provide a LAN IP address for DNS address name resolution select the Enabl...

Page 67: ...b browsers enter https 192 168 1 1 The NETGEAR Configuration Manager Login screen displays b In the Username field enter admin and in the Password Passcode field enter password Use lowercase letters If you changed the password enter your personalized password Leave the domain as it is geardomain c Click the Login button The Router Status screen displays After five minutes of inactivity which is th...

Page 68: ...dress Resolution Protocol ARP packets for the default VLAN If the broadcast of ARP packets is enabled IP addresses can be mapped to physical addresses that is MAC addresses To configure a VLAN to use a unique MAC address 1 Log in to the unit a In the address field of any of the qualified web browsers enter https 192 168 1 1 The NETGEAR Configuration Manager Login screen displays b In the Username ...

Page 69: ...ess to the Internet but you can do so only for the default VLAN The IP address that is assigned as a secondary IP address must be unique and cannot be assigned to a VLAN Secondary IP addresses cannot be configured in the DHCP server The hosts on the secondary subnets must be manually configured with the IP addresses gateway IP address and DNS server IP addresses Make sure that any secondary LAN ad...

Page 70: ... logged out 2 Select Network Configuration LAN Setup LAN Multi homing The Available Secondary LAN IPs table displays the secondary LAN IP addresses added to the VPN firewall 3 In the Add Secondary LAN IP Address section enter the following settings IP Address Enter the secondary address that you want to assign to the LAN ports Subnet Mask Enter the subnet mask for the secondary IP address 4 To add...

Page 71: ...ETGEAR Configuration Manager Login screen displays b In the Username field enter admin and in the Password Passcode field enter password Use lowercase letters If you changed the password enter your personalized password Leave the domain as it is geardomain c Click the Login button The Router Status screen displays After five minutes of inactivity which is the default login time out you are automat...

Page 72: ...e computer or device is removed from the network database either by expiration inactive for a long time or by you You do not need to use a fixed IP address on a computer Because the IP address allocated by the DHCP server never changes you do not need to assign a fixed IP address to a computer to ensure that it always uses the same IP address A computer is identified by its MAC address not its IP ...

Page 73: ...n displays After five minutes of inactivity which is the default login time out you are automatically logged out 2 Select Network Configuration LAN Setup LAN Groups 3 For each computer or device view the following fields Check box Allows you to select the computer or device in the table Name The name of the computer or device For computers that do not support the NetBIOS protocol the name is displ...

Page 74: ... Login screen displays b In the Username field enter admin and in the Password Passcode field enter password Use lowercase letters If you changed the password enter your personalized password Leave the domain as it is geardomain c Click the Login button The Router Status screen displays After five minutes of inactivity which is the default login time out you are automatically logged out 2 Select N...

Page 75: ...which is the default login time out you are automatically logged out 2 Select Network Configuration LAN Setup LAN Groups The LAN Groups screen displays IP Address Enter the IP address that this computer or device is assigned to If the IP address type is Fixed set on PC the IP address must be outside the address range that is allocated to the DHCP server pool to prevent the IP address from also bei...

Page 76: ... in the Password Passcode field enter password Use lowercase letters If you changed the password enter your personalized password Leave the domain as it is geardomain c Click the Login button The Router Status screen displays After five minutes of inactivity which is the default login time out you are automatically logged out 2 Select Network Configuration LAN Setup LAN Groups The LAN Groups scree...

Page 77: ...ssword Use lowercase letters If you changed the password enter your personalized password Leave the domain as it is geardomain c Click the Login button The Router Status screen displays After five minutes of inactivity which is the default login time out you are automatically logged out 2 Select Network Configuration LAN Setup LAN Groups The LAN Groups screen displays 3 To the right of the LAN sub...

Page 78: ...ires an IPv6 link local address that is automatically derived from the MAC addresses of the IPv4 interface and that is used for address configuration and neighbor discovery Normally you would not manually configure a link local address Traffic with site local or link local addresses is never forwarded by the VPN firewall or by any other router that is the traffic remains in the LAN subnet and is p...

Page 79: ...that is used by the VPN firewall s stateless DHCPv6 server to assign to its IPv6 LAN clients Prefix delegation functions in the following way 1 The VPN firewall s DHCPv6 client requests prefix delegation from the ISP You must select the Prefix Delegation check box on the ISP Broadband Settings screen for IPv6 For more information see Use a DHCPv6 Server to Configure an IPv6 Internet Connection on ...

Page 80: ... DNS server information and other parameters from the DHCPv6 server The IP address is a dynamic address For stateful DHCPv6 you must configure IPv6 address pools For more information see IPv6 LAN Address Pools on page 83 Configure the IPv6 LAN To configure the IPv6 LAN settings 1 Log in to the unit a In the address field of any of the qualified web browsers enter https 192 168 1 1 The NETGEAR Conf...

Page 81: ...gs as described in the following table Table 13 LAN Setup screen settings for IPv6 Setting Description IPv6 LAN Setup IPv6 Address Enter the LAN IPv6 address The default address is FEC0 1 For more information see Manage the IPv6 LAN on page 78 IPv6 Prefix Length Enter the IPv6 prefix length for example 10 or 64 The default prefix length is 64 ...

Page 82: ...tion and other parameters from the DHCPv6 server The IP address is a dynamic address You must add IPv6 address pools to the List of IPv6 Address Pools table on the LAN Setup screen see IPv6 LAN Address Pools on page 83 Prefix Delegation If you selected the stateless DHCPv6 mode you can select the Prefix Delegation check box Prefix delegation check box is selected The stateless DHCPv6 server assign...

Page 83: ...nt selects the server with the highest preference value as the preferred server DNS Servers Select one of the DNS server options from the list Use DNS Proxy The VPN firewall acts as a proxy for all DNS requests and communicates with the ISP s DNS servers that you configured on the Broadband ISP Settings IPv6 screen see Configure a Static IPv6 Internet Connection on page 42 Use DNS from ISP The VPN...

Page 84: ...r the settings as described in the following table 6 Click the Apply button Your changes are saved To edit an IPv6 LAN address pool 1 Log in to the unit a In the address field of any of the qualified web browsers enter https 192 168 1 1 The NETGEAR Configuration Manager Login screen displays Table 14 LAN IPv6 Config screen settings Setting Description Start IPv6 Address Enter the start IP address ...

Page 85: ...ck the Apply button Your changes are saved To delete one or more IPv6 LAN address pools 1 Log in to the unit a In the address field of any of the qualified web browsers enter https 192 168 1 1 The NETGEAR Configuration Manager Login screen displays b In the Username field enter admin and in the Password Passcode field enter password Use lowercase letters If you changed the password enter your pers...

Page 86: ...Login screen displays b In the Username field enter admin and in the Password Passcode field enter password Use lowercase letters If you changed the password enter your personalized password Leave the domain as it is geardomain c Click the Login button The Router Status screen displays After five minutes of inactivity which is the default login time out you are automatically logged out 2 Select Ne...

Page 87: ...prefix for example 2001 db8 IPv6 Prefix Length Enter the IPv6 prefix length for example 64 6 Click the Apply button Your changes are saved To delete one or more prefixes 1 Log in to the unit a In the address field of any of the qualified web browsers enter https 192 168 1 1 The NETGEAR Configuration Manager Login screen displays b In the Username field enter admin and in the Password Passcode fiel...

Page 88: ...LAN RAs include IPv6 addresses types of prefixes prefix addresses prefix lifetimes the maximum transmission unit MTU and so on In addition to configuring the RADVD you also must configure the prefixes that are advertised in the LAN RAs The following table provides an overview of how information is obtained in the LAN when you configure a stateless DHCPv6 server and the RADVD When the Managed flag ...

Page 89: ...sword Passcode field enter password Use lowercase letters If you changed the password enter your personalized password Leave the domain as it is geardomain c Click the Login button The Router Status screen displays After five minutes of inactivity which is the default login time out you are automatically logged out 2 Select Network Configuration LAN Setup The LAN Setup screen displays 3 Select the...

Page 90: ...e is 10 seconds the maximum value is 1800 seconds RA Flags Select what type of information the DHCPv6 server provides in the LAN Managed The DHCPv6 server is used for autoconfiguration of the IP address Other The DHCPv6 server is not used for autoconfiguration of the IP address but other configuration information such as DNS information is available through the DHCPv6 server Note Irrespective of t...

Page 91: ...field enter admin and in the Password Passcode field enter password Use lowercase letters If you changed the password enter your personalized password Leave the domain as it is geardomain c Click the Login button The Router Status screen displays After five minutes of inactivity which is the default login time out you are automatically logged out 2 Select Network Configuration LAN Setup The LAN Se...

Page 92: ... Edit button Table 17 Add Advertisement Prefix screen settings for the LAN Setting Description IPv6 Prefix Type Select the IPv6 prefix type 6to4 The prefix is for a 6to4 address You must complete the SLA ID field and Prefix Lifetime field The other fields are masked out Global Local ISATAP The prefix is for a global local or ISATAP address This must be a global prefix or a site local prefix it can...

Page 93: ... of the LAN Setup tab click the RADVD option arrow 5 Select the check box to the left of each advertisement prefix that you want to delete or click the Select All table button to select all advertisement prefixes 6 Click the Delete table button The information is deleted Configure IPv6 Multihome LAN IP Addresses on the Default VLAN If computers on your LAN use different IPv6 networks for example F...

Page 94: ... Leave the domain as it is geardomain c Click the Login button The Router Status screen displays After five minutes of inactivity which is the default login time out you are automatically logged out 2 Select Network Configuration LAN Setup LAN Multi homing The LAN Multi homing screen displays 3 In the upper right of the screen select the IPv6 radio button The Available Secondary LAN IPs table disp...

Page 95: ... displays 5 Modify the IP address or prefix length or both 6 Click the Apply button Your changes are saved To delete one or more secondary LAN IP addresses 1 Log in to the unit a In the address field of any of the qualified web browsers enter https 192 168 1 1 The NETGEAR Configuration Manager Login screen displays b In the Username field enter admin and in the Password Passcode field enter passwo...

Page 96: ... application correctly if those computers are used on the DMZ port A separate firewall security profile is provided for the DMZ port that is also physically independent of the standard firewall security component that is used for the LAN For information about how to define the DMZ WAN rules and LAN DMZ rules see Configure DMZ WAN Rules on page 144 and Configure LAN DMZ Rules on page 153 respective...

Page 97: ...alized password Leave the domain as it is geardomain c Click the Login button The Router Status screen displays After five minutes of inactivity which is the default login time out you are automatically logged out d Click the Login button The Router Status screen displays After five minutes of inactivity which is the default login time out you are automatically logged out 2 Select Network Configur...

Page 98: ...dress and LAN port IP address are in different subnets for example an address outside the LAN DHCP address pool such as 192 168 1 101 when the LAN DHCP pool is 192 168 1 2 192 168 1 100 The default IP address for the DMZ port 176 16 2 1 Subnet Mask Enter the IP subnet mask of the DMZ port The subnet mask specifies the network number portion of an IP address The subnet mask for the DMZ port is 255 ...

Page 99: ...s must be in the same network as the LAN TCP IP address of the VPN firewall that is the IP address in the DMZ Port Setup section as described earlier in this table Primary DNS Server This setting is optional If an IP address is specified the VPN firewall provides this address as the primary DNS server IP address If no address is specified the VPN firewall provides its own LAN IP address as the pri...

Page 100: ...rmation select the Enable LDAP information check box Enter the following settings LDAP Server The IP address or name of the LDAP server Search Base The search objects that specify the location in the directory tree from which the LDAP search begins You can specify multiple search objects separated by commas The search objects include the following CN for common name OU for organizational unit O fo...

Page 101: ...address pools For more information see IPv6 DMZ Address Pools on page 104 To enable and configure the DMZ port for IPv6 traffic 1 Log in to the unit a In the address field of any of the qualified web browsers enter https 192 168 1 1 The NETGEAR Configuration Manager Login screen displays b In the Username field enter admin and in the Password Passcode field enter password Use lowercase letters If ...

Page 102: ... the following radio buttons Yes Enables you to configure the DMZ port settings Complete the IP Address and Subnet Mask fields No Allows you to disable the DMZ port after you configure it IPv6 Address Enter the IP address of the DMZ port Make sure that the DMZ port IP address LAN port IP address and WAN port IP address are in different subnets The default IP address for the DMZ port is 176 1 Prefi...

Page 103: ...D and advertisement prefixes see Configure the IPv6 Router Advertisement Daemon and Advertisement Prefixes for the DMZ on page 106 Stateful The IPv6 clients obtain an interface IP address configuration information such as DNS server information and other parameters from the DHCPv6 server The IP address is a dynamic address see IPv6 DMZ Address Pools on page 104 Domain Name Enter the domain name of...

Page 104: ... out DHCP Status continued DNS Server Select one of the DNS server options from the lists Use DNS Proxy The VPN firewall acts as a proxy for all DNS requests and communicates with the ISP s DNS servers that you configured on the Broadband ISP Settings IPv6 screen see Configure a Static IPv6 Internet Connection on page 42 Use DNS from ISP The VPN firewall uses the ISP s DNS servers that you configu...

Page 105: ... inactivity which is the default login time out you are automatically logged out 2 Select Network Configuration DMZ Setup The DMZ Setup screen displays 3 In the upper right of the screen select the IPv6 radio button 4 In the Action column for the address pool that you want to modify click the Edit button The DMZ IPv6 Config screen displays 5 Modify the settings as described in Table 20 on page 105...

Page 106: ...the Delete table button The information is deleted Configure the IPv6 Router Advertisement Daemon and Advertisement Prefixes for the DMZ Note If you do not configure stateful DHCPv6 for the DMZ but use stateless DHCPv6 you must configure the Router Advertisement Deamon RADVD and advertisement prefixes The RADVD is an application that uses the Neighbor Discovery Protocol NDP to collect link local a...

Page 107: ... b In the Username field enter admin and in the Password Passcode field enter password Use lowercase letters If you changed the password enter your personalized password Leave the domain as it is geardomain c Click the Login button The Router Status screen displays After five minutes of inactivity which is the default login time out you are automatically logged out 2 Select Network Configuration D...

Page 108: ... value is 10 seconds the maximum value is 1800 seconds RA Flags Select what type of information the DHCPv6 server provides in the DMZ Managed The DHCPv6 server is used for autoconfiguration of the IP address Other The DHCPv6 server is not used for autoconfiguration of the IP address but other configuration information such as DNS information is available through the DHCPv6 server Note Irrespective...

Page 109: ...tton Your changes are saved Table 23 Add Advertisement Prefix screen settings for the DMZ Setting Description IPv6 Prefix Type Select the IPv6 prefix type 6to4 The prefix is for a 6to4 address You must complete the SLA ID field and Prefix Lifetime field The other fields are masked out Global Local ISATAP The prefix is for a global local or ISATAP address This must be a global prefix or a site loca...

Page 110: ...splays the IPv6 settings 4 Click the RADVD option arrow 5 In the Action column for the advertisement prefix that you want to modify click the Edit button The Add Advertisement Prefix screen displays 6 Modify the settings as described in Table 23 on page 109 7 Click the Apply button Your changes are saved To delete one or more advertisement prefixes 1 Log in to the unit a In the address field of an...

Page 111: ...en VLANs and secondary IPv4 addresses that you configured on the LAN Multi homing IPv4 screen For more information see Configure IPv4 Multihome LAN IP Addresses on the Default VLAN on page 69 Therefore you do not need to manually add an IPv4 static route between a VLAN and a secondary IPv4 address This section contains the following topics Configure Static IPv4 Routes Configure the Routing Informa...

Page 112: ...ade inactive if not needed This allows you to use routes as needed without deleting and re adding the entries An inactive route is not advertised if RIP is enabled Private If you want to limit access to the LAN only select the Private check box Doing so prevents the static route from being advertised in RIP Destination IP Address The destination IP address of the host or network to which the route...

Page 113: ...hat you want to modify click the Edit button The Edit Static Route screen displays This screen is identical to the Add Static Route screen 4 Modify the settings as described in Table 24 on page 112 5 Click the Apply button Your changes are saved To delete one or more routes 1 Log in to the unit a In the address field of any of the qualified web browsers enter https 192 168 1 1 The NETGEAR Configur...

Page 114: ...LANs RIP enables a router to exchange its routing information automatically with other routers to dynamically adjust its routing tables and to adapt to changes in the network RIP is disabled by default RIP does not apply to IPv6 To enable and configure RIP 1 Log in to the unit a In the address field of any of the qualified web browsers enter https 192 168 1 1 The NETGEAR Configuration Manager Logi...

Page 115: ...other routers but does not advertise its routing table Out Only The VPN firewall advertises its routing table but does not accept RIP information from other routers Both The VPN firewall advertises its routing table and also processes RIP information received from other routers RIP Version By default the RIP version is set to Disabled From the RIP Version list select the version RIP 1 Classful rou...

Page 116: ...t the Yes radio button and enter the settings for the following fields First Key Parameters MD5 Key Id The identifier for the key that is used for authentication MD5 Auth Key The password that is used for MD5 authentication Not Valid Before The beginning of the lifetime of the MD5 key Enter the month date year hour minute and second Before this date and time the MD5 key is not valid Not Valid Afte...

Page 117: ... local LAN The static route can be made private only as a precautionary security measure in case RIP is activated Manage Static IPv6 Routing NETGEAR s implementation of IPv6 does not support RIP next generation RIPng to exchange routing information and dynamic changes to IPv6 routes are not possible To enable routers to exchange information over a static IPv6 route you must manually configure the ...

Page 118: ...ded to the table and made inactive if not needed This allows you to use routes as needed without deleting and re adding the entries IPv6 Destination The destination IPv6 address of the host or network to which the route leads IPv6 Prefix Length The destination IPv6 prefix length of the host or network to which the route leads Interface Select the physical or virtual network interface WAN1 sit0 Tun...

Page 119: ...olumn for the route that you want to modify click the Edit button The Edit IPv6 Static Routing screen displays This screen is identical to the Add IPv6 Static Routing screen 5 Modify the settings as described in Table 26 on page 118 6 Click the Apply button Your changes are saved To delete one or more routes 1 Log in to the unit a In the address field of any of the qualified web browsers enter htt...

Page 120: ...mum bandwidth through each WAN port Priority Sets a priority for each different service The QoS screen also displays the configured Network QoS profiles in the router A QoS profile is active if the QoS type of the profile matches the Global QoS type for the network To enable or disable quality of service 1 Log in to the unit a In the address field of any of the qualified web browsers enter https 1...

Page 121: ...o enable or disable and click either the Enable button or the Disable button 6 Click the Apply button Your changes are saved To add a QoS profile 1 Log in to the unit a In the address field of any of the qualified web browsers enter https 192 168 1 1 The NETGEAR Configuration Manager Login screen displays b In the Username field enter admin and in the Password Passcode field enter password Use low...

Page 122: ...the QoS packet when the packet matches the selected option For DSCP the value must be between 0 and 63 DSCP match is disabled if the value is 0 Leave the field blank if the match is not required Congestion priority Rate control This affects how the excess bandwidth is distributed among rules The rules with higher priority are offered excess bandwidth first and rules about minimum and maximum rates...

Page 123: ... of IP addresses End Enter the end address for a range of IP addresses This field is not active for a single address Select Group Predefined group of network clients Bandwidth allocation Two modes are available Shared All clients share this bandwidth for the particular service Individual This bandwidth is allotted for each client for the particular service Outbound Minimum Bandwidth Specify the mi...

Page 124: ...s b In the Username field enter admin and in the Password Passcode field enter password Use lowercase letters If you changed the password enter your personalized password Leave the domain as it is geardomain c Click the Login button The Router Status screen displays After five minutes of inactivity which is the default login time out you are automatically logged out 2 Select Network Configuration ...

Page 125: ...les to Block or Allow Specific Kinds of Traffic Configure LAN WAN Rules Configure DMZ WAN Rules Configure LAN DMZ Rules Examples of Firewall Rules Configure Other Firewall Features Services Bandwidth Profiles and QoS Profiles Configure Content Filtering Set a Schedule to Block or Allow Specific Traffic Enable Source MAC Filtering Set Up IP MAC Bindings Configure Port Triggering Configure Universal...

Page 126: ...onsider the following operational items 1 As an option you can enable remote management if you must manage distant sites from a central location For more information see Configure Authentication Domains Groups and Users on page 287 and Configure Remote Management Access on page 328 2 Although rules are the basic way of managing the traffic through your system see Overview of Rules to Block or Allo...

Page 127: ...service blocking Outbound traffic is allowed unless you configure the firewall to block specific or all outbound traffic Inbound rules port forwarding Inbound traffic is blocked unless the traffic is in response to a request from the LAN side You can configure the firewall to allow specific or all inbound traffic Customized services You can add additional services to the list of services in the fa...

Page 128: ...seful only if the traffic is already covered by a BLOCK rule That is you wish to allow a subset of traffic that is blocked by another rule All rules Select Schedule The time schedule that is Schedule1 Schedule2 or Schedule3 that is used by this rule This list is activated only when BLOCK by schedule otherwise allow or ALLOW by schedule otherwise block is selected as the action Use the Schedule scr...

Page 129: ...ermines the priority of a service which in turn determines the quality of that service for the traffic passing through the firewall The VPN firewall marks the Type of Service ToS field as defined in the QoS profiles that you create For more information see Preconfigured Quality of Service Profiles on page 183 Note The VPN firewall is preconfigured with default QoS profiles you cannot configure the...

Page 130: ...also known as port forwarding WARNING Allowing inbound services opens security holes in your network Enable only those ports that are necessary for your network Log Select whether packets covered by this rule are logged Always Always log traffic that matches this rule This is useful when you are debugging your rules Never Never log traffic that matches this rule All rules NAT IP Select whether the...

Page 131: ...onfigure Port Triggering on page 206 The VPN firewall always blocks denial of service DoS attacks A DoS attack does not attempt to steal data or damage your computers but overloads your Internet connection so that you cannot use it that is the service becomes unavailable When the Block TCP Flood and Block UDP Flood check boxes are selected on the Attack Checks screen which they are by default see ...

Page 132: ...cify this setting and specify a port number If the service is using the default port you do not need to enable this feature IPv4 LAN WAN rules IPv4 DMZ WAN rules WAN Destination IP Address The setting that determines the destination IP address applicable to incoming traffic This is the public IP address that maps to the internal LAN server This can be either the address of the WAN interface or ano...

Page 133: ...red address in the Start field to apply the rule to a single computer on the DMZ network Address range Enter the required addresses in the Start and Finish fields to apply the rule to a range of DMZ computers Note For IPv4 DMZ WAN inbound rules this field does not apply when the WAN mode is NAT because your network presents only one IP address to the Internet DMZ WAN rules LAN DMZ rules Log Select...

Page 134: ...most strict rules at the top those with the most specific services or addresses The Up and Down table buttons in the Action column allow you to relocate a defined rule to a new position in the table Configure LAN WAN Rules The default outbound policy is to allow all traffic to the Internet to pass through Firewall rules can then be applied to block specific types of traffic from going out from the...

Page 135: ...time out you are automatically logged out 2 Select Security Firewall 3 From the Default Outbound Policy list select Block Always By default Allow Always is selected 4 Click the Apply button Your changes are saved 5 To change an existing outbound or inbound service rule in the Action column to the right of the rule click one of the following table buttons Up Moves the rule up one position in the ta...

Page 136: ...ain as it is geardomain c Click the Login button The Router Status screen displays After five minutes of inactivity which is the default login time out you are automatically logged out 2 Select Security Firewall The Firewall submenu tabs display with the LAN WAN Rules screen for IPv4 in view 3 In the upper right of the screen select the IPv6 radio button 4 From the Default Outbound Policy list sel...

Page 137: ...ivity which is the default login time out you are automatically logged out 2 Select Security Firewall The LAN WAN Rules screen displays 3 Select the check box to the left of each rule that you want to enable disable or delete or click the Select All table button to select all rules 4 Click one of the following table buttons Enable Enables the rule or rules The status icon changes from a gray circl...

Page 138: ... the unit a In the address field of any of the qualified web browsers enter https 192 168 1 1 The NETGEAR Configuration Manager Login screen displays b In the Username field enter admin and in the Password Passcode field enter password Use lowercase letters If you changed the password enter your personalized password Leave the domain as it is geardomain c Click the Login button The Router Status s...

Page 139: ...less your selection from the Action list is BLOCK always you also must make selections from the following lists Select Schedule QoS Priority Bandwidth Profile NAT IP This ist is available only when the WAN mode is NAT If you select Single Address the IP address specified must fall under the WAN subnet 5 Click the Apply button Your changes are saved IPv6 LAN WAN Outbound Rules To create an IPv6 LAN...

Page 140: ... default login time out you are automatically logged out 2 Select Security Firewall The LAN WAN Rules screen displays 3 In the upper right of the LAN WAN Rules screen select the IPv6 radio button The screen displays the IPv6 settings 4 Click the Add table button under the Outbound Services table 5 Enter the settings as described in Table 29 on page 128 In addition to selections from the Service Ac...

Page 141: ...re configuring the VPN firewall from a remote connection you might be locked out IPv4 LAN WAN Inbound Service Rules To create an IPv4 LAN WAN inbound rule 1 Log in to the unit a In the address field of any of the qualified web browsers enter https 192 168 1 1 The NETGEAR Configuration Manager Login screen displays b In the Username field enter admin and in the Password Passcode field enter passwor...

Page 142: ...selections from the following lists WAN Destination IP Address LAN Users This list is available only when the WAN mode is classical routing When the WAN mode is NAT your network presents only one IP address to the Internet WAN Users Unless your selection from the Action list is BLOCK always you also must make selections from the following lists Select Schedule Send to Lan Server The following conf...

Page 143: ...nged the password enter your personalized password Leave the domain as it is geardomain c Click the Login button The Router Status screen displays After five minutes of inactivity which is the default login time out you are automatically logged out 2 Select Security Firewall The LAN WAN Rules screen displays 3 In the upper right of the LAN WAN Rules screen select the IPv6 radio button The screen d...

Page 144: ...firewall You do so by adding outbound services rules For more information see Create DMZ WAN Outbound Service Rules on page 147 Inbound rules on the LAN WAN Rules screen take precedence over inbound rules on the DMZ WAN Rules screen When an inbound packet matches an inbound rule on the LAN WAN Rules screen the packet is not matched against the inbound rules on the DMZ WAN Rules screen This section...

Page 145: ... screen for IPv4 Edit DMZ WAN Inbound Service screen for IPv4 4 Click the Apply button Your changes are saved To access the DMZ WAN Rules screen for IPv6 or to change existing IPv6 rules 1 Log in to the unit a In the address field of any of the qualified web browsers enter https 192 168 1 1 The NETGEAR Configuration Manager Login screen displays b In the Username field enter admin and in the Passw...

Page 146: ...llows you to change the definition of an existing rule Depending on your selection one of the following screens displays Edit DMZ WAN Outbound Service screen for IPv6 Edit DMZ WAN Inbound Service screen for IPv6 5 Click the Apply button Your changes are saved To enable disable or delete one or more IPv4 or IPv6 rules 1 Log in to the unit a In the address field of any of the qualified web browsers ...

Page 147: ...re disabled Delete Deletes the selected rule or rules 6 Click the Apply button Your changes are saved Create DMZ WAN Outbound Service Rules You can change the default outbound policy or define rules that specify exceptions to the default outbound policy By adding custom rules you can block or allow access based on the service or application source or destination IP addresses and time of day An out...

Page 148: ...e 29 on page 128 In addition to selections from the Service Action and Log lists you must make selections from the following lists DMZ Users WAN Users Unless your selection from the Action list is BLOCK always you also must make selections from the following lists Select Schedule QoS Priority NAT IP This list is available only when the WAN mode is NAT If you select Single Address the IP address sp...

Page 149: ... password enter your personalized password Leave the domain as it is geardomain c Click the Login button The Router Status screen displays After five minutes of inactivity which is the default login time out you are automatically logged out 2 Select Security Firewall DMZ WAN Rules The DMZ WAN Rules screen displays 3 Select the IPv6 radio button The screen displays the IPv6 settings 4 Click the Add...

Page 150: ...ches an inbound rule on the LAN WAN Rules screen it is not matched against the inbound rules on the DMZ WAN Rules screen IPv4 DMZ WAN Inbound Service Rules To create an IPv4 DMZ WAN inbound rule 1 Log in to the unit a In the address field of any of the qualified web browsers enter https 192 168 1 1 The NETGEAR Configuration Manager Login screen displays b In the Username field enter admin and in t...

Page 151: ...ions from the following lists WAN Destination IP Address DMZ Users This list is available only when the WAN mode is Classical Routing When the WAN mode is NAT your network presents only one IP address to the Internet WAN Users Unless your selection from the Action list is BLOCK always you also must make selections from the following lists Select Schedule Send to DMZ Server The Translate to Port Nu...

Page 152: ...password enter your personalized password Leave the domain as it is geardomain c Click the Login button The Router Status screen displays After five minutes of inactivity which is the default login time out you are automatically logged out 2 Select Security Firewall DMZ WAN Rules The DMZ WAN Rules screen displays 3 Select the IPv6 radio button The screen displays the IPv6 settings 4 Click the Add ...

Page 153: ...does You can change the default outbound policy by allowing all outbound traffic and then blocking specific services from passing through the VPN firewall You do so by adding outbound service rules see Create LAN DMZ Outbound Service Rules on page 156 This section contains the following topics Create LAN DMZ Outbound Service Rules Create LAN DMZ Inbound Service Rules To access the LAN DMZ Rules sc...

Page 154: ... 4 Click the Apply button Your changes are saved To access the LAN DMZ Rules screen for IPv6 or to change existing IPv6 rules 1 Log in to the unit a In the address field of any of the qualified web browsers enter https 192 168 1 1 The NETGEAR Configuration Manager Login screen displays b In the Username field enter admin and in the Password Passcode field enter password Use lowercase letters If yo...

Page 155: ...rvice screen for IPv6 5 Click the Apply button Your changes are saved To enable disable or delete one or more IPv4 or IPv6 rules 1 Log in to the unit a In the address field of any of the qualified web browsers enter https 192 168 1 1 The NETGEAR Configuration Manager Login screen displays b In the Username field enter admin and in the Password Passcode field enter password Use lowercase letters If...

Page 156: ...ules that specify exceptions to the default outbound policy By adding custom rules you can block or allow access based on the service or application source or destination IP addresses and time of day An outbound rule can block or allow traffic between the DMZ and any internal LAN IP address according to the schedule created on the Schedule screen IPv4 LAN DMZ Outbound Service Rules To create an IP...

Page 157: ...s you also must make a selection from the Select Schedule list 5 Click the Apply button Your changes are saved IPv6 LAN DMZ Outbound Service Rules To create an IPv6 LAN DMZ outbound rule 1 Log in to the unit a In the address field of any of the qualified web browsers enter https 192 168 1 1 The NETGEAR Configuration Manager Login screen displays b In the Username field enter admin and in the Passw...

Page 158: ...ices table 5 Enter the settings as described in Table 29 on page 128 In addition to selections from the Service Action and Log lists you must make selections from the following lists LAN Users DMZ Users Unless your selection from the Action list is BLOCK always you also must make a selection from the Select Schedule list 6 Click the Apply button Your changes are saved Create LAN DMZ Inbound Servic...

Page 159: ...er your personalized password Leave the domain as it is geardomain c Click the Login button The Router Status screen displays After five minutes of inactivity which is the default login time out you are automatically logged out 2 Select Security Firewall LAN DMZ Rules The LAN DMZ Rules screen displays The IPv4 radio button is selected by default The screen displays the IPv4 settings 3 Click the Ad...

Page 160: ...gin screen displays b In the Username field enter admin and in the Password Passcode field enter password Use lowercase letters If you changed the password enter your personalized password Leave the domain as it is geardomain c Click the Login button The Router Status screen displays After five minutes of inactivity which is the default login time out you are automatically logged out 2 Select Secu...

Page 161: ...es of Firewall Rules This section contains the following topics Examples of Inbound Firewall Rules Examples of Outbound Firewall Rules Examples of Inbound Firewall Rules This section contains the following topics IPv4 LAN WAN Inbound Rule Host a Local Public Web Server IPv4 LAN WAN Inbound Rule Allow a Videoconference from Restricted Addresses IPv4 LAN WAN or IPv4 DMZ WAN Inbound Rule Set Up One t...

Page 162: ...bound web HTTP requests from any outside IP address to the IP address of your web server at any time of the day Figure 10 Example of inbound firewall rule IPv4 LAN WAN Inbound Rule Allow a Videoconference from Restricted Addresses If you want to allow incoming videoconferencing to be initiated from a restricted range of outside IP addresses such as from a branch office you can create an inbound ru...

Page 163: ...to support multiple public IP addresses on one WAN interface An inbound rule configures the VPN firewall to host an additional public IP address and associate this address with a web server on the LAN The following addressing scheme is used to illustrate this procedure NETGEAR VPN firewall WAN IP address 10 1 0 118 LAN IP address subnet 192 168 1 1 with subnet 255 255 255 0 DMZ IP address subnet 1...

Page 164: ...any of the qualified web browsers enter https 192 168 1 1 The NETGEAR Configuration Manager Login screen displays b In the Username field enter admin and in the Password Passcode field enter password Use lowercase letters If you changed the password enter your personalized password Leave the domain as it is geardomain c Click the Login button The Router Status screen displays After five minutes of...

Page 165: ...is example 8 In the WAN Destination IP Address fields enter 10 1 0 52 9 Click the Apply button Your changes are saved To test the connection from a computer on the Internet type http IP_address in which IP_address is the public IP address that you mapped to your web server in Step 8 You see the home page of your web server IPv4 LAN WAN or IPv4 DMZ WAN Inbound Rule Specifying an Exposed Host Specif...

Page 166: ...ord Passcode field enter password Use lowercase letters If you changed the password enter your personalized password Leave the domain as it is geardomain c Click the Login button The Router Status screen displays After five minutes of inactivity which is the default login time out you are automatically logged out 2 Select Security Firewall LAN WAN Rules The LAN WAN Rules screen displays 3 Create a...

Page 167: ...le IPv6 WAN user to a single IPv6 LAN user specify the initiating IPv6 WAN address and the receiving IPv6 LAN address See the example in the following figure Figure 13 Example of inbound firewall rule Examples of Outbound Firewall Rules Outbound rules let you prevent users from using applications such as Instant Messenger Real Audio or other nonessential sites IPv4 LAN WAN Outbound Rule Block Inst...

Page 168: ...irewall rule IPv6 DMZ WAN Outbound Rule Allow a Group of DMZ User to Access an FTP Site on the Internet If you want to allow a group of DMZ users to access a particular FTP site on the Internet during working hours you can create an outbound rule to allow such traffic by specifying the IPv6 DMZ start and finish addresses and the IPv6 WAN address On the Schedule screen create a schedule that specif...

Page 169: ... the following topics Attack Checks Set Limits for IPv4 Sessions Manage the Application Level Gateway for SIP Sessions Attack Checks You can specify whether the VPN firewall is protected against common attacks in the DMZ LAN and WAN networks The various types of IPv4 attack checks are listed on the Attack Checks screen and defined in Table 31 on page 170 For IPv6 the only options are to specify wh...

Page 170: ...Internet Ports check box to enable the VPN firewall to respond to a ping from the Internet to its IPv4 address A ping can be used as a diagnostic tool Keep this check box cleared unless a specific reason exists to enable the VPN firewall to respond to a ping from the Internet Enable Stealth Mode Select the Enable Stealth Mode check box which is the default setting to prevent the VPN firewall from ...

Page 171: ...Ports check box to prevent the VPN firewall from responding to a ping on a LAN port A ping can be used as a diagnostic tool Keep this check box cleared unless a specific reason exists to prevent the VPN firewall from responding to a ping on a LAN port VPN Pass through IPSec PPTP L2TP When the VPN firewall functions in NAT mode all packets going to the remote VPN gateway are first filtered through ...

Page 172: ...The Router Status screen displays After five minutes of inactivity which is the default login time out you are automatically logged out 2 Select Security Firewall Attack Checks The Attack Checks screen displays 3 In the upper right of the screen select the IPv6 radio button 4 Configure the following settings Jumbo Frames Enable Jumbo Frame Jumbo frames allow multiple smaller packets to be combined...

Page 173: ...r changes are saved Set Limits for IPv4 Sessions You can specify the total number of sessions that are allowed per user over an IPv4 connection across the VPN firewall The session limits feature is disabled by default To enable and configure session limits 1 Log in to the unit a In the address field of any of the qualified web browsers enter https 192 168 1 1 The NETGEAR Configuration Manager Logi...

Page 174: ...nter a number to indicate the user limit Note the following If the user limit parameter is set to Percentage of Max Sessions the number specifies the maximum number of sessions that are allowed from a single source device as a percentage of the total session connection capacity of the VPN firewall The session limit is per device based If the user limit parameter is set to Number of Sessions the nu...

Page 175: ... the Username field enter admin and in the Password Passcode field enter password Use lowercase letters If you changed the password enter your personalized password Leave the domain as it is geardomain c Click the Login button The Router Status screen displays After five minutes of inactivity which is the default login time out you are automatically logged out 2 Select Security Firewall Advanced 3...

Page 176: ...ection contains the following topics Add Customized Services Create Bandwidth Profiles Preconfigured Quality of Service Profiles Configure Service Groups Configure IP Groups Add Customized Services Services are functions performed by server computers at the request of client computers You can configure up to 124 custom services For example web servers serve web pages time servers serve time and da...

Page 177: ... ports are used internally TCP ports 11 23 53 113 443 7911 49152 UDP ports 53 67 161 500 520 1028 1029 1030 1900 4500 To add a customized service 1 Log in to the unit a In the address field of any of the qualified web browsers enter https 192 168 1 1 The NETGEAR Configuration Manager Login screen displays b In the Username field enter admin and in the Password Passcode field enter password Use low...

Page 178: ...es screen settings Setting Description Name A descriptive name of the service for identification and management purposes Type Select the Layer 3 protocol that the service uses as its transport protocol TCP UDP ICMP ICMPv6 ICMP Type A numeric value that can range between 0 and 40 For a list of ICMP types visit http www iana org assignments icmp parameters Note This field is enabled only when you se...

Page 179: ...gin screen displays b In the Username field enter admin and in the Password Passcode field enter password Use lowercase letters If you changed the password enter your personalized password Leave the domain as it is geardomain c Click the Login button The Router Status screen displays After five minutes of inactivity which is the default login time out you are automatically logged out 2 Select Secu...

Page 180: ...e the same bandwidth class An exception occurs for an individual bandwidth profile if the classes are per source IP address classes The source IP address is the IP address of the first packet that is transmitted for the connection So for outbound firewall rules the source IP address is the LAN side IP address for inbound firewall rules the source IP address is the WAN side IP address The class is ...

Page 181: ...e of the bandwidth profile for identification and management purposes Direction Select the traffic direction for the bandwidth profile Inbound Traffic The bandwidth profile is applied only to inbound traffic Specify the inbound minimum and maximum bandwidths Outbound Traffic The bandwidth profile is applied only to outbound traffic Specify the outbound minimum and maximum bandwidths Both The bandw...

Page 182: ... are automatically logged out 2 Select Security Bandwidth Profiles The Bandwidth Profiles screen displays Inbound Minimum Bandwidth The inbound minimum allocated bandwidth in Kbps No default setting is specified Inbound Maximum Bandwidth The inbound maximum allowed bandwidth in Kbps The maximum allowable bandwidth is 100 000 Kbps and you cannot configure less than 100 Kbps No default setting is sp...

Page 183: ...ally logged out 2 Select Security Bandwidth Profiles The Bandwidth Profiles screen displays 3 In the List of Bandwidth Profiles table select the check box to the left of each bandwidth profile that you want to delete or click the Select All table button to select all profiles 4 To delete the selected profile or profiles click the Delete table button The information is deleted Preconfigured Quality...

Page 184: ...w IP packets are marked with a ToS value of 16 Configure Service Groups A firewall is a security mechanism that lets network administrators selectively block or allow certain types of traffic in accordance with rules that they specify When you create a firewall rule you select a service to which the firewall rule applies Use the Service Group screen to create custom service groups for which firewa...

Page 185: ...g that of the most recently added service in the list Name Name of the service group for identification and management purposes List of Services Shows the services that are grouped separated by commas Table 36 The settings to add a custom service group Setting Description Name Name of the service group for identification and management purposes Available Services This list includes all the availab...

Page 186: ...he service that you want to edit click the Edit table button 4 Modify the settings that you wish to change See Table 36 on page 185 5 Click the Apply button Your changes are saved To delete a custom service group 1 Log in to the unit a In the address field of any of the qualified web browsers enter https 192 168 1 1 The NETGEAR Configuration Manager Login screen displays Click this button to move ...

Page 187: ... mechanism that selectively blocks or allows certain types of traffic in accordance with rules specified by network administrators The Firewall Rules screen allows selection of IP groups LAN WAN while creating firewall rules This screen allows the creation of custom IP groups against which firewall rules can be defined Once defined the new custom IP group appears in the LAN Users list and WAN User...

Page 188: ... The Router Status screen displays After five minutes of inactivity which is the default login time out you are automatically logged out 2 Select Security IP Groups The IP Groups screen displays Table 37 Custom IP group settings Setting Description A numerical ID assigned to a custom IP group by the router The router contains a list of predefined IP groups which can be viewed from the Firewall Rul...

Page 189: ...minutes of inactivity which is the default login time out you are automatically logged out 2 Select Security IP Groups The IP Groups screen displays 3 In the Custom IP Groups table select the check box to the left of each custom IP group that you want to delete or click the Select All table button to select all groups 4 To delete the selected profile or profiles click the Delete table button The i...

Page 190: ... store session information by websites that usually require login However several websites use cookies to store tracking information and browsing habits Enabling this option blocks cookies from being created by a website Many websites require that cookies be accepted for the site to be accessed correctly Blocking cookies might interfere with useful functions provided by these websites Keyword bloc...

Page 191: ...gin screen displays b In the Username field enter admin and in the Password Passcode field enter password Use lowercase letters If you changed the password enter your personalized password Leave the domain as it is geardomain c Click the Login button The Router Status screen displays After five minutes of inactivity which is the default login time out you are automatically logged out ...

Page 192: ... 192 NETGEAR ProSAFE VPN Firewall FVS318G v2 2 Select Security Content Filtering 3 In the Content Filtering section select the Yes radio button 4 In the Web Components section select the components that you want to block ...

Page 193: ...it is geardomain c Click the Login button The Router Status screen displays After five minutes of inactivity which is the default login time out you are automatically logged out 2 Select Security Content Filtering The Block Sites screen displays 3 In the Apply Keyword Blocking to section select the check boxes for the groups to which you want to apply keyword blocking or click the Select All butto...

Page 194: ...Filtering on page 189 6 Click the Apply button Your changes are saved To build your list of trusted domains 1 Log in to the unit a In the address field of any of the qualified web browsers enter https 192 168 1 1 The NETGEAR Configuration Manager Login screen displays b In the Username field enter admin and in the Password Passcode field enter password Use lowercase letters If you changed the pass...

Page 195: ...rewall rules To set a schedule 1 Log in to the unit a In the address field of any of the qualified web browsers enter https 192 168 1 1 The NETGEAR Configuration Manager Login screen displays b In the Username field enter admin and in the Password Passcode field enter password Use lowercase letters If you changed the password enter your personalized password Leave the domain as it is geardomain c ...

Page 196: ... Scheduled Time of Day section select one of the following radio buttons All Day The schedule is in effect all hours of the selected day or days Specific Times The schedule is in effect only during specific hours of the selected day or days To the right of the radio buttons fill in the Start Time and End Time fields Hour Minute AM PM during which the schedule is in effect 5 Click the Apply button ...

Page 197: ...ified web browsers enter https 192 168 1 1 The NETGEAR Configuration Manager Login screen displays b In the Username field enter admin and in the Password Passcode field enter password Use lowercase letters If you changed the password enter your personalized password Leave the domain as it is geardomain c Click the Login button The Router Status screen displays After five minutes of inactivity whi...

Page 198: ...able button The MAC address is added to the MAC Addresses table 8 To add more MAC addresses to the MAC Addresses table repeat the previous two steps To remove one or more MAC addresses from the table 1 Log in to the unit a In the address field of any of the qualified web browsers enter https 192 168 1 1 The NETGEAR Configuration Manager Login screen displays b In the Username field enter admin and...

Page 199: ...2 MAC address 00 01 02 03 04 06 and IP address 192 168 10 11 Host 3 MAC address 00 01 02 03 04 07 and IP address 192 168 10 12 Three scenarios are possible in relation to the addresses in the IP MAC Bindings table Host 1 did not change its IP and MAC addresses The IP and MAC addresses of a packet coming from Host 1 match those in the IP MAC Bindings table Host 2 changed its MAC address to 00 01 02...

Page 200: ...es IP MAC binding violations are emailed Click the Firewall Logs E mail page link to ensure that emailing of logs is enabled on the Firewall Logs E mail screen see Configure Logging Alerts and Event Notifications on page 353 No IP MAC binding violations are not emailed 4 Click the Apply button Your changes are saved 5 In the IP MAC Bindings sections of the screen enter the settings as described in...

Page 201: ...ding The IP MAC Binding screen displays 3 In the IP MAC Bindings table to the right of the IP MAC binding that you want to edit click the Edit table button The Edit IP MAC Binding screen displays 4 Modify the settings that you wish to change See Table 38 on page 200 You can change the MAC address IPv4 address and logging status 5 Click the Apply button Your changes are saved To remove one or more ...

Page 202: ...ng interval from its default setting of 10 seconds 1 Log in to the unit a In the address field of any of the qualified web browsers enter https 192 168 1 1 The NETGEAR Configuration Manager Login screen displays b In the Username field enter admin and in the Password Passcode field enter password Use lowercase letters If you changed the password enter your personalized password Leave the domain as...

Page 203: ...browsers enter https 192 168 1 1 The NETGEAR Configuration Manager Login screen displays b In the Username field enter admin and in the Password Passcode field enter password Use lowercase letters If you changed the password enter your personalized password Leave the domain as it is geardomain c Click the Login button The Router Status screen displays After five minutes of inactivity which is the ...

Page 204: ...the address field of any of the qualified web browsers enter https 192 168 1 1 The NETGEAR Configuration Manager Login screen displays b In the Username field enter admin and in the Password Passcode field enter password Use lowercase letters If you changed the password enter your personalized password Leave the domain as it is geardomain c Click the Login button The Router Status screen displays ...

Page 205: ...nalized password Leave the domain as it is geardomain c Click the Login button The Router Status screen displays After five minutes of inactivity which is the default login time out you are automatically logged out 2 Select Security Address Filter IP MAC Binding The IP MAC Binding screen displays 3 Select the check box to the left of each IP MAC binding that you want to delete or click the Select ...

Page 206: ...on a LAN network to be available to external applications that would otherwise be partially blocked by the firewall Using the port triggering feature requires that you know the port numbers used by the application Note Port triggering is supported for IPv4 devices only Once configured port triggering operates as follows 1 A computer makes an outgoing connection using a port number that is defined ...

Page 207: ...another computer This time out period is required so the VPN firewall can determine that the application terminates Note For additional ways of allowing inbound traffic see Inbound Rules on page 130 To add a port triggering rule 1 Log in to the unit a In the address field of any of the qualified web browsers enter https 192 168 1 1 The NETGEAR Configuration Manager Login screen displays b In the U...

Page 208: ...gering The Port Triggering screen displays 3 In the Port Triggering Rules table to the right of the port triggering rule that you want to edit click the Edit table button The Edit Port Triggering Rule screen displays 4 Modify the settings that you wish to change See Table 40 on page 208 Table 40 Port Triggering screen settings Setting Description Name A descriptive name of the rule for identificat...

Page 209: ...curity Port Triggering The Port Triggering screen displays 3 Select the check box to the left of each port triggering rule that you want to delete or click the Select All table button to select all rules 4 Click the Delete table button The information is deleted To display the status of the port triggering rules 1 Log in to the unit a In the address field of any of the qualified web browsers enter...

Page 210: ...To configure UPnP 1 Log in to the unit a In the address field of any of the qualified web browsers enter https 192 168 1 1 The NETGEAR Configuration Manager Login screen displays b In the Username field enter admin and in the Password Passcode field enter password Use lowercase letters If you changed the password enter your personalized password Leave the domain as it is geardomain c Click the Log...

Page 211: ... opened by the UPnP device IP Address Lists the IP address of the UPnP device accessing the VPN firewall 3 To enable the UPnP feature select the Yes radio button The feature is disabled by default To disable the feature select the No radio button 4 Complete the following fields Advertisement Period Enter the period in seconds that specifies how often the VPN firewall broadcasts its UPnP informatio...

Page 212: ...our local network and a remote network or computer The chapter contains the following sections Use the IPSec VPN Wizard for Client and Gateway Configurations Test the Connection and View Connection and Status Information Manage IPSec VPN Policies Configure Extended Authentication XAUTH Assign IPv4 Addresses to Remote Users Configure Keep Alives and Dead Peer Detection Configure NetBIOS Bridging wi...

Page 213: ...so configures the settings for the network connection security association SA traffic selectors authentication algorithm and encryption The settings that the VPN Wizard uses are based on the recommendations of the VPN Consortium VPNC an organization that promotes multivendor VPN interoperability The following sections provide wizard and NETGEAR ProSafe VPN Client software configuration procedures ...

Page 214: ...update interval is available set the interval to an appropriately short time To set up an IPv4 gateway to gateway VPN tunnel using the VPN Wizard 1 Log in to the unit a In the address field of any of the qualified web browsers enter https 192 168 1 1 The NETGEAR Configuration Manager Login screen displays b In the Username field enter admin and in the Password Passcode field enter password Use low...

Page 215: ...Name and Remote IP Type What is the new Connection Name Enter a descriptive name for the connection This name is used to help you to manage the VPN settings the name is not supplied to the remote VPN endpoint What is the pre shared key Enter a pre shared key The key must be entered both here and on the remote VPN gateway This key must be a minimum of 8 characters and must not exceed 49 characters ...

Page 216: ...remote LAN IP Address Enter the LAN IPv4 address of the remote gateway Note The remote LAN IPv4 address must be in a different subnet from the local LAN IP address For example if the local subnet is 192 168 1 x the remote subnet could be 192 168 10 x but could not be 192 168 1 x If this information is incorrect the tunnel fails to connect What is the remote LAN Subnet Mask Enter the LAN subnet mas...

Page 217: ...hen your DHCP WAN address changes the VPN tunnel fails because the FQDNs do not resolve to your new address If the option to configure the update interval is available set the interval to an appropriately short time To set up an IPv6 gateway to gateway VPN tunnel using the VPN Wizard 1 Log in to the unit a In the address field of any of the qualified web browsers enter https 192 168 1 1 The NETGEA...

Page 218: ...Name and Remote IP Type What is the new Connection Name Enter a descriptive name for the connection This name is used to help you to manage the VPN settings the name is not supplied to the remote VPN endpoint What is the pre shared key Enter a pre shared key The key must be entered both here and on the remote VPN gateway This key must be a minimum of 8 characters and must not exceed 49 characters ...

Page 219: ...hat is the remote LAN IP Address Enter the LAN IPv6 address of the remote gateway Note The remote LAN IPv6 address must be different from the local LAN IPv6 address For example if the local LAN IPv6 address is FEC0 1 the remote LAN IPv6 address could be FEC0 1 1 but could not be FEC0 1 If this information is incorrect the tunnel fails to connect IPv6 Prefix Length Enter the prefix length for the r...

Page 220: ...rs when your DHCP WAN address changes the VPN tunnel fails because the FQDNs do not resolve to your new address If the option to configure the update interval is available set the interval to an appropriately short time To set up a client to gateway VPN tunnel using the VPN Wizard 1 Log in to the unit a In the address field of any of the qualified web browsers enter https 192 168 1 1 The NETGEAR C...

Page 221: ...settings for a client to gateway tunnel Setting Description About VPN Wizard This VPN tunnel will connect to the following peers Select the VPN Client radio button The default remote FQDN remote com and the default local FQDN local com display in the End Point Information section Connection Name and Remote IP Type What is the new Connection Name Enter a descriptive name for the connection This nam...

Page 222: ...local ID on the VPN client What is the Local Identifier Information When you select the Client radio button in the About VPN Wizard section the default local FQDN local com is automatically entered Use the default local FQDN or enter another FQDN Note The local ID on the VPN firewall is the remote ID on the VPN client It might be less confusing to configure an FQDN such as router com as the local ...

Page 223: ...ation Wizard is the easier and preferred method For more information see Use the NETGEAR VPN Client Wizard to Create a Secure Connection on page 223 Manual Method Instead of using the wizard on the VPN client you can manually configure the VPN client For more information see Manually Create a Secure Connection Using the NETGEAR VPN Client on page 228 Note Perform these tasks from a computer on whi...

Page 224: ...ll FVS318G v2 To use the Configuration Wizard to set up a VPN connection between the VPN client and the VPN firewall 1 Right click the VPN client icon in your Windows system tray and select Configuration Panel 2 From the main menu on the Configuration Panel screen select Configuration Wizard ...

Page 225: ...e of the VPN firewall For example enter 192 168 15 175 Preshared key Enter the pre shared key that you already specified on the VPN firewall For example enter I7 KL39dFG_8 IP private internal address of the remote network Enter the remote private IP address of the VPN firewall For example enter 192 168 1 0 This IP address enables communication with the entire 192 168 1 x subnet 5 Click the Next bu...

Page 226: ...n Panel screen with the Authentication tab selected by default b In the Authentication pane click the Advanced tab c Specify the settings that are described in the following table Table 45 VPN client advanced authentication settings Setting Description Advanced features Aggressive Mode Select this check box to enable aggressive mode as the mode of negotiation with the VPN firewall NAT T Select Aut...

Page 227: ...m as the local ID for the VPN client Note The remote ID on the VPN firewall is the local ID on the VPN client It might be less confusing to configure an FQDN such as client com as the remote ID on the VPN firewall and then enter client com as the local ID on the VPN client Remote ID As the type of ID select DNS from the list because you specified an FQDN in the VPN firewall configuration As the va...

Page 228: ... configuration is now complete Manually Create a Secure Connection Using the NETGEAR VPN Client Perform these tasks from a computer on which the NETGEAR ProSafe VPN Client is installed To manually configure a VPN connection between the VPN client and the VPN firewall create authentication settings phase 1 settings create an associated IPSec configuration phase 2 settings and specify the global par...

Page 229: ...lect New Phase 1 3 Change the name of the authentication phase the default is Gateway a Right click the authentication phase name b Select Rename c Type vpn_client d Click anywhere in the tree list pane This is the name for the authentication phase that is used only for the VPN client not during IKE negotiation You can view and change this name in the tree list pane This name must be a unique name...

Page 230: ...erface Select Any from the list Remote Gateway Enter the remote IP address or DNS name of the VPN firewall For example enter 192 168 15 175 Preshared Key Select the Preshared Key radio button Enter the pre shared key that you already specified on the VPN firewall For example enter I7 KL39dFG_8 Confirm the key in the Confirm field IKE Encryption Select the 3DES encryption algorithm from the list Au...

Page 231: ...ed authentication settings Setting Description Advanced features Aggressive Mode Select this check box to enable aggressive mode as the mode of negotiation with the VPN firewall NAT T Select Automatic from the list to enable the VPN client and VPN firewall to negotiate NAT T Local and Remote ID Local ID As the type of ID select DNS from the list because you specified FQDN in the VPN firewall confi...

Page 232: ...nt opened a tunnel appears in the LAN with this IP address Address Type Select Subnet address from the list This selection defines which addresses the VPN client can communicate with after the VPN tunnel is established Remote LAN address Enter 192 168 1 0 as the remote IP address that is LAN network address of the gateway that opens the VPN tunnel Subnet mask Enter 255 255 255 0 as the remote subn...

Page 233: ...creen displays 2 Click Global Parameters in the left column of the Configuration Panel screen 3 Specify the default lifetimes in seconds Authentication IKE Default The default lifetime value is 3600 seconds Change this setting to 28800 seconds to match the configuration of the VPN firewall Encryption IPSec Default The default lifetime value is 1200 seconds Change this setting to 3600 seconds to ma...

Page 234: ...you use the default authentication phase name Gateway and the default IPSec configuration name Tunnel If you manually set up the connection and changed the names use vpn_client or any other name that you configured as the authentication phase name and netgear_platform or any other name that you configured as the IPSec configuration name To establish a connection use one of the following three meth...

Page 235: ... opened message displays above the system tray Figure 19 Tunnel opened message After the VPN client is launched it displays an icon in the system tray that indicates whether a tunnel is opened using a color code Figure 20 VPN client icon in system tray NETGEAR VPN Client Status and Log Information To view detailed negotiation and error information on the NETGEAR VPN client Right click the VPN clie...

Page 236: ...ield of any of the qualified web browsers enter https 192 168 1 1 The NETGEAR Configuration Manager Login screen displays b In the Username field enter admin and in the Password Passcode field enter password Use lowercase letters If you changed the password enter your personalized password Leave the domain as it is geardomain c Click the Login button The Router Status screen displays After five mi...

Page 237: ... Manager Login screen displays b In the Username field enter admin and in the Password Passcode field enter password Use lowercase letters If you changed the password enter your personalized password Leave the domain as it is geardomain Table 49 IPSec VPN Connection Status screen information Item Description Policy Name The name of the VPN policy that is associated with this SA Endpoint The IP add...

Page 238: ...nd IKE policy You can edit existing policies or manually add new VPN and IKE policies directly in the policy tables This section contains the following topics Manage IKE Policies Manage VPN Policies Manage IKE Policies The Internet Key Exchange IKE protocol performs negotiations between the two VPN gateways and provides automatic management of the keys that are used for IPSec connections It is imp...

Page 239: ...set up a VPN tunnel an IKE policy is established and populated in the List of IKE Policies and is given the same name as the new VPN connection name You can also edit exiting policies or add new IKE policies from the IKE Policies screen IKE Policies To access the IKE Policies list 1 Log in to the unit a In the address field of any of the qualified web browsers enter https 192 168 1 1 The NETGEAR C...

Page 240: ...N The IKE Policies screen displays 3 Select the check box to the left of each policy that you want to delete or click the Select All table button to select all IKE policies Table 50 IKE Policies screen information for IPv4 and IPv6 Item Description Name The name that identifies the IKE policy When you use the VPN Wizard to set up a VPN policy an accompanying IKE policy is automatically created wit...

Page 241: ...nd in the Password Passcode field enter password Use lowercase letters If you changed the password enter your personalized password Leave the domain as it is geardomain c Click the Login button The Router Status screen displays After five minutes of inactivity which is the default login time out you are automatically logged out 2 Select VPN IPSec VPN The IPSec VPN submenu tabs display with the IKE...

Page 242: ...orking Using IPSec and L2TP Connections 242 NETGEAR ProSAFE VPN Firewall FVS318G v2 IPv4 In the upper right of the screen the IPv4 radio button is already selected by default Go to Step 5 IPv6 Select the IPv6 radio button ...

Page 243: ...ents through a Mode Config record but you cannot assign IPv6 addresses to clients Select Mode Config Record From the list select one of the Mode Config records that you defined on the Add Mode Config Record screen see Configure Mode Config Operation on the VPN Firewall on page 262 Note Click the View Selected button to open the Selected Mode Config Record Details pop up screen General Policy Name ...

Page 244: ...eld Remote Wan IP The WAN IP address of the remote endpoint When you select this option the Identifier field automatically shows the IP address of the selected WAN interface FQDN The FQDN for a remote gateway User FQDN The email address for a remote VPN client or gateway DER ASN1 DN A distinguished name DN that identifies the remote endpoint in the DER encoding and ASN 1 format Identifier Dependin...

Page 245: ...ly on both sides SA Lifetime sec The period in seconds for which the IKE SA is valid When the period times out the next rekeying occurs The default is 28800 seconds eight hours Enable Dead Peer Detection Note See also Configure Keep Alives and Dead Peer Detection on page 276 Select whether Dead Peer Detection DPD is enabled Yes This feature is enabled When the VPN firewall detects an IKE connectio...

Page 246: ... gateway tunnels terminate The authentication modes that are available for this configuration are User Database RADIUS PAP or RADIUS CHAP IPSec Host The VPN firewall functions as a VPN client of the remote gateway In this configuration the VPN firewall is authenticated by a remote gateway with a user name and password combination Authentication Type For an Edge Device configuration from the list s...

Page 247: ...eys for the VPN tunnel on the VPN firewall and on the remote VPN endpoint No third party server or organization is involved Auto Some settings for the VPN tunnel are generated automatically through the use of the IKE Internet Key Exchange Protocol to perform negotiations between the two VPN endpoints the local ID endpoint and the remote ID endpoint You still must manually enter all settings on the...

Page 248: ...urity association SA The remote VPN endpoint must use a matching SA otherwise it refuses the connection To view the VPN policies 1 Log in to the unit a In the address field of any of the qualified web browsers enter https 192 168 1 1 The NETGEAR Configuration Manager Login screen displays b In the Username field enter admin and in the Password Passcode field enter password Use lowercase letters If...

Page 249: ...screen information for IPv4 and IPv6 Item Description Status Indicates whether the policy is enabled green circle or disabled gray circle To enable or disable a policy select the check box to the left of the circle and click the Enable or Disable table button as appropriate Name The name that identifies the VPN policy When you use the VPN Wizard to create a VPN policy the name of the VPN policy an...

Page 250: ... you want to enable or disable or click the Select All table button to select all VPN Policies 4 Click the Enable or Disable table button Manually Add or Edit a VPN Policy To manually add a VPN policy 1 Log in to the unit a In the address field of any of the qualified web browsers enter https 192 168 1 1 The NETGEAR Configuration Manager Login screen displays b In the Username field enter admin an...

Page 251: ...tual Private Networking Using IPSec and L2TP Connections 251 NETGEAR ProSAFE VPN Firewall FVS318G v2 IPv4 In the upper right of the screen the IPv4 radio button is already selected by default Go to Step 5 ...

Page 252: ...scribed in the following table The only differences between IPv4 and IPv6 settings are the subnet mask IPv4 and prefix length IPv6 Table 53 Add New VPN Policy screen settings for IPv4 and IPv6 Setting Description General Policy Name A descriptive name of the VPN policy for identification and management purposes Note The name is not supplied to the remote VPN endpoint ...

Page 253: ...with this VPN policy must be either Initiator or Both but cannot be Responder For more information see Manually Add or Edit an IKE Policy on page 241 Enable Keepalive Note See also Configure Keep Alives and Dead Peer Detection on page 276 Select whether keep alive is enabled Yes This feature is enabled Periodically the VPN firewall sends keep alive requests ping packets to the remote endpoint to k...

Page 254: ...rt of the VPN tunnel on the remote endpoint The selections are the same as for the Local IP list Manual Policy Parameters Note These fields apply only when you select Manual Policy as the policy type When you specify the settings for the fields in this section a security association SA is created SPI Incoming The security parameter index SPI for the inbound policy Enter a hexadecimal value between...

Page 255: ... Key Out The integrity key for the outbound policy The length of the key depends on the selected integrity algorithm MD5 Enter 16 characters SHA 1 Enter 20 characters Auto Policy Parameters Note These fields apply only when you select Auto Policy as the policy type SA Lifetime The lifetime of the security association SA is the period or the amount of transmitted data after which the SA becomes inv...

Page 256: ...adio button is already selected by default Go to Step 4 IPv6 Select the IPv6 radio button The VPN Policies screen for IPv6 displays 4 In the List of VPN Policies table to the right of the VPN policy that you want to edit click the Edit table button Integrity Algorithm From the list select the algorithm to be used in the VPN header for the authentication process SHA 1 Hash algorithm that produces a...

Page 257: ... The VPN firewall is used as a VPN concentrator on which one or more gateway tunnels terminate You must specify the authentication type to be used during verification of the credentials of the remote VPN gateways the user database RADIUS PAP or RADIUS CHAP IPSec Host Authentication by the remote gateway through a user name and password that are associated with the IKE policy The user name and pass...

Page 258: ...ete the settings as described in the following table Table 54 Extended authentication settings for IPv4 and IPv6 Setting Description Select whether Extended Authentication XAUTH is enabled and if enabled which device is used to verify user account information None XAUTH is disabled This the default setting Edge Device The VPN firewall functions as a VPN concentrator on which one or more gateway tu...

Page 259: ...rocess with an XAUTH request At that point the remote user must provide authentication information such as a user name and password or some encrypted response using the user name and password information The gateway then attempts to verify this information first against a local user database if RADIUS PAP is enabled and then by relaying the information to a central authentication server such as a ...

Page 260: ...ht The default setting is that the No radio button is selected Primary Server IP Address The IPv4 address of the primary RADIUS server Secret Phrase A shared secret phrase to authenticate the transactions between the client and the primary RADIUS server The same secret phrase must be configured on both the client and the server Primary Server NAS Identifier The primary Network Access Server NAS id...

Page 261: ...the IKE Phase 1 negotiation is complete the VPN connection initiator which is the remote user with a VPN client requests the IP configuration settings such as the IP address To enable and configure the backup RADIUS server select the Yes radio button and enter the settings for the three fields to the right The default setting is that the No radio button is selected Backup Server IP Address The IPv...

Page 262: ...ed to a VPN client is released only after the VPN client gracefully disconnects or after the SA liftetime for the connection times out Configure Mode Config Operation on the VPN Firewall To configure Mode Config on the VPN firewall first create a Mode Config record and then select the Mode Config record for an IKE policy To configure Mode Config on the VPN firewall 1 Log in to the unit a In the ad...

Page 263: ... VPN clients The Second Pool and Third Pool fields are optional To specify any client pool enter the starting IP address for the pool in the Starting IP field and enter the ending IP address for the pool in the Ending IP field Note Make sure that no IP pool is within the range of the local network IP addresses Use a different range of private IP addresses such as 172 16 xxx xx Second Pool Third Po...

Page 264: ...e SA Lifetime field enter a period in seconds The minimum value is 300 seconds The default setting is 3600 seconds KBytes In the SA Lifetime field enter a number of kilobytes The minimum value is 1920000 KB Encryption Algorithm From the list select the algorithm to negotiate the security association SA None No encryption DES Data Encryption Standard DES 3DES Triple DES This is the default algorith...

Page 265: ... policy IPv4 In the upper right of the screen the IPv4 radio button is already selected by default Go to Step 9 IPv6 Select the IPv6 radio button The Add IKE Policy screen for IPv6 displays This screen is identical to the Add IKE Policy screen for IPv4 see the next figure You can configure an IPv6 IKE policy to assign IPv4 addresses to clients but you cannot assign IPv6 addresses to clients 9 On t...

Page 266: ... not supplied to the remote VPN endpoint Direction Type Responder is automatically selected when you select the Mode Config record in the Mode Config Record section This ensures that the VPN firewall responds to an IKE request from the remote endpoint but does not initiate one Exchange Mode Aggressive mode is automatically selected when you select the Mode Config record in the Mode Config Record s...

Page 267: ...ep Alives and Dead Peer Detection on page 276 Select whether Dead Peer Detection DPD is enabled Yes This feature is enabled When the VPN firewall detects an IKE connection failure it deletes the IPSec and IKE SA and forces a reestablishment of the connection You must specify the detection period in the Detection Period field and the maximum number of times that the VPN firewall attempts to reconne...

Page 268: ...gateway tunnels terminate The authentication modes that are available for this configuration are User Database RADIUS PAP and RADIUS CHAP IPSec Host The VPN firewall functions as a VPN client of the remote gateway In this configuration the VPN firewall is authenticated by a remote gateway with a user name and password combination Authentication Type For an Edge Device configuration from the list s...

Page 269: ...configuration phase 2 settings and specify the global parameters Configure the Mode Config Authentication Settings Phase 1 Settings To create new authentication settings 1 Right click the VPN client icon in your Windows system tray and select Configuration Panel 2 In the tree list pane of the Configuration Panel screen right click VPN Configuration and select New Phase 1 3 Change the name of the a...

Page 270: ...ck the Save button Table 58 VPN client authentication settings Mode Config Setting Description Interface Select Any from the list Remote Gateway Enter the remote IP address or DNS name of the VPN firewall For example enter 192 168 15 175 Preshared Key Select the Preshared Key radio button Enter the pre shared key that you already specified on the VPN firewall For example enter H8 spsf3 JYK2 Confir...

Page 271: ... to enable aggressive mode as the mode of negotiation with the VPN firewall NAT T Select Automatic from the list to enable the VPN client and VPN firewall to negotiate NAT T Local and Remote ID Local ID As the type of ID select DNS from the Local ID list because you specified FQDN in the VPN firewall configuration As the value of the ID enter client com as the local ID for the VPN client Note The ...

Page 272: ...tion Panel The Configuration Panel screen displays 2 In the tree list pane of the Configuration Panel screen right click the GW_ModeConfig authentication phase name and select New Phase 2 3 Change the name of the IPSec configuration the default is Tunnel a Right click the IPSec configuration name b Select Rename c Type Tunnel_ModeConfig d Click anywhere in the tree list pane This is the name for t...

Page 273: ...he Local IP Address field on the Add Mode Config Record screen of the VPN firewall If you left the Local IP Address field blank enter the VPN firewall s default LAN IP address as the remote host address that opens the VPN tunnel For example enter 192 168 1 1 If you specified a LAN IP network address in the Local IP Address field enter the address that you specified as the remote host address that ...

Page 274: ...PSec Default Enter 3600 seconds 4 Select the Dead Peer Detection DPD check box and configure the following DPD settings to match the configuration on the VPN firewall Check Interval Enter 30 seconds Max number of entries Enter 3 retries Delay between entries Leave the default delay setting of 15 seconds 5 To use the new settings immediately click the Apply button 6 To keep the settings for future ...

Page 275: ...s to the VPN client This IP address displays in the VPN Client address field on the IPSec pane of the VPN client 3 From the client computer ping a computer on the VPN firewall LAN Modify or Delete a Mode Config Record Note Before you modify or delete a Mode Config record make sure that it is not used in an IKE policy To edit a Mode Config record 1 Log in to the unit a In the address field of any o...

Page 276: ...e saved To delete one or more Mode Config records 1 Log in to the unit a In the address field of any of the qualified web browsers enter https 192 168 1 1 The NETGEAR Configuration Manager Login screen displays b In the Username field enter admin and in the Password Passcode field enter password Use lowercase letters If you changed the password enter your personalized password Leave the domain as ...

Page 277: ...unnel and monitoring the replies To configure the keep alive feature on a configured VPN policy 1 Log in to the unit a In the address field of any of the qualified web browsers enter https 192 168 1 1 The NETGEAR Configuration Manager Login screen displays b In the Username field enter admin and in the Password Passcode field enter password Use lowercase letters If you changed the password enter y...

Page 278: ...ive feature Periodically the VPN firewall sends keep alive requests ping packets to the remote endpoint to keep the tunnel alive You must specify the ping IP address in the Ping IP Address field the detection period in the Detection Period field and the maximum number of keep alive requests that the VPN firewall sends in the Reconnect after failure count field Ping IP Address The IP address that t...

Page 279: ...assword Leave the domain as it is geardomain c Click the Login button The Router Status screen displays After five minutes of inactivity which is the default login time out you are automatically logged out 2 Select VPN IPSec VPN The IPSec VPN submenu tabs display with the IKE Policies screen for IPv4 in view 3 Specify the IP version for which you want to edit an IKE policy IPv4 In the upper right ...

Page 280: ...rd Passcode field enter password Use lowercase letters If you changed the password enter your personalized password Leave the domain as it is geardomain c Click the Login button The Router Status screen displays After five minutes of inactivity which is the default login time out you are automatically logged out 2 Select VPN IPSec VPN VPN Policies Table 62 Dead Peer Detection settings Setting Desc...

Page 281: ...igure a Layer 2 Tunneling Protocol L2TP server on the VPN firewall to allow users to access L2TP clients over L2TP tunnels A maximum of 25 simultaneous L2TP user sessions are supported The very first IP address of the L2TP address pool is used for distribution to the VPN firewall An L2TP Access Concentrator LAC typically initiates a tunnel to fulfill a connection request from an L2TP user the L2TP...

Page 282: ...main as it is geardomain c Click the Login button The Router Status screen displays After five minutes of inactivity which is the default login time out you are automatically logged out 2 Select VPN L2TP Server 3 To enable the L2TP server select the Enable check box 4 Enter the settings as described in the following table Table 63 L2TP Server screen settings Setting Description L2TP Server Configu...

Page 283: ...f inactivity which is the default login time out you are automatically logged out 2 Select VPN Connection Status L2TP Active Users The List of L2TP Active Users table lists each active connection with the information that is described in the following table Authentication Select one or more of the following authentication methods to authenticate L2TP users PAP RADIUS Password Authentication Protoc...

Page 284: ...NETGEAR ProSAFE VPN Firewall FVS318G v2 L2TP IP The IP address that is assigned by the L2TP server on the VPN firewall Action Click the Disconnect table button to terminate the L2TP connection Table 64 L2TP Active Users screen information continued Item Description ...

Page 285: ...ibes how to manage users authentication and security certificates for IPSec VPN The chapter contains the following sections The VPN Firewall s Authentication Process and Options Configure Authentication Domains Groups and Users Manage Digital Certificates for VPN Connections ...

Page 286: ...tion protocols and methods that the VPN firewall supports Table 65 External authentication protocols and methods Authentication Protocol or Method Description PAP Password Authentication Protocol PAP is a simple protocol in which the client sends a password in clear text CHAP Challenge Handshake Authentication Protocol CHAP executes a three way handshake in which the client and server trade challe...

Page 287: ...main as it is geardomain c Click the Login button Active Directory A network validated domain based authentication method that functions with a Microsoft Active Directory authentication server Microsoft Active Directory authentication servers support a group and user structure Because the Active Directory supports a multilevel hierarchy for example groups or organizational units this information c...

Page 288: ...utomatically logged out 2 Select Users Domains The List of Domains table displays the following fields Check box Allows you to select the domain in the table Domain Name The name of the domain Authentication Type The authentication method that is assigned to the domain Action The Edit table button which provides access to the Edit Domain screen 3 Under the List of Domains table click the Add table...

Page 289: ...rs are authenticated locally on the VPN firewall This is the default setting You do not need to complete any other fields on this screen Radius PAP RADIUS Password Authentication Protocol PAP Complete the following fields Authentication Server Authentication Secret Radius CHAP RADIUS Challenge Handshake Authentication Protocol CHAP Complete the following fields Authentication Server Authentication...

Page 290: ...ve Directory Domain LDAP Lightweight Directory Access Protocol LDAP Complete the following fields and make a selection from the LDAP Encryption list Authentication Server LDAP Base DN Authentication Server The server IP address or server name of the authentication server for any type of authentication other than authentication through the local user database Authentication Secret The authenticatio...

Page 291: ...ld of any of the qualified web browsers enter https 192 168 1 1 The NETGEAR Configuration Manager Login screen displays b In the Username field enter admin and in the Password Passcode field enter password Use lowercase letters If you changed the password enter your personalized password Leave the domain as it is geardomain c Click the Login button The Router Status screen displays After five minu...

Page 292: ...ed in Table 66 on page 289 You cannot modify the Domain Name and Authentication Type fields 5 Click the Apply button Your changes are saved Configure Groups The use of groups simplifies the configuration of VPN policies when different restrictions and access controls apply to different sets of users It also simplifies the configuration of web access exception rules Like the default domain of the V...

Page 293: ...ield enter admin and in the Password Passcode field enter password Use lowercase letters If you changed the password enter your personalized password Leave the domain as it is geardomain c Click the Login button The Router Status screen displays After five minutes of inactivity which is the default login time out you are automatically logged out 2 Select Users Groups The List of Groups table displ...

Page 294: ...e Password Passcode field enter password Use lowercase letters If you changed the password enter your personalized password Leave the domain as it is geardomain c Click the Login button The Router Status screen displays After five minutes of inactivity which is the default login time out you are automatically logged out 2 Select Users Groups Table 67 Add Group screen settings Setting Description N...

Page 295: ...r admin and in the Password Passcode field enter password Use lowercase letters If you changed the password enter your personalized password Leave the domain as it is geardomain c Click the Login button The Router Status screen displays After five minutes of inactivity which is the default login time out you are automatically logged out 2 Select Users Groups The Groups screen displays 3 In the Act...

Page 296: ... capacity to change the VPN firewall configuration that is read write access Guest user A user who can only view the VPN firewall configuration that is read only access IPSec VPN user A user who can make an IPSec VPN connection only through a NETGEAR ProSafe VPN Client and only when the XAUTH feature is enabled see Configure Extended Authentication XAUTH on page 257 L2TP user A user who can connec...

Page 297: ...y an asterisk the user is a default user that is preconfigured on the VPN firewall and cannot be deleted Group The group to which the user is assigned Type The type of access credentials that are assigned to the user Authentication Domain The authentication domain to which the user is assigned Action The Edit table button which provides access to the Edit User screen and the Policies table button ...

Page 298: ...ined user types that determines the access credentials Administrator A user with full access and the capacity to change the VPN firewall configuration that is read write access Guest User A user who can only view the VPN firewall configuration that is read only access IPSEC VPN User A user who can make an IPSec VPN connection only through a NETGEAR ProSafe VPN Client and only when the XAUTH featur...

Page 299: ...ing topics Configure Login Policies Configure Login Restrictions Based on IPv4 Addresses Configure Login Restrictions Based on IPv6 Addresses Configure Login Restrictions Based on Web Browser Configure Login Policies To configure user login policies 1 Log in to the unit a In the address field of any of the qualified web browsers enter https 192 168 1 1 The NETGEAR Configuration Manager Login scree...

Page 300: ...ed masked out for administrators 5 Click the Apply button Your changes are saved Configure Login Restrictions Based on IPv4 Addresses To restrict logging in based on IPv4 addresses 1 Log in to the unit a In the address field of any of the qualified web browsers enter https 192 168 1 1 The NETGEAR Configuration Manager Login screen displays b In the Username field enter admin and in the Password Pa...

Page 301: ...dress to the Defined Addresses table by entering the settings as described in the following table 8 Click the Add table button The address is added to the Defined Addresses table 9 Repeat Step 7 and Step 8 for any other addresses that you want to add to the Defined Addresses table Table 69 Defined addresses settings for IPv4 Setting Description Source Address Type Select the type of address from t...

Page 302: ...ss that you want to delete or click the Select All table button to select all addresses 5 Click the Delete table button The information is deleted Configure Login Restrictions Based on IPv6 Addresses To restrict logging in based on IPv6 addresses 1 Log in to the unit a In the address field of any of the qualified web browsers enter https 192 168 1 1 The NETGEAR Configuration Manager Login screen d...

Page 303: ... to the Defined Addresses table by entering the settings as described in the following table 9 Click the Add table button The address is added to the Defined Addresses table 10 Repeat Step 8 and Step 9 for any other addresses that you want to add to the Defined Addresses table Table 70 Defined addresses settings for IPv6 Setting Description Source Address Type Select the type of address from the l...

Page 304: ...ss that you want to delete or click the Select All table button to select all addresses 5 Click the Delete table button The information is deleted Configure Login Restrictions Based on Web Browser To restrict logging in based on the user s browser 1 Log in to the unit a In the address field of any of the qualified web browsers enter https 192 168 1 1 The NETGEAR Configuration Manager Login screen ...

Page 305: ...he Add Defined Browser section add a browser to the Defined Browsers table by selecting one of the following browsers from the list Internet Explorer Opera Netscape Navigator Firefox Mozilla Firefox Mozilla Other Mozilla browsers 8 Click the Add table button The browser is added to the Defined Browsers table 9 Repeat Step 7 and Step 8 for any other browsers that you want to add to the Defined Brow...

Page 306: ... passwords for the web management interface are both password NETGEAR recommends that you change the password for the administrator account to a more secure password and that you configure a separate secure password for the guest account The most secure password contains no dictionary words from any language and is a mixture of letters both uppercase and lowercase numbers and symbols Your password...

Page 307: ... User with full access and the capacity to change the VPN firewall configuration that is read write access Guest readonly User who can only view the VPN firewall configuration that is read only access IPSEC VPN User You cannot change an existing user from the IPSEC VPN User type to another type or from another type to the IPSEC VPN User type L2TP User You cannot change an existing user from the L2...

Page 308: ...e The digital certificate is accepted when it passes the validity test and the purpose matches its use The check for the purpose must correspond to its use for IPSec VPN If the defined purpose is for IPSec VPN the digital certificate is uploaded to both the IPSec VPN certificate repository However if the defined purpose is for IPSec VPN only the certificate is uploaded only to the IPSec VPN certif...

Page 309: ...rusted Certificates CA Certificate table Contains the trusted digital certificates that were issued by CAs and that you uploaded For more information see Manage VPN CA Certificates on page 309 Active Self Certificates table Contains the self signed certificates that were issued by CAs and that you uploaded For more information see Manage VPN Self Signed Certificates on page 311 Self Certificate Re...

Page 310: ...llowing fields CA Identity Subject Name The organization or person to whom the digital certificate is issued Issuer Name The name of the CA that issued the digital certificate Expiry Time The date after which the digital certificate becomes invalid To upload a digital certificate of a trusted CA on the VPN firewall 1 Download a digital certificate file from a trusted CA and store it on your comput...

Page 311: ...geardomain c Click the Login button The Router Status screen displays After five minutes of inactivity which is the default login time out you are automatically logged out 2 Select VPN Certificates The Certificates screen displays 3 In the Trusted Certificates CA Certificate table select the check box to the left of each digital certificate that you want to delete or click the Select All table but...

Page 312: ...and about the device that holds the certificate Refer to the CA for guidelines about the information that you must include in your CSR To generate a new CSR file obtain a digital certificate from a CA and upload it to the VPN firewall 1 Log in to the unit a In the address field of any of the qualified web browsers enter https 192 168 1 1 The NETGEAR Configuration Manager Login screen displays b In...

Page 313: ...nagement purposes Subject The name that other organizations see as the holder owner of the certificate In general use your registered business name or official company name for this purpose Note Generally all of your certificates should use the same value in the Subject field Hash Algorithm From the list select the hash algorithm MD5 A 128 bit 16 byte message digest slightly faster than SHA 1 SHA ...

Page 314: ...to the website of the CA b Start the SCR procedure c When prompted for the requested data copy the data from your saved text file including BEGIN CERTIFICATE REQUEST and END CERTIFICATE REQUEST Signature Key Length From the list select the signature key length in bits 512 1024 2048 Note Larger key sizes might improve security but might also decrease performance Optional Fields IP Address Enter you...

Page 315: ...enter password Use lowercase letters If you changed the password enter your personalized password Leave the domain as it is geardomain c Click the Login button The Router Status screen displays After five minutes of inactivity which is the default login time out you are automatically logged out 2 Select VPN Certificates The Certificates screen displays 3 In the Self Certificate Requests table sele...

Page 316: ...s table select the check box to the left of each self signed certificate that you want to delete or click the Select All table button to select all self signed certificates 4 Click the Delete table button The information is deleted Manage the VPN Certificate Revocation List A Certificate Revocation List CRL file shows digital certificates that were revoked and are no longer valid Each CA issues it...

Page 317: ...on Lists CRL table If the table already contains a CRL from the same CA the old CRL is deleted when you upload the new CRL To delete one or more CRLs 1 Log in to the unit a In the address field of any of the qualified web browsers enter https 192 168 1 1 The NETGEAR Configuration Manager Login screen displays b In the Username field enter admin and in the Password Passcode field enter password Use...

Page 318: ...Manage Users Authentication and VPN Certificates 318 NETGEAR ProSAFE VPN Firewall FVS318G v2 4 Click the Delete table button The information is deleted ...

Page 319: ...nt This chapter describes the tools for managing the network traffic to optimize its performance and the system management features of the VPN firewall The chapter contains the following sections Performance Management System Management ...

Page 320: ...0 Mbps In practice the WAN side bandwidth capacity is much lower when DSL or cable modems are used to connect to the Internet The typical traffic rate is 1 5 Mbps As a result and depending on the traffic that is being carried the WAN side of the VPN firewall is the limiting factor for the data rate for most installations Features That Reduce Traffic You can adjust the following features of the VPN...

Page 321: ...see Outbound Rules on page 128 and Add Customized Services on page 176 LAN users or DMZ users You can specify which computers on your network are affected by an outbound rule Several options are available Any The rule applies to all computers and devices on your LAN Single address The rule applies to the address of a particular computer Address range The rule applies to a range of addresses Groups...

Page 322: ...d To reduce traffic the VPN firewall provides the following methods to filter web content Keyword blocking You can specify words that if they appear in the website name URL or newsgroup name cause that site or newsgroup to be blocked by the VPN firewall Web object blocking You can block the following web component types embedded objects ActiveX and Java proxies and cookies To further narrow down t...

Page 323: ...rules see Inbound Rules on page 130 For detailed procedures about how to configure inbound rules see Configure LAN WAN Rules on page 134 and Configure DMZ WAN Rules on page 144 When you define inbound firewall rules you can further refine their application according to the following criteria Services You can specify the services or applications to be covered by an inbound rule If the desired servi...

Page 324: ...ly them to inbound LAN WAN rules to limit traffic You cannot apply bandwidth profiles to DMZ WAN rules For information about how to define bandwidth profiles see Create Bandwidth Profiles on page 180 Port Triggering Port triggering allows some applications running on a LAN network to be available to external applications that would otherwise be partially blocked by the firewall Using the port trig...

Page 325: ...o aim for optimum performance of the VPN firewall Set QoS Priorities The QoS priority settings determine the Quality of Service for the traffic passing through the VPN firewall You can assign a QoS priority to LAN WAN and DMZ WAN outbound firewall rules The QoS is set individually for each firewall rule You can change the mix of traffic through the WAN ports by granting some services a higher prio...

Page 326: ...anagement interface are both password NETGEAR recommends that you change the password for the administrator account to a more secure password and that you configure a separate secure password for the guest account After a factory defaults reset the password and time out value are changed back to password and five minutes respectively For general information about user accounts passwords and login ...

Page 327: ...nter the new password and confirm the new password The most secure password should no dictionary words from any language and is a mixture of letters both uppercase and lowercase numbers and symbols Your password can be up to 32 characters 6 To change the idle time out for an administrator login session enter a new number of minutes in the Idle Timeout field The default setting is five minutes 7 Cl...

Page 328: ... firewall s web management interface is accessible to anyone who knows its IP address and default password Because a malicious WAN user can reconfigure the VPN firewall and misuse it in many ways NETGEAR recommends that you change the admin and guest default passwords before continuing For more information see Configure Login Policies on page 299 and Change Passwords and Administrator and Guest Se...

Page 329: ...Network and System Management 329 NETGEAR ProSAFE VPN Firewall FVS318G v2 IPv4 In the upper right of the screen the IPv4 radio button is already selected by default Go to Step 4 ...

Page 330: ...h is the default setting To disable secure HTTP management select the No radio button Select the addresses through which access is allowed Everyone No IP addresses are restricted IP address range Only users who use devices in the specified IP address range can securely manage over an HTTP connection In the From fields type the start IP address of the range in the To fields type the end IP address ...

Page 331: ...le Network Management Protocol SNMP forms part of the Internet Protocol Suite as defined by the Internet Engineering Task Force IETF SNMP is used in network management systems such as the NETGEAR ProSafe Network Management Software Allow Secure HTTP Management continued Port Number Enter the port number through which access is allowed The default port number is 443 Note The URL through which you c...

Page 332: ...k devices and to manage configurations statistics collection performance and security The VPN firewall supports SNMPv1 SNMPv2c and SNMPv3 To configure the SNMP settings 1 Log in to the unit a In the address field of any of the qualified web browsers enter https 192 168 1 1 The NETGEAR Configuration Manager Login screen displays b In the Username field enter admin and in the Password Passcode field...

Page 333: ... an RWUSER and the user guest is an ROUSER Security Level The level of security that indicates whether security is disabled NoAuthNoPriv Both authentication and privacy are disabled AuthNoPriv Authentication is enabled but privacy is disabled AuthPriv Both authentication and privacy are enabled The SNMP Configuration table shows the following columns IP Address The IP address of the SNMP manager S...

Page 334: ...he host IP address and receive traps enter an IP address with a subnet mask of 255 255 255 252 If you want to allow a subnet to access the VPN firewall through the host IP address and receive traps enter an IP address with a subnet mask of 255 0 0 0 The traps are received at the IP address but almost the entire subnet is allowed access through the community string SNMP Version From the list select...

Page 335: ... that you want to modify click the Edit button 4 Modify the settings as described in Table 74 on page 334 5 Click the Apply button Your changes are saved To delete one or more SNMP configurations 1 Log in to the unit a In the address field of any of the qualified web browsers enter https 192 168 1 1 The NETGEAR Configuration Manager Login screen displays b In the Username field enter admin and in ...

Page 336: ...field enter password Use lowercase letters If you changed the password enter your personalized password Leave the domain as it is geardomain c Click the Login button The Router Status screen displays After five minutes of inactivity which is the default login time out you are automatically logged out 2 Select Administration SNMP The SNMP screen displays 3 In the Action column of the SNMPv3 User ta...

Page 337: ...d Make a selection from the Authentication Algorithm list and enter an authentication password AuthPriv Authentication and privacy are enabled Make a selection from the Authentication Algorithm list and enter an authentication password In addition make a selection from the Privacy Algorithm list and enter a privacy password Authentication Algorithm From the list select the protocol for authenticat...

Page 338: ...guration file to a computer If necessary you can later restore the VPN firewall settings from this file The Backup Restore Settings screen lets you do the following Back up and save a copy of the current settings see Back Up Settings on page 339 Restore saved settings from the backed up file see Restore Settings on page 340 Revert to the factory default settings see Revert to Factory Default Setti...

Page 339: ...1 1 The NETGEAR Configuration Manager Login screen displays b In the Username field enter admin and in the Password Passcode field enter password Use lowercase letters If you changed the password enter your personalized password Leave the domain as it is geardomain c Click the Login button The Router Status screen displays After five minutes of inactivity which is the default login time out you ar...

Page 340: ...ersion Restoring settings from a different software version can corrupt your backup file or the VPN firewall system software To restore settings from a backup file 1 Log in to the unit a In the address field of any of the qualified web browsers enter https 192 168 1 1 The NETGEAR Configuration Manager Login screen displays b In the Username field enter admin and in the Password Passcode field ente...

Page 341: ...l until the settings are fully restored The VPN firewall reboots During the reboot process the Settings Backup and Firmware Upgrade screen might remain visible or a status message with a counter might show the number of seconds left until the reboot process is complete The reboot process takes about 165 seconds If you can see the unit the reboot process is complete when the Test LED on the front p...

Page 342: ...e rear panel of the VPN firewall The Test LED lights and blinks for about 30 seconds The VPN firewall reboots The reboot process takes about 165 seconds The reboot process is complete when the Test LED on the front panel turns off Management Interface Method To reset the VPN firewall to the original factory defaults settings 1 Log in to the unit a In the address field of any of the qualified web b...

Page 343: ...rade screen To view the current version of the firmware that the VPN firewall is running log in to the unit and from the main menu select Monitoring The Router Status screen displays showing the firmware version in the System Info section of the screen After you update the firmware the new firmware version is displayed In some cases such as a major upgrade it might be necessary to erase the config...

Page 344: ...automatically logged out 2 Select Administration Settings Backup Upgrade 3 In the Router Upgrade section click the Browse button 4 Locate and select the downloaded firmware file 5 Click Upload The upgrade process starts During the upgrade process the Settings Backup and Firmware Upgrade screen remains visible and a status bar shows the progress of the upgrade process The upgrade process can take u...

Page 345: ...elect the default NTP servers or if you enter a custom server FQDN the VPN firewall determines the IP address of the NTP server by performing a DNS lookup Before the VPN firewall can perform this lookup you must configure a DNS server address on the Broadband ISP Settings screen For more information see Manually Configure an IPv4 Internet Connection on page 31 To set time date and NTP servers 1 Lo...

Page 346: ... box is cleared Force IPv6 address resolution for servers Select this check box to force the use of IPv6 addresses and FQDN domain name resolution in the Server 1 Name IP Address and Server 2 Name IP Address fields when you select the Use Custom NTP Servers radio button NTP Servers default or custom Select a NTP server option Use Default NTP Servers The VPN firewall regularly updates its RTC by co...

Page 347: ...Apply button Your changes are saved NTP Servers custom Server 1 Name IP Address Enter the IP address or host name of the primary NTP server Server 2 Name IP Address Enter the IP address or host name of the backup NTP server Table 77 Time Zone screen settings continued Setting Description ...

Page 348: ... tunnels and more In addition the diagnostics utilities are described The chapter contains the following sections Enable the WAN Traffic Meter Configure Logging Alerts and Event Notifications View the Status Diagnostics Utilities All log and report functions that are part of the Firewall Logs E mail screen and some of the functions that are part of the Diagnostics screen require that you configure...

Page 349: ... WAN port 1 Log in to the unit a In the address field of any of the qualified web browsers enter https 192 168 1 1 The NETGEAR Configuration Manager Login screen displays b In the Username field enter admin and in the Password Passcode field enter password Use lowercase letters If you changed the password enter your personalized password Leave the domain as it is geardomain c Click the Login butto...

Page 350: ...t Monitoring Traffic Meter The Internet Traffic Statistics section in the lower part of the screen displays statistics on Internet traffic through the WAN port If you did not enable the traffic meter these statistics are not available 3 Enter the settings as described in the following table ...

Page 351: ...default setting is 0 MB Increase this month limit by Select this check box to temporarily increase a previously specified monthly traffic volume limit and enter the additional allowed volume in MB The default setting is 0 MB Note When you click the Apply button to save these settings this field is reset to 0 MB so that the increase is applied only once This month limit This is a nonconfigurable fi...

Page 352: ...ys After five minutes of inactivity which is the default login time out you are automatically logged out 2 Select Monitoring Traffic Meter The Broadband Traffic Meter screen displays When Limit is reached Block Traffic Select which action the VPN firewall performs when the traffic limit is reached Block All Traffic All incoming and outgoing Internet and email traffic is blocked Block All Traffic E...

Page 353: ...server secure login attempts and reboots and to log other events You can also schedule logs to be sent to the administrator and enable logs to be sent to a syslog server on the network Enabling routing and other event logs might generate a significant volume of log messages NETGEAR recommends that you enable firewall logs for debugging purposes only Note This release does not support sending the N...

Page 354: ...rformance 354 NETGEAR ProSAFE VPN Firewall FVS318G v2 The Router Status screen displays After five minutes of inactivity which is the default login time out you are automatically logged out 2 Select Monitoring Firewall Logs E mail ...

Page 355: ... Login Attempts Logs a message when a secure login is attempted Both successful and failed secure login attempts are logged Reboots Logs a message when the VPN firewall is rebooted through the web management interface No message is logged when the factory default Reset button is pressed All Unicast Traffic All incoming unicast packets are logged All Broadcast Multicast Traffic All incoming broadca...

Page 356: ...not require authentication Login Plain The SMTP server requires authentication with regular login Specify the user name and password to be used for authentication CRAM MD5 The SMTP server requires authentication with CRAM MD5 login Specify the user name and password to be used for authentication Username The user name for SMTP server authentication Password The password for SMTP server authenticat...

Page 357: ...yslog server select the Yes radio button Complete the fields that are shown on the right side of the screen To prevent the logs from being sent select the No radio button which is the default setting SysLog Server The IP address or FQDN of the syslog server SysLog Severity All the logs with a severity that is equal to and above the severity that you specify are logged on the specified syslog serve...

Page 358: ...plays After five minutes of inactivity which is the default login time out you are automatically logged out 2 Select VPN IPSec VPN VPN Wizard The VPN Wizard screen displays 3 Configure a gateway to gateway VPN tunnel using the following information Connection name Any name of your choice Pre shared key Any key of your choice Remote WAN IP address 10 0 0 2 Local WAN IP address 10 0 0 1 Remote LAN I...

Page 359: ...the Start IP fields type 10 0 0 2 which is the WAN IP address of Gateway 2 6 Click the Apply button Your changes are saved Configure Gateway 2 at Site 2 To create a gateway to gateway VPN tunnel to Gateway 1 using the IPSec VPN wizard 1 Log in to the unit a In the address field of any of the qualified web browsers enter https 192 168 1 1 The NETGEAR Configuration Manager Login screen displays b In...

Page 360: ...fault login time out you are automatically logged out 2 Select VPN IPSec VPN VPN Policies The VPN Policy screen displays 3 Next to the policy name for the Gateway 2 to Gateway 1 autopolicy click the Edit button The Edit VPN Policy screen displays 4 In the General section clear the Enable NetBIOS check box 5 In the Traffic Selector section make the following changes From the Local IP list select Si...

Page 361: ...View the Status This section contains the following topics View the System Status View the VPN Connection Status and L2TP Users View the VPN Logs View the Port Triggering Status View the WAN Port Status View the Attached Devices and the DHCP Log View the System Status When you start the VPN firewall the default screen that displays is the Router Status screen The Router Status screen and Detailed ...

Page 362: ...GEAR Configuration Manager Login screen displays b In the Username field enter admin and in the Password Passcode field enter password Use lowercase letters If you changed the password enter your personalized password Leave the domain as it is geardomain c Click the Login button The Router Status screen displays After five minutes of inactivity which is the default login time out you are automatic...

Page 363: ...ofile on page 61 DHCP Relay The status of the IPv4 DHCP relay Enabled or Disabled For information about configuring the IPv4 DHCP relay see Configure a VLAN Profile on page 61 DHCPv6 Server The status of the DHCPv6 server Enabled or Disabled for the LAN For information about configuring the DHCPv6 server for the LAN see Manage the IPv6 LAN on page 78 DMZ IPv6 Information IPv6 Address The IPv6 addr...

Page 364: ...are automatically logged out 2 Select Monitoring Router Status The Router Status screen displays 3 Click the Show Statistics option arrow The following table explains the fields of the Router Statistics screen Table 81 Router Statistics screen information Item Description System up Time The period since the last time that the VPN firewall was started Router Statistics The following statistics are ...

Page 365: ...en displays b In the Username field enter admin and in the Password Passcode field enter password Use lowercase letters If you changed the password enter your personalized password Leave the domain as it is geardomain c Click the Login button The Router Status screen displays After five minutes of inactivity which is the default login time out you are automatically logged out Tx B s The number of ...

Page 366: ...Monitor System Access and Performance 366 NETGEAR ProSAFE VPN Firewall FVS318G v2 2 Select Monitoring Router Status Detailed Status ...

Page 367: ...e the same MAC address as the default VLAN LAN port 8 can be assigned as the DMZ port in which case it was assigned a MAC address that differs from the other LAN ports For information about configuring the DMZ port see Enable and Configure the DMZ Port for IPv4 and IPv6 Traffic on page 96 IP Address The IP address for this port If the port is part of the default VLAN the IP address is the default ...

Page 368: ...ed to the Internet over an IPv4 address For information about configuring the IPv4 address of the WAN port see Configure the IPv4 Internet Connection and WAN Settings on page 26 IPv6 Connection State The IPv6 connection state can be either Connected or Not Connected depending on whether the WAN interface is connected to the Internet over an IPv6 address For information about configuring the IPv6 a...

Page 369: ...ogin time out you are automatically logged out 2 Select Monitoring Router Status VLAN Status The VLAN Status table contains a list of configured VLANs both enabled and disabled The VLAN Status table shows the following fields Profile Name The unique identifier assigned to this VLAN profile VLAN ID The VLAN tag associated with this profile between 2 and 4089 1 is the default VLAN ID MAC Address Con...

Page 370: ...atus The IPv6 Tunnel Status table shows the following fields Tunnel Name The tunnel name for the 6to4 tunnel is always sit0 WAN1 SIT stands for simple Internet transition the tunnel name for an ISATAP tunnel is isatapx LAN in which x is an integer IPv6 Address The IPv6 address of the local tunnel endpoint View the VPN Connection Status and L2TP Users The Connection Status screens display a list of...

Page 371: ...users 1 Log in to the unit a In the address field of any of the qualified web browsers enter https 192 168 1 1 The NETGEAR Configuration Manager Login screen displays b In the Username field enter admin and in the Password Passcode field enter password Use lowercase letters If you changed the password enter your personalized password Leave the domain as it is geardomain c Click the Login button Th...

Page 372: ...he domain as it is geardomain c Click the Login button The Router Status screen displays After five minutes of inactivity which is the default login time out you are automatically logged out 2 Select Monitoring VPN Logs View the Port Triggering Status To view the status of the port triggering feature 1 Log in to the unit a In the address field of any of the qualified web browsers enter https 192 1...

Page 373: ...the IPv4 and IPv6 WAN connections the DNS servers and the DHCP servers Table 83 Port Triggering Status screen information Item Description The sequence number of the rule onscreen Rule The name of the port triggering rule that is associated with this entry LAN IP Address The IP address of the computer or device that is using this rule Open Ports The incoming ports that are associated with this rul...

Page 374: ...minutes of inactivity which is the default login time out you are automatically logged out 2 Select Network Configuration WAN Settings Broadband ISP Settings IPv4 The Broadband ISP Settings IPv4 screen displays 3 In the upper right of the screen click the Broadband Status option arrow The type of connection determines the information that is displayed on the Connection Status screen The screen can...

Page 375: ...band ISP Settings IPv6 screen displays IP Address The addresses that were automatically detected or that you configured on the Broadband ISP Settings IPv4 screen Note For more information see Let the VPN Firewall Automatically Detect and Configure an IPv4 Internet Connection on page 28 and Manually Configure an IPv4 Internet Connection on page 31 Subnet Mask Gateway DNS Server DHCP Server DHCP onl...

Page 376: ... known computers and network devices that are assigned dynamic IP addresses by the VPN firewall were discovered by other means or were manually added Collectively these entries make up the network Table 85 Connection Status screen information for an IPv6 connection Item Description Connection Time The period that the VPN firewall is connected through the WAN port IPv6 Connection Type The connectio...

Page 377: ...n button The Router Status screen displays After five minutes of inactivity which is the default login time out you are automatically logged out 2 Select Network Configuration LAN Setup LAN Groups For each attached computer or device the Known PCs and Devices table displays the following fields Check box Allows you to select the computer or device in the table Name The name of the computer or devi...

Page 378: ...ttps 192 168 1 1 The NETGEAR Configuration Manager Login screen displays b In the Username field enter admin and in the Password Passcode field enter password Use lowercase letters If you changed the password enter your personalized password Leave the domain as it is geardomain c Click the Login button The Router Status screen displays After five minutes of inactivity which is the default login ti...

Page 379: ...d and download the packet information For normal operation diagnostic tools are not required To display the Diagnostics screen 1 Log in to the unit a In the address field of any of the qualified web browsers enter https 192 168 1 1 The NETGEAR Configuration Manager Login screen displays b In the Username field enter admin and in the Password Passcode field enter password Use lowercase letters If y...

Page 380: ...IPv4 In the upper right of the screen the IPv4 radio button is already selected by default IPv6 Select the IPv6 radio button The various tasks that you can perform on the Diagnostics screen are described in the following sections Send a Ping Packet Trace a Route Look Up a DNS Address ...

Page 381: ...nter your personalized password Leave the domain as it is geardomain c Click the Login button The Router Status screen displays After five minutes of inactivity which is the default login time out you are automatically logged out 2 Select Monitoring Diagnostics The Diagnostics screen displays the IPv4 settings 3 Specify the IP version for the screen that you want For IPv4 in the IP Address Domain ...

Page 382: ...you want to trace For IPv6 in the Domain Name field enter the domain name that you want to trace You cannot enter an IP address 4 If the specified address is reached through a VPN tunnel select the Ping through VPN tunnel check box and then select a VPN policy from the Select VPN Policy list 5 Click the Trace Route button The results of the traceroute are displayed in a new screen To return to the...

Page 383: ...ddress field of any of the qualified web browsers enter https 192 168 1 1 The NETGEAR Configuration Manager Login screen displays b In the Username field enter admin and in the Password Passcode field enter password Use lowercase letters If you changed the password enter your personalized password Leave the domain as it is geardomain c Click the Login button The Router Status screen displays After...

Page 384: ...er Status screen displays After five minutes of inactivity which is the default login time out you are automatically logged out 2 Select Monitoring Diagnostics The Diagnostics screen displays the IPv4 settings 3 Specify the IP version for the screen that you want 4 In Router Options section next to Capture Packets click the Packet Trace button 5 From the Select Network list select the physical or ...

Page 385: ...of any of the qualified web browsers enter https 192 168 1 1 The NETGEAR Configuration Manager Login screen displays b In the Username field enter admin and in the Password Passcode field enter password Use lowercase letters If you changed the password enter your personalized password Leave the domain as it is geardomain c Click the Login button The Router Status screen displays After five minutes...

Page 386: ...nter a URL or IP Address a Time Out Error Occurs on page 389 I cannot access the Internet or the LAN Go to Troubleshoot the ISP Connection on page 389 I am experiencing problems with the IPv6 connection Go to Troubleshooting the IPv6 Connection on page 391 I am experiencing problems with the LAN connection Go to Troubleshoot a TCP IP Network Using a Ping Utility on page 395 I want to clear the con...

Page 387: ... Off LAN or WAN Port LEDs Not On Power LED Not On If the Power and other LEDs are off when your VPN firewall is turned on make sure that the power cord is correctly connected to your VPN firewall and that the power supply adapter is correctly connected to a functioning power outlet If the error persists a hardware problem occurred Contact NETGEAR technical support Test LED Never Turns Off When the...

Page 388: ... s IP address is shown as 169 254 x x Windows and Mac operating systems generate and assign an IP address if the computer cannot reach a DHCP server These autogenerated addresses are in the range of 169 254 x x If your IP address is in this range check the connection from the computer to the VPN firewall and reboot your computer If your VPN firewall s IP address was changed and you do not know the...

Page 389: ...t your computer s TCP IP settings are correct If you use a fixed static IP address check the subnet mask default gateway DNS and IP addresses on the Broadband ISP Settings screen For more information see Manually Configure an IPv4 Internet Connection on page 31 If the computer is configured correctly but still not working ensure that the VPN firewall is connected and turned on Connect to the web m...

Page 390: ...d Settings screen displays the IPv6 settings b Click the Status option arrow The Connection Status pop up screen for IPv6 displays 4 Check that an IP address is shown for the WAN port If an IP address with zeros only is shown or if no IP address is shown the VPN firewall did not obtain an IP address from your ISP or for IPv6 did not obtain or generate an IP address If your VPN firewall is unable t...

Page 391: ...s and Other Tasks on page 52 If your VPN firewall can obtain an IP address but an attached computer is unable to load any web pages from the Internet it might be for one of the following reasons Your computer might not recognize any DNS server addresses A DNS server is a host on the Internet that translates Internet names such as www netgear com to numeric IP addresses Typically your ISP provides ...

Page 392: ...ns Windows Vista all 32 bit and 64 bit versions Windows XP Professional SP3 32 bit and 64 bit Windows Server 2008 all versions Windows Server 2008 R2 all versions Windows Server 2003 all versions Windows Server 2003 R2 all versions Linux and other UNIX based systems with a correctly configured kernel MAC OS X Make sure that IPv6 is enabled on the computer On a computer that runs a Windows based op...

Page 393: ...ses a link local address only it cannot reach the VPN firewall or the Internet On a computer that runs a Windows based operating system do the following the steps might differ on the various Windows operating systems a Open the Network Connections screen or the Network and Sharing Center screen For example on the Windows taskbar click Start select Control Panel and select Network Connections b Cli...

Page 394: ...2 c Click or double click View status of this connection d Make sure that Internet access shows for the IPv6 connection The previous figure shows that the device is not connected to the Internet e Click the Details button f Make sure that an IPv6 address shows ...

Page 395: ...ur computer to verify that the LAN path to the VPN firewall is set up correctly To ping the VPN firewall from a computer running Windows 95 or later 1 From the Windows taskbar click Start and select Run 2 In the field provided type ping followed by the IP address of the VPN firewall For example ping 192 168 1 1 3 Click the OK button A message similar to the following displays Pinging IP address wi...

Page 396: ...k to see that the network address of your computer the portion of the IP address that is specified by the netmask is different from the network address of the remote device Check that the modem dish or router is connected and functioning For IPv4 connections if your ISP assigned a host name system name or account name to your computer enter that name in the Account Name field on the Broadband ISP ...

Page 397: ...ttings Backup and Firmware Upgrade screen 1 Log in to the unit a In the address field of any of the qualified web browsers enter https 192 168 1 1 The NETGEAR Configuration Manager Login screen displays b In the Username field enter admin and in the Password Passcode field enter password Use lowercase letters If you changed the password enter your personalized password Leave the domain as it is ge...

Page 398: ...Protocol NTP to obtain the current time from one of several network time servers on the Internet Each entry in the log is stamped with the date and time of day Problems with the date and time function can include the following Date shown is January 1 2000 Cause The VPN firewall did not yet successfully reach a network time server Check that your Internet access settings are configured correctly If...

Page 399: ...and Technical Specifications This appendix provides the default settings and the physical and technical specifications of the VPN firewall in the following sections Factory Default Settings Physical and Technical Specifications ...

Page 400: ... Pressing the factory default Reset button for a shorter period causes the VPN firewall to reboot The following table shows the default configuration settings for the VPN firewall Table 86 VPN firewall factory default configuration settings Feature Default Behavior Login settings User login URL https 192 168 1 1 Administrator user name case sensitive admin Administrator login password case sensiti...

Page 401: ...the same MAC address Broadcast of ARP packets Enabled for the default VLAN DMZ port for IPv4 Disabled DMZ IPv4 address Port 8 172 16 2 1 DMZ IPv4 subnet mask Port 8 255 255 255 0 DMZ DHCP server Disabled DMZ DHCP IPv4 starting address 176 16 2 100 DMZ DHCP IPv4 ending address 176 16 2 254 RIP direction None RIP version Disabled RIP authentication Disabled IPv6 LAN and DMZ settings LAN IPv6 address...

Page 402: ...Stealth mode Enabled TCP flood Enabled UDP flood Enabled Respond to ping on LAN ports Disabled IPv4 VPN pass through for IPSec in NAT mode Enabled IPv4 VPN pass through for PPTP in NAT mode Enabled IPv4 VPN pass through for L2TP in NAT mode Enabled IPv6 VPN pass through for IPSec Enabled Multicast pass through for IGMP Disabled Jumbo frames Disabled Session limits Disabled TCP time out 1800 second...

Page 403: ...settings for IPv4 and IPv6 gateway to gateway tunnels Exchange mode Main ID type Local WAN IP address Local WAN ID Local WAN IP address Remote WAN ID Not applicable Encryption algorithm 3DES Authentication algorithm SHA 1 Authentication method Pre shared key Key group DH Group 2 1024 bit Lifetime Eight hours VPN IPSec Wizard VPN policy settings for IPv4 and IPv6 gateway to gateway tunnels Encrypti...

Page 404: ...ard VPN policy settings for IPv4 gateway to client tunnels Encryption algorithm 3DES Authentication algorithm SHA 1 Life time One hour Key group DH Group 2 1024 bit NetBIOS Disabled RADIUS settings Primary RADIUS server Disabled and none configured Secondary RADIUS server Disabled and none configured RADIUS time out period 30 seconds RADIUS maximum retry count Four User group and domain settings d...

Page 405: ... event logs Disabled Email logs Disabled Syslogs Disabled IPSec VPN logs Enabled Table 87 VPN firewall physical and technical specifications Feature Specification Network protocol and standards compatibility Data and Routing Protocols TCP IP RIP 1 RIP 2 PPP over Ethernet PPPoE DHCP DHCPv6 Power plug localized to the country of sale North America 120V 60 Hz input United Kingdom Australia 240V 50 Hz...

Page 406: ... specifications LAN Eight LAN autosensing 10 100 1000BASE T RJ 45 one of which is a configurable DMZ interface WAN One WAN autosensing 10 100 1000BASE T RJ 45 One administrative console port RS 232 Table 88 VPN firewall IPSec VPN specifications Setting Specification Network management Web based configuration and status monitoring Number of concurrent users supported 12 IPSec authentication algorit...

Page 407: ...ppendix provides an overview of two factor authentication and an example of how to implement the WiKID solution This appendix contains the following sections Why Do I Need Two Factor Authentication NETGEAR Two Factor Authentication Solutions ...

Page 408: ...words or users cannot remember complex and unique passwords One time passcode OTP strengthens and replaces the need to remember complex password No need to replace existing hardware Two factor authentication can be added to existing NETGEAR products through a firmware upgrade Quick to deploy and manage The WiKID solution integrates seamlessly with the NETGEAR VPN firewall products Proven regulator...

Page 409: ... solution So instead of using only Windows Active Directory or LDAP as the authentication server administrators now can use WiKID to perform two factor authentication on NETGEAR VPN firewall products The WiKID solution is based on a request response architecture where a one time passcode OTP which is time synchronized with the authentication server is generated and sent to the user after the valid...

Page 410: ... time synchronized to the authentication server so that the OTP can be used only once and must be used before the expiration time If a user does not use this passcode before it expires the user must go through the request process again to generate a new OTP 3 Proceed to the 2 Factor Authentication login screen and enter the one time passcode as the login password ...

Page 411: ...PnP information 211 AES Advanced Encryption Standard IKE policy settings 244 Mode Config settings 264 SNMPv3 user settings 337 VPN policy settings 254 255 ALG application level gateway 175 application level gateway ALG 175 ARP Address Resolution Protocol broadcasting configuring 69 requests 72 arrows option web management interface 21 attached devices monitoring with SNMP 332 viewing 376 attack ch...

Page 412: ... SNMP 334 compatibility protocols and standards 405 concatenating IPv6 addresses 48 configuration file managing 338 341 configuration manager web management interface login 19 menu 21 configuration settings defaults 400 connection reset PPPoE broadband connection 33 connection to Internet testing 55 connection type and state WAN viewing 368 console port 16 content filtering configuring 190 cookies...

Page 413: ...MZ configuring 103 LAN configuring 82 WAN configuring 41 diagnostics tools 379 Diffie Hellman DH groups 240 245 256 264 digital certificates See certificates dimensions 405 direction bandwidth profiles 181 DMZ demilitarized zone configuring 96 111 increasing traffic 324 port 10 15 DNS 35 37 DNS Domain Name Server automatic configuration of computers 11 dynamic 35 38 looking up an address 382 Mode ...

Page 414: ...domain names See FQDNs G gateway ISP IPv4 address 34 IPv6 address 43 global addresses IPv6 48 global IPv6 tunnels DMZ configuring for 109 LAN configuring for 92 groups LAN groups 74 77 VPN policies 292 guests user account 296 298 GUI graphical user interface described 21 troubleshooting 388 H hardware front panel ports and LEDs 14 rear panel components 16 Help button web management interface 22 ho...

Page 415: ...C bindings 199 requirements 22 reserved 78 secondary LAN 69 SIIT address 52 static or permanent 30 34 subnet mask default 64 subnet mask DMZ port 98 VPN tunnels 215 222 244 254 IPv4 DMZ configuring 96 100 IPv4 gateway 34 IPv4 Internet connection autodetecting 28 manually configuring 31 setting up 25 IPv4 ISP logging in 31 IPv4 routing modes 26 IPv6 addresses autoconfiguration 40 82 103 concatenati...

Page 416: ...city 320 default settings 401 groups assigning and managing 74 77 IPv4 settings configuring 58 IPv6 settings configuring 80 Known PCs and Devices table 73 74 network database 72 76 port status viewing 367 prefixes IPv6 79 86 secondary IPv4 addresses 69 secondary IPv6 addresses 93 testing the LAN path 395 LAN groups keyword blocking 193 LAN LEDs 15 388 LAN ports 9 13 LAN security checks 171 Layer 2...

Page 417: ...MZ packets 108 IPv6 LAN packets 90 multicast pass through 171 multihome LAN addresses IPv4 configuring 69 71 IPv6 configuring 93 95 N names changing DDNS host and domain 37 ISP login 32 known PCs and devices 74 LAN groups 77 PPTP and PPPoE accounts 32 NAS Network Access Server 260 NAT Network Address Translation configuring 27 described 11 firewall use with 126 mapping one to one described 27 rule...

Page 418: ...es IKE exchange mode 240 243 ISAKMP identifier 240 244 managing 238 Mode Config operation 243 264 XAUTH 246 IPSec VPN automatically generated 247 groups configuring 292 managing 238 manually generated 247 pools Mode Config operation 263 port filtering reducing traffic 320 rules 127 port forwarding firewall rules 127 130 increasing traffic 131 reducing traffic 323 port membership VLANs 64 port numb...

Page 419: ...amon DMZ configuring for 106 LAN configuring for 88 RAs router advertisements DMZ configuring for 108 LAN configuring for 90 read only and read write access 296 rebooting 385 reducing traffic 320 322 relay gateway 65 99 Remote Authentication Dial In User Service See RADIUS authentication See RADIUS servers remote management access 328 remote users assigning addresses Mode Config 261 reserved IPv4 ...

Page 420: ...reducing traffic 322 specifications physical and technical 405 speed ports 54 SPI security parameters index 254 SPI stateful packet inspection 10 126 spoofing MAC addresses 391 stateful packet inspection SPI 10 126 stateless and stateful IPv6 addresses autoconfiguration 40 82 103 Stateless IP ICMP Translation SIIT 51 static addresses IPv4 address 30 34 IPv6 address 43 static routes IPv4 routes con...

Page 421: ...AN configuring for 90 upgrading firmware 343 UPnP Universal Plug and Play configuring 210 user accounts configuring 295 User Datagram Protocol UDP 208 user interface described 21 troubleshooting 388 user name default 19 user passwords changing 306 user types 296 298 307 users active VPN and L2TP 370 371 administrative admin settings 326 assigned groups 298 login policies configuring 299 306 login ...

Page 422: ...hared key client to gateway tunnel 221 gateway to gateway tunnel 215 218 IKE policy settings 245 RSA signature 245 sending syslogs 357 testing connections 234 XAUTH 257 259 VPNC Virtual Private Network Consortium 11 213 W WAN bandwidth capacity 320 connection type and state viewing 368 default settings 400 DHCPv6 client prefix delegation 40 41 WAN LEDs 15 388 WAN ports 13 WAN traffic meter or coun...

Reviews: