background image

19

A

A.   

Physical and Technical Specifications

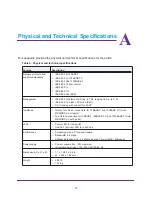
This appendix provides the physical and technical specifications for the switch. 

Table 4.  Physical and technical specifications


Feature

Description

Network protocols and 
supported standards

IEEE 802.3i 10BASE-T

IEEE 802.3u 100BASE-TX

IEEE 802.3ab 1000BASE-T

IEEE 802.3x flow control

IEEE 802.1x

IEEE 802.1D

IEEE 802.3az (EEE)

Management

IEEE 802.1Q static VLAN (up to 128, ranging from 2 to 4 K)

IEEE 802.1p Class of Service (CoS)

Port trunking with support for LACP

Interfaces

Twenty-four RJ-45 connectors for 10BASE-T and 100BASE-TX (Auto 
MDI/MIDX on all ports)

Two RJ-45 connectors for 10BASE-T, 100BASE-TX, and 1000BASE-T (Auto 
MDI/MIDX on both ports)

LEDs

Power LED for the switch

Link/ACT (activity) LED for each port

Performance

Forwarding mode. Store-and-forward

Bandwidth. 8.8 Gbps

Address database size. 8 k Media Access Control (MAC) addresses

Power supply

Power consumption. 12W maximum

Universal power input. 100–240 VAC/50–60 Hz

Dimensions (H x W x D)

1.7 x 12.83 x 6.6 in.

43 x 326 x 168 mm

Weight

2.98 lb

1.35 kg

Summary of Contents for ProSAFE FS526Tv2

Page 1: ...350 East Plumeria Drive San Jose CA 95134 USA July 2013 202 11251 02 ProSAFE 26 Port Fast Ethernet Smart Switch FS526Tv2 Hardware Installation Guide ...

Page 2: ... only 1 888 NETGEAR Phone Other Countries Check the list of phone numbers at http support netgear com general contact default aspx Trademarks NETGEAR the NETGEAR logo and Connect with Innovation are trademarks and or registered trademarks of NETGEAR Inc and or its subsidiaries in the United States and or other countries Information is subject to change without notice NETGEAR Inc All rights reserve...

Page 3: ... the Switch 12 Install the Switch on a Flat Surface 12 Install the Switch in a Rack 13 Step 3 Check the Installation 14 Step 4 Connect Devices to the Switch 14 Step 5 Apply AC Power 15 Step 6 Manage the Switch through a Web Browser or through the Smart Control Center 15 Chapter 3 Troubleshooting Troubleshooting Chart 17 Troubleshooting Suggestions 17 Network Adapter Cards 17 Configuration 18 Switc...

Page 4: ... LEDs Product Label RJ 45 Ports Factory Defaults Button and Reset Button Note For more information about the topics covered in this manual visit the support website at support netgear com Note Firmware updates with new features and bug fixes are made available from time to time on downloadcenter netgear com Some products can regularly check the site and download new firmware or you can check for a...

Page 5: ...imple and intuitive manner The switch s management features include configuration for port and switch information VLAN for traffic control port trunking for increased bandwidth and Class of Service CoS for traffic prioritization Initial discovery of the switch on the network requires the Smart Control Center a utility that runs on a computer You can use the switch freestanding or rack mounted in a...

Page 6: ... with IEEE standards IEEE 802 3i 10BASE T IEEE 802 3u 100BASE TX IEEE 802 3x full duplex flow control IEEE 802 3ab 1000BASE T IEEE 802 3az EEE Autosensing and autonegotiating capabilities for all ports Auto MDI MIDX technology is supported on all ports Automatic address learning function to build the packet forwarding information table The table contains up to 8 K Media Access Control MAC addresse...

Page 7: ...h 35 0 Ea st Plu me ria Dr ive Sa n Jo se CA 95 13 4 US A Ju ne 20 13 20 2 1 12 51 01 35 0 Ea st Plu me ria Dr ive Sa n Jo se CA 95 13 4 US A Ju ne 20 13 20 2 1 12 51 01 Figure 2 Package contents Verify that the package contains the following NETGEAR ProSAFE 26 Port Fast Ethernet Smart Switch FS526Tv2 Rubber footpads for tabletop installation Power cord Rack mount kit for installing the switch in ...

Page 8: ...t Ethernet ports 1 2 3 4 5 6 Figure 3 Front panel The front panel contains the following 1 Power LED 2 Recessed Factory Defaults button to restore the switch to the factory defaults 3 Recessed Reset button to reboot the switch 4 Twenty six Link ACT port LEDs 5 Twenty four RJ 45 10 100BASE T ports 6 Two RJ 45 Gigabit Ethernet uplink ports Back Panel The back panel provides a cable security lock rec...

Page 9: ...iptions Port LED Designation Not applicable system LED Power Off Power is disconnected Solid green Power is supplied to the switch and the switch is operating normally Twenty four 10 100BASE T ports one LED for each port Link ACT Off No link is established on the port Solid green A valid link at any speed is established on the port Blinking green Packet transmission or reception occurs on the port...

Page 10: ...cables When you insert a cable into the switch s RJ 45 port the switch automatically configures the RJ 45 port to enable communications with the attached device With Auto MDI MIDX technology you do not need to configure uplink connections and you do not need to think about whether to use crossover or straight through cables when you attach a device Factory Defaults Button and Reset Button The swit...

Page 11: ...lves the steps that are described in the following sections Step 1 Prepare the Site Step 2 Install the Switch Step 3 Check the Installation Step 4 Connect Devices to the Switch Step 5 Apply AC Power Step 6 Manage the Switch through a Web Browser or through the Smart Control Center ...

Page 12: ...ch ships with four self adhesive rubber footpads Stick one rubber footpad on each of the four concave spaces on the bottom of the switch The rubber footpads cushion the switch against shock and vibrations Desktop installations Provide a flat table or shelf surface Rack mount installations Use a 19 inch 48 3 centimeter EIA standard equipment rack that is grounded and physically secure You also need...

Page 13: ...switch in a rack 1 Attach the supplied mounting brackets to the side of the switch 2 Insert the screws provided in the rack mount kit through each bracket and into the bracket mounting holes in the switch 3 Tighten the screws with a No 1 Phillips screwdriver to secure each bracket 4 Align the mounting holes in the brackets with the holes in the rack and insert two pan head screws with nylon washer...

Page 14: ...es to the Switch The switch supports Auto MDI MIDX technology which allows you to attach devices using either straight through or crossover cables Note Ethernet specifications limit the cable length between the switch and an attached device to 100 meters 328 feet Figure 6 Connecting devices to ports on the front panel To connect a computer to an RJ 45 network port on the front panel of the switch ...

Page 15: ...solve the problem see Chapter 3 Troubleshooting Step 6 Manage the Switch through a Web Browser or through the Smart Control Center The switch contains management software that lets you view change and monitor the way the switch functions The management software is not required for the switch to function You can use the ports without using the management software However the management software let...

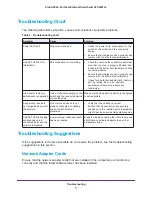
Page 16: ...16 3 3 Troubleshooting This chapter describes how you can troubleshoot the switch The chapter covers the following topics Troubleshooting Chart Troubleshooting Suggestions ...

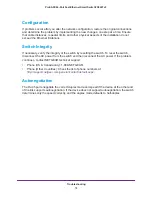
Page 17: ... any networked device to any other networked device Troubleshooting Suggestions If the suggestions in the previous table do not resolve the problem see the troubleshooting suggestions in this section Network Adapter Cards Ensure that the network adapter cards that are installed in the computers are functioning correctly and that the latest software driver has been installed Check the power cord co...

Page 18: ... integrity of the switch by resetting the switch To reset the switch disconnect the AC power from the switch and then reconnect the AC power If the problem continues contact NETGEAR technical support Phone US Canada only 1 888 NETGEAR Phone Other Countries Check the list of phone numbers at http support netgear com general contact default aspx Autonegotiation The RJ 45 ports negotiate the correct ...

Page 19: ...om 2 to 4 K IEEE 802 1p Class of Service CoS Port trunking with support for LACP Interfaces Twenty four RJ 45 connectors for 10BASE T and 100BASE TX Auto MDI MIDX on all ports Two RJ 45 connectors for 10BASE T 100BASE TX and 1000BASE T Auto MDI MIDX on both ports LEDs Power LED for the switch Link ACT activity LED for each port Performance Forwarding mode Store and forward Bandwidth 8 8 Gbps Addre...

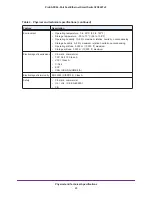
Page 20: ...condensing Storage humidity 5 95 maximum relative humidity noncondensing Operating altitude 3 000 m 10 000 ft maximum Storage altitude 3 000 m 10 000 ft maximum Electromagnetic emissions CE mark commercial FCC Part 15 Class A VCCI Class A C Tick KCC CAN ICES 3 A NMB 3 A Electromagnetic immunity EN 55022 CISPR 22 Class A Safety CE mark commercial UL cUL CE EN 60950 1 CB Table 4 Physical and technic...

Reviews: