background image

ProSecure Unified Threat Management UTM10 or UTM25 Reference Manual

5-36

Firewall Protection

v1.0, September 2009

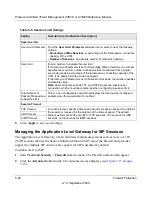
3.

Click 

Apply 

to save your changes. The modified QoS profile is displayed in the List of QoS 

Profiles table.

Creating Bandwidth Profiles

Bandwidth profiles determine the way in which data is communicated with the hosts. The purpose 
of bandwidth profiles is to provide a method for allocating and limiting traffic, thus allocating 
LAN users sufficient bandwidth while preventing them from consuming all the bandwidth on your 
WAN link.

For outbound traffic, you can apply bandwidth profiles on the available WAN interfaces in both 
the single WAN port mode and auto-rollover modes, and in load balancing mode on interface that 
you specify. For inbound traffic, you can apply bandwidth profiles to a LAN interface for all WAN 
modes. Bandwidth profiles do not apply to the DMZ interface. For example, when a new 
connection is established by a device, the device locates the firewall rule corresponding to the 
connection. 

If the rule has a bandwidth profile specification, the device creates a bandwidth class in the 
kernel. 

If multiple connections correspond to the same firewall rule, the connections all share the 
same bandwidth class.

An exception occurs for an individual bandwidth profile if the classes are per-source IP address 
classes. The source IP address is the IP address of the first packet that is transmitted for the 
connection. So for outbound firewall rules, the source IP address is the LAN-side IP address; for 
inbound firewall rules, the source IP address is the WAN-side IP address. The class is deleted 
when all the connections that are using the class expire.

After you have created a bandwidth profile, you can assign the bandwidth profile to firewall rules 
on the following screens:

Add LAN WAN Outbound Services screen (see 

Figure 5-3 on page 5-13

).

Add LAN WAN Inbound Services screen (see 

Figure 5-4 on page 5-14

).

To add and enable a bandwidth profile:

1.

Select 

Network


Security 

Firewall


Objects

 from the menu. The Firewall Objects submenu 

tabs appear, with the Services screen in view.

2.

Click the 

Bandwidth Profiles 

submenu tab.


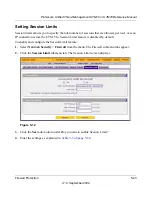
The Bandwidth Profiles screen displays (see 

Figure 5-23 on page 5-37

, which shows one profile in the List of Bandwidth Profiles table as 

an example).

Summary of Contents for UTM10 - ProSecure Unified Threat Management Appliance

Page 1: ...202 10482 01 September 2009 v1 0 NETGEAR Inc 350 East Plumeria Drive San Jose CA 95134 ProSecure Unified Threat Management UTM10 or UTM25 Reference Manual...

Page 2: ...he interference at his own expense Changes or modifications not expressly approved by NETGEAR could void the user s authority to operate the equipment EU Regulatory Compliance Statement The ProSecure...

Page 3: ...terference Read instructions for correct handling Additional Copyrights AES Copyright c 2001 Dr Brian Gladman brg gladman uk net Worcester UK All rights reserved TERMS Redistribution and use in source...

Page 4: ...D OR IMPLIED WARRANTIES INCLUDING BUT NOT LIMITED TO THE IMPLIED WARRANTIES OF MERCHANTABILITY AND FITNESS FOR A PARTICULAR PURPOSE ARE DISCLAIMED IN NO EVENT SHALL THE OpenSSL PROJECT OR ITS CONTRIBU...

Page 5: ...authors be held liable for any damages arising from the use of this software Permission is granted to anyone to use this software for any purpose including commercial applications and to alter it and...

Page 6: ...v1 0 September 2009 vi...

Page 7: ...liability or Outbound Load Balancing UTM25 Only 1 3 Advanced VPN Support for Both IPsec and SSL 1 3 A Powerful True Firewall 1 4 Stream Scanning for Content Filtering 1 4 Security Features 1 5 Autosen...

Page 8: ...ard Step 8 of 10 Administrator Email Notification Settings 2 23 Setup Wizard Step 9 of 10 Security Subscription Update Settings 2 24 Setup Wizard Step 10 of 10 Saving the Configuration 2 26 Verifying...

Page 9: ...work Database 4 16 Setting Up Address Reservation 4 17 Configuring and Enabling the DMZ Port 4 18 Managing Routing 4 22 Configuring Static Routes 4 23 Configuring Routing Information Protocol RIP 4 24...

Page 10: ...mail Anti Virus and Notification Settings 6 5 E mail Content Filtering 6 8 Protecting Against E mail Spam 6 11 Configuring Web and Services Protection 6 19 Customizing Web Protocol Scan Settings and S...

Page 11: ...TM 7 42 Configuring the ProSafe VPN Client for Mode Config Operation 7 49 Testing the Mode Config Connection 7 54 Configuring Keepalives and Dead Peer Detection 7 54 Configuring Keepalives 7 55 Config...

Page 12: ...ts 9 9 Setting User Login Policies 9 12 Changing Passwords and Other User Settings 9 16 Managing Digital Certificates 9 17 Managing CA Certificates 9 19 Managing Self Certificates 9 20 Managing the Ce...

Page 13: ...iewing Port Triggering Status 11 26 Viewing the WAN Ports Status 11 27 Viewing Attached Devices and the DHCP Log 11 29 Querying Logs and Generating Reports 11 32 Querying the Logs 11 32 Scheduling and...

Page 14: ...Network Planning for Dual WAN Ports UTM25 Only What to Consider Before You Begin B 1 Cabling and Computer Hardware Requirements B 3 Computer Network Configuration Requirements B 3 Internet Configurat...

Page 15: ...s C 14 E mail Filter Logs C 14 IPS Logs C 15 Port Scan Logs C 15 Instant Messaging Peer to Peer Logs C 15 Routing Logs C 16 LAN to WAN Logs C 16 LAN to DMZ Logs C 16 DMZ to WAN Logs C 16 WAN to LAN Lo...

Page 16: ...ProSecure Unified Threat Management UTM10 or UTM25 Reference Manual xvi v1 0 September 2009...

Page 17: ...ope of this manual are described in the following paragraphs Typographical conventions This manual uses the following typographical conventions Formats This manual uses the following formats to highli...

Page 18: ...ry Danger This is a safety warning Failure to take heed of this notice might result in personal injury or death Product Version ProSecure Unified Threat Management Appliance UTM10 or UTM25 Manual Publ...

Page 19: ...rough one or two external broadband access devices such as cable modems or DSL modems Dual wide area network WAN ports allow you to increase effective throughput to the Internet by utilizing both WAN...

Page 20: ...IPsec VPN tunnels and up to 5 UTM10 or 13 UTM25 dedicated SSL VPN tunnels Bundled with a 1 user license of the NETGEAR ProSafe VPN Client software VPN01L Advanced stateful packet inspection SPI firew...

Page 21: ...ections IPsec VPN delivers full network access between a central office and branch offices or between a central office and telecommuters Remote access by telecommuters requires the installation of VPN...

Page 22: ...enters the network As soon as a number of bytes are available scanning starts The scan engine continues to scan more bytes as they become available while at the same time another thread starts to deli...

Page 23: ...based on the service port number of the incoming request You can specify forwarding of single ports or ranges of ports DMZ port Incoming traffic from the Internet is normally discarded by the UTM unle...

Page 24: ...ctual DNS addresses from the ISP during connection setup and forwards DNS requests from the LAN PPP over Ethernet PPPoE PPPoE is a protocol for connecting remote hosts to the Internet over a DSL conne...

Page 25: ...iables for MIB2 Diagnostic functions The UTMl incorporates built in diagnostic functions such as Ping Trace Route DNS lookup and remote reboot Remote management The UTM allows you to login to the Web...

Page 26: ...t settings after you have entered the license keys to activate the UTM see Registering the UTM with NETGEAR on page 2 27 the license keys are erased The license keys and the different types of license...

Page 27: ...or damaged contact your NETGEAR dealer Keep the carton including the original packing materials in case you need to return the product for repair Hardware Features The front panel ports and LEDs rear...

Page 28: ...wn in Figure 1 2 and no Active WAN LEDs Table 1 1 LED Descriptions Object Activity Description Power On Green Power is supplied to the UTM Off Power is not supplied to the UTM Test On Amber during sta...

Page 29: ...rt On Green Port 4 is operating as a dedicated hardware DMZ port WAN Ports Left LED Off The WAN port has no physical link that is no Ethernet cable is plugged into the UTM On Green The WAN port has a...

Page 30: ...rate is 9600 K The pinouts are 2 Tx 3 Rx 5 and 7 Gnd 3 Factory default Reset button Using a sharp object press and hold this button for about eight seconds until the front panel Test light flashes to...

Page 31: ...fied Threat Management UTM10 or UTM25 Reference Manual Introduction 1 13 v1 0 September 2009 Figure 1 4 shows the product label for the UTM10 Figure 1 5 shows the product label for the UTM25 Figure 1...

Page 32: ...s Water or moisture cannot enter the case of the unit Airflow around the unit and through the vents in the side of the case is not restricted Provide a minimum of 25 mm or 1 inch clearance The air is...

Page 33: ...site at http prosecure netgear com or http kb netgear com app home 2 Log in to the UTM After logging in you are ready to set up and configure your UTM See Logging In to the UTM on page 2 2 3 Use the S...

Page 34: ...hat Java is only required for the SSL VPN portal not for the Web Management Interface Logging In to the UTM To connect to the UTM your computer needs to be configured to obtain an IP address automatic...

Page 35: ...first time that you remotely connect to the UTM with a browser via an SSL connection you might get a warning message regarding the SSL certificate You can follow to directions of your browser to acce...

Page 36: ...ember 2009 5 Click Login The Web Management Interface appears displaying the System Status screen Figure 2 2 on page 2 4 shows the top part of the UTM25 s screen For information about this screen see...

Page 37: ...u link the letters are displayed in white against an orange background 2nd Level Configuration menu links The configuration menu links in the gray bar immediately below the main navigation menu bar ch...

Page 38: ...etect the configuration automatically and suggest values for the configuration Next Go to the next screen for wizards Back Go to the previous screen for wizards Search Perform a search operation Cance...

Page 39: ...nually see Chapter 3 Manually Configuring Internet and WAN Settings To start the Setup Wizard 1 Select Wizards from the main navigation menu The Welcome to the Netgear Configuration Wizard screen disp...

Page 40: ...to go the following screen Figure 2 7 Note In this first step you are actually configuring the LAN settings for the UTM s default VLAN For more information about VLANs see Managing Virtual LANs and D...

Page 41: ...DHCP Server If another device on your network is the DHCP server for the default VLAN or if you will manually configure the network settings of all of your computers select the Disable DHCP Server rad...

Page 42: ...on your network Enter the following setting Relay Gateway The IP address of the DHCP server for which the UTM serves as a relay Enable LDAP information Select the Enable LDAP information checkbox to e...

Page 43: ...e DNS Proxy This is optional Select the Enable DNS Proxy radio button to enable the UTM to provide a LAN IP address for DNS address name resolution This setting is enabled by default Note When you des...

Page 44: ...he Yes radio button Otherwise select the No radio button which is the default setting and skip the ISP Type section below If you select Yes enter the following settings Login The login name that your...

Page 45: ...ep the connection always on To log out after the connection is idle for a period of time select the Idle Time radio button and in the timeout field enter the number of minutes to wait before disconnec...

Page 46: ...tton Ensure that you fill in valid DNS server IP addresses in the fields Incorrect DNS entries might cause connectivity issues Primary DNS Server The IP address of the primary DNS server Secondary DNS...

Page 47: ...lly Adjust for Daylight Savings Time checkbox NTP Server default or custom From the pull down menu select an NTP server Use Default NTP Servers The UTM s RTC is updated regularly by contacting a defau...

Page 48: ...s as explained in Table 2 4 on page 2 17 then click Next to go the following screen Figure 2 10 Note After you have completed the steps in the Setup Wizard you can make changes to the security service...

Page 49: ...ther port in the corresponding Ports to Scan field HTTPS HTTPS scanning is disabled by default To enable HTTPS scanning select the corresponding checkbox You can change the standard service port port...

Page 50: ...on page 6 5 Table 2 5 Setup Wizard Step 5 Email Security Settings Setting Description or Subfield and Description Action SMTP From the SMTP pull down menu specify one of the following actions when an...

Page 51: ...ly a log entry is created The e mail is not blocked and the attachment is not deleted Scan Exceptions The default maximum file or message size that is scanned is 2048 KB but you can define a maximum s...

Page 52: ...m the HTTPS pull down menu specify one of the following actions when an infected Web file or object is detected Delete file This is the default setting The Web file or object is deleted and a log entr...

Page 53: ...Unified Threat Management UTM10 or UTM25 Reference Manual Using the Setup Wizard to Provision the UTM in Your Network 2 21 v1 0 September 2009 Setup Wizard Step 7 of 10 Web Categories to Be Blocked Fi...

Page 54: ...ns at the top of the section in the following way Allow All All Web categories are allowed Block All All Web categories are blocked Set to Defaults Blocking and allowing of Web categories are returned...

Page 55: ...ng Network Config Email Notification For more information about these settings see Configuring the E mail Notification Server on page 11 5 Table 2 8 Setup Wizard Step 8 Administrator Email Notificatio...

Page 56: ...authentication If the SMTP server requires authentication select the This server requires authentication checkbox and enter the following settings User name The user name for SMTP server authenticati...

Page 57: ...ettings below Update From Set the update source server by selecting one of the following radio buttons Default update server Files are updated from the default NETGEAR update server Server address Fil...

Page 58: ...t your UTM is functioning correctly Testing Connectivity Verify that network traffic can pass through the UTM Ping an Internet URL Ping the IP address of a device on either side of the UTM Testing HTT...

Page 59: ...te the attached malware information file Registering the UTM with NETGEAR To receive threat management component updates and technical support you must register your UTM with NETGEAR The support regis...

Page 60: ...the Internet you can activate the service licenses 1 Select Support Registration The Registration screen displays 2 Enter the license key in the Registration Key field 3 Fill out the customer and VAR...

Page 61: ...ted below Configuring the WAN Mode Required for the UTM25 s Dual WAN Mode on page 3 9 Configuring VPN Authentication Domains Groups and Users on page 9 1 Managing Digital Certificates on page 9 17 Usi...

Page 62: ...ProSecure Unified Threat Management UTM10 or UTM25 Reference Manual 2 30 Using the Setup Wizard to Provision the UTM in Your Network v1 0 September 2009...

Page 63: ...Configuring the Internet Connections on page 3 2 2 Configure the WAN mode required for the UTM25 s dual WAN operation For both the UTM10 and UTM25 select either NAT or classical routing For the UTM25...

Page 64: ...The Web Configuration Manager offers two connection configuration options Automatic detection and configuration of the network connection Manual configuration of the network connection Each option is...

Page 65: ...ber 2009 2 Click the Auto Detect action button at the bottom of the menu The auto detect process probes the WAN port for a range of connection methods and suggests one that your ISP is most likely to...

Page 66: ...the physical connection between your UTM and the cable or DSL line or to check your UTM s MAC address For more information see Configuring the WAN Mode Required for the UTM25 s Dual WAN Mode on page 3...

Page 67: ...ur network has a unique 48 bit local Ethernet address This is also referred to as the computer s Media Access Control MAC address The default is set to Use Default Address If your ISP requires MAC aut...

Page 68: ...e WAN ISP Settings screen displays Figure 3 4 shows the ISP Login section of the screen 2 In the ISP Login section of the screen select one of the following options If your ISP requires an initial log...

Page 69: ...always on To log out after the connection is idle for a period of time select the Idle Time radio button and in the timeout field enter the number of minutes to wait before disconnecting This is usef...

Page 70: ...Subfield and Description Get Dynamically from ISP If your ISP has not assigned you a static IP address select the Get dynamically from ISP radio button The ISP automatically assigns an IP address to...

Page 71: ...r Mode The selected WAN interface is defined as the primary link and the other interface is defined as the rollover link As long as the primary link is up all traffic is sent over the primary link Whe...

Page 72: ...ublic Internet IP address you must use NAT the default setting If your ISP has provided you with multiple public IP addresses you can use one address as the primary shared address for Internet access...

Page 73: ...ISP link for backup purposes ensure that the backup WAN interface has already been configured Then select the WAN interface that will act as the primary link for this mode and configure the WAN failu...

Page 74: ...b The WAN Mode screen displays 2 Enter the settings as explained in Table 3 5 Figure 3 8 Table 3 5 Auto Rollover Mode Settings UTM25 Only Setting Description or Subfield and Description Port Mode Auto...

Page 75: ...y WAN link is considered down after the configured number of queries have failed to elicit a reply The backup link is brought up after this has occurred The failover default is 4 failures Ping these I...

Page 76: ...c from the computers on the LAN through the WAN1 port All outbound FTP traffic is routed through the WAN2 port Protocol binding addresses two issues Segregation of traffic between links that are not o...

Page 77: ...menu select a service or application to be covered by this rule If the service or application does not appear in the list you must define it using the Services menu see Services Based Rules on page 5...

Page 78: ...to the WAN Mode screen by selecting Network Config WAN Settings from the menu and clicking the WAN Mode tab 4 Click Apply to save your settings Source Network continued Group 1 Group 8 If this option...

Page 79: ...nd firewall rule screens Add LAN WAN Outbound Service screen Add DMZ WAN Outbound Service screen For more information about firewall rules see Using Rules to Block or Allow Specific Kinds of Traffic o...

Page 80: ...table displays the secondary LAN IP addresses added to the UTM 3 In the Add WAN1 Secondary Addresses section UTM25 or Add WAN Secondary Addresses section of the screen UTM10 enter the following setti...

Page 81: ...your IP address will be and the address can change frequently hence the need for a commercial DDNS service which allows you to register an extension to its domain and restores DNS requests for the res...

Page 82: ...configured WAN mode For the UTM25 for example Single Port WAN1 Load Balancing or Auto Rollover Only those options that match the configured WAN Mode are accessible on screen 3 Select the submenu tab...

Page 83: ...enable the DDNS service The service that displays on screen depends on the submenu tab for the DDNS service provider that you have selected Enter the following settings Host and Domain Name The host...

Page 84: ...d setting a rate limit on the traffic that is being forwarded by the UTM To configure advanced WAN options 1 Select Network Config WAN Settings from the menu On the UTM25 the WAN Settings tabs appear...

Page 85: ...ht need to manually select the port speed If you know the Ethernet port speed of the modem or router select it from the pull down menu Use the half duplex settings only of the full duplex settings do...

Page 86: ...ettings These settings rate limit the traffic that is being forwarded by the UTM WAN Connection Type From the pull down menu select the type of connection that the UTM uses to connect to the Internet...

Page 87: ...a local area network with a definition that maps workstations on some basis other than geographic location for example by department type of user or primary application To enable traffic to flow betwe...

Page 88: ...t based VLANs help to confine broadcast traffic to the LAN ports Even though a LAN port can be a member of more than one VLAN the port can have only one VLAN ID as its Port VLAN Identifier PVID By def...

Page 89: ...he IP phone to the UTM LAN port are tagged Packets passing through the IP phone from the connected device to the UTM LAN port are untagged When you assign the UTM LAN port to a VLAN packets entering a...

Page 90: ...us 3 Click Apply to save your settings VLAN DHCP Options For each VLAN you must specify the Dynamic Host Configuration Protocol DHCP options The configuration of the DHCP options for the UTM s default...

Page 91: ...ou must configure the DHCP Relay Agent on the subnet that contains the remote clients so that the DHCP Relay Agent can relay DHCP broadcast messages to your DHCP server DNS Proxy When the DNS Proxy op...

Page 92: ...t defines the location in the directory that is the directory tree from which the LDAP search begins Configuring a VLAN Profile For each VLAN on the UTM you can configure its profile port membership L...

Page 93: ...Either select an entry from the VLAN Profiles table by clicking the corresponding edit table button or add a new VLAN profile by clicking the add table button under the VLAN Profiles table The Edit VL...

Page 94: ...e factory default is 192 168 1 1 Note Always make sure that the LAN port IP address and DMZ port IP address are in different subnets Note If you change the LAN IP address of the VLAN while being conne...

Page 95: ...ess The IP address 192 168 1 100 is the default ending address Note The starting and ending DHCP IP addresses should be in the same network as the LAN TCP IP address of the UTM the IP address in LAN T...

Page 96: ...ional unit o for organization c for country dc for domain For example to search the Netgear net domain for all last names of Johnson you would enter cn Johnson dc Netgear dc net port The port number f...

Page 97: ...u The LAN Settings submenu tabs appear with the LAN Setup screen in view 2 Click the LAN Multi homing submenu tab The LAN Multi homing screen displays The Available Secondary LAN IPs table displays th...

Page 98: ...her means Collectively these entries make up the Network Database The Network Database is updated by these methods DHCP Client Requests When the DHCP server is enabled it accepts and responds to DHCP...

Page 99: ...iduals You can assign PCs to groups see Managing the Network Database on this page and apply restrictions outbound rules and inbound rules to each group see Using Rules to Block or Allow Specific Kind...

Page 100: ...vice For DHCP clients of the UTM this IP address does not change If a PC or device is assigned a static IP address you need to update this entry manually after the IP address on the PC or device has c...

Page 101: ...Directs the UTM s DHCP server to always assign the specified IP address to this client during the DHCP negotiation see Setting Up Address Reservation on page 4 17 Note When assigning a reserved IP add...

Page 102: ...nown PC and Device section specify the fields and make selections from the pull down menus as explained in step 1 of the previous section Adding PCs or Devices to the Network Database on page 4 15 3 C...

Page 103: ...f characters is 15 spaces and double quotes are not allowed 5 Repeat step 3 and step 4 for any other group names 6 Click Apply to save your settings Setting Up Address Reservation When you specify a r...

Page 104: ...rt and both inbound and outbound DMZ traffic are disabled Enabling the DMZ port and allowing traffic to and from the DMZ increases the traffic through the WAN ports Using a DMZ port is also helpful wi...

Page 105: ...25 Reference Manual LAN Configuration 4 19 v1 0 September 2009 To enable and configure the DMZ port 1 Select Network Config DMZ Setup from the menu The DMZ Setup screen displays 2 Enter the settings a...

Page 106: ...he Disable DHCP Server radio button to disable the DHCP server This is the default setting Enable DHCP Server Select the Enable DHCP Server radio button to enable the UTM to function as a Dynamic Host...

Page 107: ...UTM as a DHCP relay agent for a DHCP server somewhere else on your network Enter the following setting Relay Gateway The IP address of the DHCP server for which the UTM serves as a relay Enable LDAP...

Page 108: ...twork DNS Proxy Enable DNS Proxy This is optional Select the Enable DNS Proxy radio button to enable the UTM to provide a LAN IP address for DNS address name resolution This setting is enabled by defa...

Page 109: ...3 v1 0 September 2009 Configuring Static Routes To add a static route to the Static Route table 1 Select Network Config Routing from the menu The Routing screen displays 2 Click the add table button u...

Page 110: ...cription or Subfield and Description Route Name The route name for the static route for purposes of identification and management Active To make the static route effective select the Active checkbox N...

Page 111: ...1 0 September 2009 To enable and configure RIP 1 Select Network Configuration Routing from the menu 2 Click the RIP Configuration option arrow at the right of the Routing submenu tab The RIP Configura...

Page 112: ...pports subnet information Both RIP 2B and RIP 2M send the routing data in RIP 2 format RIP 2B Sends the routing data in RIP 2 format and uses subnet broadcasting RIP 2M Sends the routing data in RIP 2...

Page 113: ...rk s firewall In this case you must define a static route informing the UTM that the 134 177 0 0 IP address should be accessed through the local LAN IP address 192 168 1 100 The static route on the UT...

Page 114: ...ProSecure Unified Threat Management UTM10 or UTM25 Reference Manual 4 28 LAN Configuration v1 0 September 2009...

Page 115: ...ne network the trusted network such as your LAN from another the untrusted network such as the Internet while allowing communication between the two You can further segment keyword blocking to certain...

Page 116: ...ic Traffic on page 5 39 Allow or block sites and applications see Setting Web Access Exception Rules on page 6 41 Source MAC filtering see Enabling Source MAC Filtering on page 5 40 Port triggering se...

Page 117: ...locking and allowing traffic on the UTM can be applied to LAN WAN traffic DMZ WAN traffic and LAN DMZ traffic Services Based Rules The rules to block traffic are based on the traffic s category of ser...

Page 118: ...led service blocking or port filtering Table 5 2 on page 5 5 describes the fields that define the rules for outbound traffic and that are common to most Outbound Service screens see Figure 5 3 on page...

Page 119: ...figure the time schedules see Setting a Schedule to Block or Allow Specific Traffic on page 5 39 LAN Users The settings that determine which computers on your network are affected by this rule The opt...

Page 120: ...miting determines the way in which the data is sent to and from your host The purpose of bandwidth limiting is to provide a solution for limiting the outgoing and incoming traffic thus preventing the...

Page 121: ...dress will fail Table 5 3 on page 5 8 describes the fields that define the rules for inbound traffic and that are common to most Inbound Service screens see Figure 5 4 on page 5 14 Figure 5 7 on page...

Page 122: ...ber Send to DMZ Server The DMZ server address determines which computer on your network is hosting this service rule You can also translate this address to a port number Translate to Port Number You c...

Page 123: ...all The UTM marks the Type Of Service ToS field as defined in the QoS profiles that you create For more information see Creating Quality of Service QoS Profiles on page 5 33 Note There is no default Q...

Page 124: ...cket information is subjected to the rules in the order shown in the Rules table beginning at the top and proceeding to the bottom In some cases the order of precedence of two or more rules might be i...

Page 125: ...s through Firewall rules can then be applied to block specific types of traffic from going out from the LAN to the Internet outbound This feature is also referred to as service blocking You can change...

Page 126: ...you want to delete or disable or click the select all table button to select all rules 2 Click one of the following table buttons disable Disables the rule or rules The status icon changes from a gree...

Page 127: ...s as explained in Table 5 2 on page 5 5 3 Click Apply to save your changes The new rule is now added to the Outbound Services table LAN WAN Inbound Services Rules The Inbound Services table lists all...

Page 128: ...ween the DMZ and the Internet are configured on the DMZ WAN Rules screen The default outbound policy is to allow all traffic from and to the Internet to pass through You can then apply firewall rules...

Page 129: ...of to the rule click on of the following table buttons edit Allows you to make any changes to the rule definition of an existing rule Depending on your selection either the Edit DMZ WAN Outbound Servi...

Page 130: ...at specify exceptions to the default outbound policy By adding custom rules you can block or allow access based on the service or application source or destination IP addresses and time of day An outb...

Page 131: ...es screen take precedence over inbound rules that are configured on the DMZ WAN Rules screen As a result if an inbound packet matches an inbound rule on the LAN WAN Rules screen it is not matched agai...

Page 132: ...d policy by blocking all outbound traffic and then enabling only specific services to pass through the UTM You do so by adding outbound services rules see LAN DMZ Outbound Services Rules on page 5 19...

Page 133: ...is or rules are disabled By default when a rule is added to the table it is automatically enabled delete Deletes the rule or rules LAN DMZ Outbound Services Rules You may change the default outbound...

Page 134: ...ervice rule 1 In the LAN DMZ Rules screen click the add table button under the Inbound Services table The Add LAN DMZ Inbound Service screen displays 2 Enter the settings as explained in Table 5 3 on...

Page 135: ...on to enable the UTM to respond to a ping from the Internet Enable Stealth Mode Select the Enable Stealth Mode checkbox which is the default setting to prevent the UTM from responding to port scans fr...

Page 136: ...work location anonymous Disable Ping Reply on LAN Ports Select the Disable Ping Reply on LAN Ports checkbox to prevent the UTM from responding to a ping on a LAN port A ping can be used as a diagnosti...

Page 137: ...er an IP connection across the UTM The Session Limit feature is disabled by default To enable and configure the Session Limit feature 1 Select Network Security Firewall from the menu The Firewall subm...

Page 138: ...n capacity of the UTM Number of Sessions An absolute number of maximum sessions User Limit Enter a number to indicate the user limit If the User Limit Parameter is set to Percentage of Max Sessions th...

Page 139: ...kbox 4 Click Apply to save your settings Inbound Rules Examples LAN WAN Inbound Rule Hosting A Local Public Web Server If you host a public Web server on your local network you can define a rule to al...

Page 140: ...only from a specified range of external IP addresses LAN WAN or DMZ WAN Inbound Rule Setting Up One to One NAT Mapping In this example we will configure multi NAT to support multiple public IP address...

Page 141: ...t the LAN WAN Rules submenu tab This is the screen we will use in this example If your server is to be on your DMZ select DMZ WAN Rules submenu tab 3 Click the add table button under the Inbound Servi...

Page 142: ...settings Your is now added to the Inbound Services table of the LAN WAN Rules screen To test the connection from a PC on the Internet type http IP_address where IP_address is the public IP address tha...

Page 143: ...cking Instant Messenger If you want to block Instant Messenger usage by employees during working hours you can create an outbound rule to block that application from any internal IP address to any ext...

Page 144: ...rofiles A quality of service QoS profile defines the relative priority of an IP packet for traffic that matches the firewall rule Bandwidth Profiles A bandwidth profile allocates and limits traffic ba...

Page 145: ...en from the range 1024 to 65535 by the authors of the application Although the UTM already holds a list of many service port numbers you are not limited to these choices Use the Services screen to add...

Page 146: ...ication and management purposes Type From the Type pull down menu select the Layer 3 protocol that the service uses as its transport protocol TCP UDP ICMP ICMP Type A numeric value that can range betw...

Page 147: ...orities are defined by the Type of Service ToS in the Internet Protocol Suite standards RFC 1349 There is no default QoS profile on the UTM Following are examples of QoS profiles that you could create...

Page 148: ...Services screen in view 2 Click the QoS Profiles submenu tab The QoS Profiles screen displays Figure 5 21 shows some profiles in the List of QoS Profiles table as an example The screen displays the L...

Page 149: ...re the QoS type IP Precedence or DHCP and QoS value and to set only the QoS priority Add DiffServ Mark Select the Add DiffServ Mark radio button to set the differentiated services DiffServ mark in the...

Page 150: ...idth profile specification the device creates a bandwidth class in the kernel If multiple connections correspond to the same firewall rule the connections all share the same bandwidth class An excepti...

Page 151: ...eptember 2009 The screen displays the List of Bandwidth Profiles table with the user defined profiles 3 Under the List of Bandwidth Profiles table click the add table button The Add Bandwidth Profile...

Page 152: ...or Subfield and Description Profile Name A descriptive name of the bandwidth profile for identification and management purposes Minimum Bandwidth The minimum allocated bandwidth in Kbps The default se...

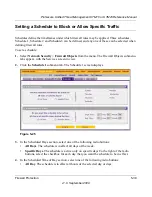
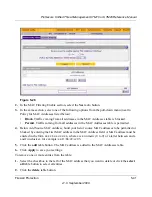
Page 153: ...Objects from the menu The Firewall Objects submenu tabs appear with the Services screen in view 2 Click the Schedule 1 submenu tab The Schedule 1 screen displays 3 In the Scheduled Days section selec...

Page 154: ...certain known PCs or devices By default the source MAC address filter is disabled All the traffic received from PCs with any MAC address is allowed When the source MAC address filter is enabled depen...

Page 155: ...ted 4 Below Add Source MAC Address build your list of source MAC addresses to be permitted or blocked by entering the first MAC address in the MAC Address field A MAC address must be entered in the fo...

Page 156: ...10 Host2 MAC address 00 01 02 03 04 06 and IP address 192 168 10 11 Host3 MAC address 00 01 02 03 04 07 and IP address 192 168 10 12 If all of the above host entry examples are added to the IP MAC Bin...

Page 157: ...Binding Violation Select one of the following radio buttons Yes IP MAC binding violations are e mailed No IP MAC binding violations are not e mailed Note Click the Firewall Logs E mail page hyperlink...

Page 158: ...as follows 1 A PC makes an outgoing connection using a port number that is defined in the Port Triggering Rules table 2 The UTM records this connection opens the additional incoming port or ports tha...

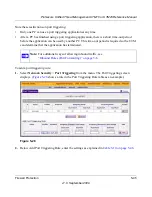
Page 159: ...ication can be used by another PC This time out period is required so the UTM can determine that the application has terminated To add a port triggering rule 1 Select Network Security Port Triggering...

Page 160: ...een A popup window appears displaying the status of the port triggering rules Table 5 10 Port Triggering Settings Setting Description or Subfield and Description Name A descriptive name of the rule fo...

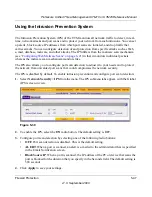
Page 161: ...IPS also allows you to configure port scan detection to adjust it to your needs and to protect the network from unwanted port scans that could compromise the network security The IPS is disabled by d...

Page 162: ...for each section either select the actions for individual attacks by making selections from the pull down menus to the right of the names or select a global action for all attacks for that category by...

Page 163: ...ProSecure Unified Threat Management UTM10 or UTM25 Reference Manual Firewall Protection 5 49 v1 0 September 2009 Figure 5 31...

Page 164: ...aced under other Web categories such as DoS and overflow attacks against specific Web services These Web services include IMail Web Calendaring ZixForum ScozNet ScozNews and other services inappropria...

Page 165: ...ptions and instant alerts via e mail You can establish restricted Web access policies that are based on the time of day Web addresses and Web address keywords You can also block Internet access by app...

Page 166: ...Server Protocols SMTP Enabled Block infected e mail POP3 Enabled Delete attachment if infected IMAP Enabled Delete attachment if infected Web Server Protocols a HTTP Enabled Delete file if malware th...

Page 167: ...ltered to block objectionable or high risk content Customer notifications and e mail alerts that are sent when events are detected Rules and policies for spam detection Drugs and Violence Blocked Educ...

Page 168: ...ransfer Protocol SMTP scanning is enabled by default on port 25 POP3 Post Office Protocol 3 POP3 scanning is enabled by default on port 110 IMAP Internet Message Access Protocol IMAP scanning is enabl...

Page 169: ...Settings Whether or not the UTM detects an e mail virus you can configure it to take a variety of actions some of the default actions are listed in Table 6 1 on page 6 2 and send notifications e mails...

Page 170: ...he following actions when an infected e mail is detected Delete attachment This is the default setting The e mail is not blocked but the attachment is deleted and a log entry is created Log only Only...

Page 171: ...s infected with a default warning message The warning message informs the end user about the name of the malware threat You can change the default message to include the action that the UTM has taken...

Page 172: ...ock e mails based on the extensions of attached files Such files can include executable files audio and video files and compressed files File name blocking You can block e mails based on the names of...

Page 173: ...UTM10 or UTM25 Reference Manual Content Filtering and Optimizing Scans 6 9 v1 0 September 2009 To configure e mail content filtering 1 Select Application Security Email Filters from the menu The Email...

Page 174: ...log entry is created The e mail is not blocked Filter by Password Protected Attachments ZIP RAR etc Action SMTP From the SMTP pull down menu specify one of the following actions when a password protec...

Page 175: ...le extensions are added to the File Extension field This is the default setting Executables Executable file extensions exe com dll so lib scr bat and cmd are added to the File Extension field Audio Vi...

Page 176: ...list You can specify e mails that are accepted or blocked based on the originating IP address domain and e mail address by setting up the whitelist and blacklist You can also specify e mails that are...

Page 177: ...ce Manual Content Filtering and Optimizing Scans 6 13 v1 0 September 2009 To configure the whitelist and blacklist 1 Select Application Security Anti Spam from the menu The Anti Spam submenu tabs appe...

Page 178: ...s can be trusted Blacklist Enter the sender e mail domains from which e mails are blocked Click Apply to save your settings or click Reset to clear all entries from these fields Sender Email Address W...

Page 179: ...ist 1 Select Application Security Anti Spam from the menu The Anti Spam submenu tabs appear with the Whitelist Blacklist screen in view 2 Click the Real time Blacklist submenu tab The Real time Blackl...

Page 180: ...message format or encoding type Message patterns can be divided into distribution patterns and structure patterns Distribution patterns determine if the message is legitimate or a potential threat by...

Page 181: ...buted Spam Analysis Settings Setting Description or Subfield and Description Distributed Spam Analysis SMTP Select the SMTP checkbox to enable Distributed Spam Analysis for the SMTP protocol You can e...

Page 182: ...on is to block spam e mail Tag Add tag to mail subject When the option Tag spam email is selected from the Action pull down menu see above select this checkbox to add a tag to the e mail subject line...

Page 183: ...s are detected Schedules that determine when content filtering is active Customizing Web Protocol Scan Settings and Services You can specify the Web protocols HTTP HTTPS and FTP that are scanned for m...

Page 184: ...cription or Subfield and Description Web HTTP Select the HTTP checkbox to enable Hypertext Transfer Protocol HTTP scanning This service is enabled by default and uses default port 80 HTTPS Select the...

Page 185: ...xample port 80 for HTTP enter this non standard port in the Ports to Scan field For example if the HTTP service on your network uses both port 80 and port 8080 enter both port numbers in the Ports to...

Page 186: ...PS pull down menu specify one of the following actions when an infected Web file or object is detected Delete file This is the default setting The Web file or object is deleted and a log entry is crea...

Page 187: ...UTM s performance see Performance Management on page 10 1 From the pull down menu specify one of the following actions when the file or message exceeds the maximum size Skip The file is not scanned bu...

Page 188: ...oups for which keyword blocking has not been enabled Web object blocking You can block the following Web objects embedded objects ActiveX Java Flash proxies and cookies and you can disable Java script...

Page 189: ...en displays Because of the large size of this screen it is presented in this manual in three figures Figure 6 9 on this page Figure 6 10 on page 6 26 and Figure 6 11 on page 6 27 Note You can bypass a...

Page 190: ...ProSecure Unified Threat Management UTM10 or UTM25 Reference Manual 6 26 Content Filtering and Optimizing Scans v1 0 September 2009 Figure 6 10 Content Filtering screen 2 of 3...

Page 191: ...Threat Management UTM10 or UTM25 Reference Manual Content Filtering and Optimizing Scans 6 27 v1 0 September 2009 3 Enter the settings as explained in Table 6 8 on page 6 28 Figure 6 11 Content Filter...

Page 192: ...added to the File Extension field This is the default setting Executables Executable file extensions exe com dll so lib scr bat and cmd are added to the File Extension field Audio Video Audio and vide...

Page 193: ...the right of the radio buttons select the checkbox for each day that you want the schedule to be in effect Blocked Categories Time of Day Select one of the following radio buttons All Day The schedule...

Page 194: ...GEAR for analysis select the category in which you think that the URL must be categorized from the pull down menu Then enter the Submit button Note When the UTM blocks access to a link of a certain bl...

Page 195: ...ans 6 31 v1 0 September 2009 To configure Web URL filtering 1 Select Application Security HTTP HTTPS from the menu The HTTP HTTPS submenu tabs appear with the Malware Scan screen in view 2 Click the U...

Page 196: ...ds are supported For example if you enter www net com in the URL field any URL that begins with www net is blocked and any URL that ends with com is blocked delete To delete one or more URLs highlight...

Page 197: ...URL in the Add URL field Then click the add table button to add the URL to the URL field Import from File To import a list with URLs into the URL field click the Browse button and navigate to a file i...

Page 198: ...n an HTTPS server and an HTTP client in two parts A connection between the HTTPS client and the UTM A connection between the UTM and the HTTPS server The UTM simulates the HTTPS server communication t...

Page 199: ...e UTM s Manager Login screen see Figure 2 1 on page 2 3 If client authentication is required the UTM might not be able to scan the HTTPS traffic because of the nature of SSL SSL has two parts client a...

Page 200: ...ember 2009 To configure the HTTPS scan settings 1 Select Application Security HTTP HTTPS from the menu The HTTP HTTPS submenu tabs appear with the Malware Scan screen in view 2 Click the HTTPS Setting...

Page 201: ...ugh an HTTP proxy which is disabled by default Traffic from trusted hosts is not scanned see Specifying Trusted Hosts on page 6 37 Note For HTTPS scanning to occur properly you must add the HTTP proxy...

Page 202: ...pplication Security HTTP HTTPS from the menu The HTTP HTTPS submenu tabs appear with the Malware Scan screen in view 2 Click the Trusted Hosts submenu tab The Trusted Hosts screen displays Figure 6 16...

Page 203: ...e To delete one or more hosts highlight the hosts and click the delete table button export To export the hosts click the export table button and follow the instructions of your browser Add Host Type o...

Page 204: ...Enter the settings as explained in Table 6 12 Figure 6 17 Table 6 12 FTP Scan Settings Setting Description or Subfield and Description Action FTP Action From the FTP pull down menu specify one of the...

Page 205: ...value might affect the UTM s performance see Performance Management on page 10 1 From the pull down menu specify one of the following actions when the file or message exceeds the maximum size Skip The...

Page 206: ...xceptions from the menu The Block Accept Exceptions screen displays This screen shows the Exceptions table which is empty if you have not specified any exception rules Figure 6 18 shows three exceptio...

Page 207: ...ts LAN Groups on page 4 12 Start Time The time in 24 hour format hours and minutes when the action starts If you leave these fields empty the action applies continuously End TIme The time in 24 hour f...

Page 208: ...rule in the Exceptions table determines the order in which the rule is applied To change the position of the rules in the table click the following table buttons up Moves the rule up one position in t...

Page 209: ...Interface on other screens you do not need to click any other button to disable the rule To delete an exclusion rule from the Scanning Exclusions table click the delete table button in the Action col...

Page 210: ...ProSecure Unified Threat Management UTM10 or UTM25 Reference Manual 6 46 Content Filtering and Optimizing Scans v1 0 September 2009...

Page 211: ...e UTM25 only if both of the WAN ports are configured you can enable either auto rollover mode for increased system reliability or load balancing mode for optimum bandwidth efficiency Your WAN mode sel...

Page 212: ...ng Mode VPN Road Warrior client to gateway Fixed FQDN required FQDN Allowed optional Dynamic FQDN required FQDN required VPN Gateway to Gateway Fixed FQDN required FQDN Allowed optional Dynamic FQDN r...

Page 213: ...iciently guides you through the setup procedure with a series of questions that determine the IPsec keys and VPN policies it sets up The VPN Wizard also configures the settings for the network connect...

Page 214: ...mber 2009 To view the wizard default settings click the VPN Wizard Default Values option arrow at the top right of the screen A popup window appears see Figure 7 5 on page 7 5 displaying the wizard de...

Page 215: ...nect to the following peers Select the Gateway radio button The local WAN port s IP address or Internet name appears in the End Point Information section of the screen Connection Name and Remote IP Ty...

Page 216: ...te Accessibility What is the remote LAN IP Address Enter the LAN IP address of the remote gateway Note The remote LAN IP address must be in a different subnet than the local LAN IP address For example...

Page 217: ...y is enabled 5 Configure a VPN policy on the remote gateway that allows connection to the UTM 6 Activate the IPsec VPN connection a Select Monitoring Active Users VPNs from the menu The Active Users V...

Page 218: ...o gateway VPN tunnel using the VPN Wizard 1 Select VPN IPsec VPN from the menu The IPsec VPN submenu tabs appear with the IKE Policies screen in view 2 Click the VPN Wizard submenu tab The VPN Wizard...

Page 219: ...ber 2009 To display the wizard default settings click the VPN Wizard Default Values option arrow at the top right of the screen A popup window appears see Figure 7 5 on page 7 5 displaying the wizard...

Page 220: ...ill use following local WAN Interface UTM25 only For the UTM25 only select one of the two radio buttons WAN1 or WAN2 to specify which local WAN interface the VPN tunnel uses as the local endpoint Note...

Page 221: ...th the NETGEAR ProSafe VPN Client installed configure a VPN client policy to connect to the UTM 1 Right click on the VPN client icon in your Windows toolbar select Security Policy Editor Then select O...

Page 222: ...rivate Networking Using IPsec Connections v1 0 September 2009 2 In the upper left of the Policy Editor window click the New Connection icon the first icon on the left to open a new connection Give the...

Page 223: ...0 Mask Enter the LAN IP subnet mask of the UTM that is displayed on the UTM s VPN Policies screen see Figure 7 10 on page 7 11 In this example the subnet mask is 255 255 255 0 Protocol From the pull d...

Page 224: ...Table 7 5 Figure 7 13 Table 7 5 Security Policy Editor My Identity Settings Setting Description or Subfield and Description Select Certificate From the pull down menu select None The Pre Shared Key w...

Page 225: ...n menu select Domain Name Then below enter the remote FQDN that you entered on the UTM s VPN Wizard screen see Figure 7 9 on page 7 9 In this example the domain name is utm_remote com Secure Interface...

Page 226: ...onnection from your PC right click on the VPN client icon in your Windows toolbar and then select the VPN connection that you want to test In the example that is shown in Figure 7 15 on page 7 17 sele...

Page 227: ...receive the message Successfully connected to My Connections UTM_SJ within 30 seconds The VPN client icon in the system tray should say On NETGEAR VPN Client Status and Log Information To view more d...

Page 228: ...Management UTM10 or UTM25 Reference Manual 7 18 Virtual Private Networking Using IPsec Connections v1 0 September 2009 Right click the VPN Client icon in the system tray and select Connection Monitor...

Page 229: ...PN tunnels 1 Select Monitoring Active Users VPNs from the main menu The Active Users VPN submenu tabs appear with the Active Users screen in views 2 Click the IPSec VPN Connection Status submenu tab T...

Page 230: ...2 Click the Logs Query submenu tab The Logs Query screen displays 3 From the Log Type pull down menu select IPSEC VPN The IPsec VPN logs display see Figure 7 19 on page 7 21 Table 7 8 IPsec VPN Connec...

Page 231: ...fter you have used the VPN Wizard to set up a VPN tunnel a VPN policy and an IKE policy are stored in separate policy tables The name that you selected as the VPN tunnel connection name during the VPN...

Page 232: ...settings that are specified in the Manual Policy Parameters section of the Add VPN Policy screen see Figure 7 23 on page 7 33 are accessed and the first matching IKE policy is used to start negotiati...

Page 233: ...PN Wizard to set up a VPN policy an accompanying IKE policy is automatically created with the same name that you select for the VPN policy Note The name is not supplied to the remote VPN endpoint Mode...

Page 234: ...st of IKE Policies table click the add table button The Add IKE Policy screen displays see Figure 7 21 on page 7 25 which shows the UTM25 screen The WAN1 and WAN2 radio buttons next to Select Local Ga...

Page 235: ...ProSecure Unified Threat Management UTM10 or UTM25 Reference Manual Virtual Private Networking Using IPsec Connections 7 25 v1 0 September 2009 Figure 7 21...

Page 236: ...ce is not possible without Mode Config and is therefore disabled too For more information about XAUTH see Configuring Extended Authentication XAUTH on page 7 37 Select Mode Config Record From the pull...

Page 237: ...Type From the pull down menu select one of the following ISAKMP identifiers to be used by the remote endpoint and then specify the identifier in the field below Local WAN IP The WAN IP address of the...

Page 238: ...menu select one of the following three strengths Group 1 768 bit Group 2 1024 bit This is the default setting Group 5 1536 bit Note Ensure that the DH Group is configured identically on both sides SA...

Page 239: ...he default setting Edge Device The UTM functions as a VPN concentrator on which one or more gateway tunnels terminate The authentication mode that is available for this configuration is User Database...

Page 240: ...CA For each certificate there is both a public key and a private key The public key is freely distributed and is used by any sender to encrypt data intended for the receiver the key owner The receiver...

Page 241: ...as required Name The name that identifies the VPN policy When you use the VPN Wizard to create a VPN policy the name of the VPN policy and of the automatically created accompanying IKE policy is the C...

Page 242: ...nu tabs appear with the IKE Policies screen in view see Figure 7 20 on page 7 23 2 Click the VPN Policies submenu tab The VPN Policies screen displays see Figure 7 22 on page 7 31 3 Under the List of...

Page 243: ...ProSecure Unified Threat Management UTM10 or UTM25 Reference Manual Virtual Private Networking Using IPsec Connections 7 33 v1 0 September 2009 Figure 7 23...

Page 244: ...Enter the FQDN of the remote endpoint in the field to the right of the radio button Enable NetBIOS Select this checkbox to allow NetBIOS broadcasts to travel over the VPN tunnel For more information...

Page 245: ...y type When you specify the settings for the fields in this section a security association SA is created SPI Incoming The Security Parameters Index SPI for the inbound policy Enter a hexadecimal value...

Page 246: ...ion SA is the period or the amount of transmitted data after which the SA becomes invalid and must be renegotiated From the pull down menu select how the SA lifetime is specified Seconds In the SA Lif...

Page 247: ...use a unique user authentication method beyond relying on a single common pre shared key for all clients Although you could configure a unique VPN policy for each user it is more efficient to authenti...

Page 248: ...stablish user accounts on the User Database to be authenticated against XAUTH or you must enable a RADIUS CHAP or RADIUS PAP server To enable and configure XAUTH 1 Select VPN IPSec VPN from the menu T...

Page 249: ...ify whether or not Extended Authentication XAUTH is enabled and if enabled which device is used to verify user account information None XAUTH is disabled This the default setting Edge Device The UTM f...

Page 250: ...ication information such as a user name and password or some encrypted response using his user name and password information The gateway then attempts to verify this information first against a local...

Page 251: ...after verification of their authentication information In a RADIUS transaction the NAS must provide some NAS identifier information to the RADIUS server Depending on the configuration of the RADIUS s...

Page 252: ...policy using the information that is specified in the Traffic Tunnel Security Level section of the Mode Config record on the Add Mode Config Record screen that is shown in Figure 7 26 on page 7 44 Co...

Page 253: ...A Sales and NA Sales For EMEA Sales a first pool 172 169 100 1 through 172 169 100 99 and second pool 182 183 200 1 through 172 183 200 99 are shown For NA Sales a first pool 172 173 100 50 through 17...

Page 254: ...tive name of the Mode Config record for identification and management purposes First Pool Assign at least one range of IP pool addresses in the First Pool fields to enable the UTM to allocate these to...

Page 255: ...invalid and must be renegotiated From the pull down menu select how the SA lifetime is specified Seconds In the SA Lifetime field enter a period in seconds The minimum value is 300 seconds The default...

Page 256: ...e by configuring an IKE policy 6 Select VPN IPSec VPN from the menu The IPsec VPN submenu tabs appear with the IKE Policies screen in view see Figure 7 20 on page 7 23 7 Under the List of IKE Policies...

Page 257: ...fig also requires that both the local and remote ends are defined by their FQDNs Select Mode Config Record From the pull down menu select the Mode Config record that you created in step 5 above In thi...

Page 258: ...the pull down menu select Group 2 1024 bit SA Lifetime sec The period in seconds for which the IKE SA is valid When the period times out the next rekeying must occur The default is 28800 seconds 8 hou...

Page 259: ...s as a VPN concentrator on which one or more gateway tunnels terminate The authentication mode that is available for this configuration is User Database RADIUS PAP or RADIUS CHAP IPSec Host The UTM fu...

Page 260: ...iption Connection Security Select the Secure radio button If you want to connect manually only select the Only Connect Manually checkbox ID Type From the pull down menu select IP Subnet Subnet Enter t...

Page 261: ...that you specified in the UTM s Mode Config IKE policy In this example we are using utm25_local com Right pull down menu From the right pull down menu select Gateway IP Address Then below enter the IP...

Page 262: ...7 18 Figure 7 29 Table 7 18 Security Policy Editor My Identity Mode Config Settings Setting Description or Subfield and Description Select Certificate From the pull down menu select None The Pre Shar...

Page 263: ...ID Type From the pull down menu select Domain Name Then below enter the remote FQDN that you specified in the UTM s Mode Config IKE policy In this example we are using utm25_remote com Secure Interfa...

Page 264: ...n In some cases you might not want a VPN tunnel to be disconnected when traffic is idle for example when client server applications over the tunnel cannot tolerate the tunnel establishment time If you...

Page 265: ...onfigure the Keepalive feature on a configured VPN policy 1 Select VPN IPSec VPN from the menu The IPsec VPN submenu tabs appear with the IKE Policies screen in view 2 Click the VPN Policies submenu t...

Page 266: ...Edit IKE Policy screen displays Figure 7 31 on page 7 55 shows only the top part of the screen with the General section Table 7 20 Keepalive Settings Item Description or Subfield and Description Gener...

Page 267: ...s radio button to enable DPD When the UTM25 detects an IKE connection failure it deletes the IPsec and IKE SA and forces a reestablishment of the connection You must enter the detection period and the...

Page 268: ...ection To solve this problem you can configure the UTM to bridge NetBIOS traffic over the VPN tunnel To enable NetBIOS bridging on a configured VPN tunnel 1 Select VPN IPSec VPN from the menu The IPse...

Page 269: ...this page Using the SSL VPN Wizard for Client Configurations on page 8 2 Manually Configuring and Editing SSL Connections on page 8 17 Understanding the SSL VPN Portal Options The UTM s SSL VPN portal...

Page 270: ...arding offers more fine grained management than an SSL VPN tunnel You define individual applications and resources that are available to remote users The SSL VPN portal can present the remote user wit...

Page 271: ...ion below provides a specific link to a section in Manually Configuring and Editing SSL Connections on page 8 17 or to a section in another chapter SSL VPN Wizard Step 1 of 6 Portal Settings Note that...

Page 272: ...the first non alphanumeric character Note Unlike most other URLs this name is case sensitive Portal Site Title The title that appears at the top of the user s Web browser window For example Company C...

Page 273: ...ll temporary Internet files cookies and browser history when the user logs out or closes the Web browser window The ActiveX Web cache control is ignored by Web browsers that do not support ActiveX SSL...

Page 274: ...lies Local User Database default Users are authenticated locally on the UTM This is the default setting You do not need to complete any other fields on this screen Radius PAP RADIUS Password Authentic...

Page 275: ...thentication other than authentication through the local user database Authentication Secret The authentication secret or password that is required to access the authentication server for RADIUS WIKID...

Page 276: ...Wizard the user type always is SSL VPN User You cannot change the user type on this screen the user type is displayed for information only Group When you create a new domain on the second SSL VPN Wiza...

Page 277: ...o go the following screen Figure 8 5 Note Do not enter an existing route for a VPN tunnel client in the Destination Network and Subnet Mask fields otherwise the SSL VPN Wizard will fail and the UTM wi...

Page 278: ...This is an option Primary DNS Server The IP address of the primary DNS server that is assigned to the VPN tunnel clients This is an option Note If you do not assign a DNS server the DNS settings remai...

Page 279: ...se in the TCP Port NumberAction field otherwise the SSL VPN Wizard will fail and the UTM will reboot to recover its configuration Note After you have completed the steps in the SSL VPN Wizard you can...

Page 280: ...ng 5900 or 5800 Add New Host Name for Port Forwarding Local Server IP Address The IP address of an internal server or host computer that you want to name Note Both Local Server IP Address fields on th...

Page 281: ...cure Unified Threat Management UTM10 or UTM25 Reference Manual Virtual Private Networking Using SSL Connections 8 13 v1 0 September 2009 SSL VPN Wizard Step 6 of 6 Verify and Save Your Settings Figure...

Page 282: ...om the SSL VPN menu of the Web Management Interface display a user portal link at the right upper corner above the menu bars When you click on the user portal link the SSL VPN default portal opens see...

Page 283: ...rence Manual Virtual Private Networking Using SSL Connections 8 15 v1 0 September 2009 4 Enter the user name and password that you just created with the help of the SSL VPN Wizard 5 Click Login The de...

Page 284: ...To review the status of current SSL VPN tunnels 1 Select Monitoring Active Users VPNs from the main menu The Active Users VPN submenu tabs appear with the Active Users screen in views 2 Click the SSL...

Page 285: ...an customize to present the resources and functions that you choose to make available 2 Create authentication domains user groups and user accounts see Configuring Domains Groups and Users on page 8 2...

Page 286: ...n functions as if it were on the local network Configure the portal s SSL VPN client to define a pool of local IP addresses to be issued to remote clients as well as DNS addresses Declare static route...

Page 287: ...The layout configuration includes the menu layout theme portal pages to display and Web cache control options The default portal layout is the SSL VPN portal You can add additional portal layouts You...

Page 288: ...scription The banner message that is displayed at the top of the portal see Figure 8 8 on page 8 15 Use Count The number of remote users that are currently using the portal Portal URL The URL at which...

Page 289: ...pany Customer Support Banner Title The banner title of a banner message that users see before they log in to the portal For example Welcome to Customer Support Note For an example see Figure 8 8 on pa...

Page 290: ...ins Groups and Users on page 9 1 Configuring Applications for Port Forwarding Port forwarding provides access to specific defined network services To define these services you must specify the interna...

Page 291: ...N from the menu The SSL VPN s submenu tabs appear with the Policies screen in view 2 Click the Port Forwarding submenu tab The Port Forwarding screen displays Figure 8 14 shows some examples 3 In the...

Page 292: ...applications that are available to remote users you then can also specify host name to IP address resolution for the network servers as a convenience for users Host name resolution allows users to ac...

Page 293: ...N tunnel client does not conflict with addresses on the local network configure an IP address range that does not directly overlap with addresses on your local network For example if 192 168 1 1 throu...

Page 294: ...network you must add a client route to ensure that a VPN tunnel client connects to the local network over the VPN tunnel Configuring the Client IP Address Range First determine the address range to b...

Page 295: ...ent IP Address Range Settings Item Description or Subfield and Description Client IP Address Range Enable Full Tunnel Support Select this checkbox to enable full tunnel support If you leave this check...

Page 296: ...e the specifications of an existing route and to delete an old route 1 Add a new route to the Configured Client Routes table 2 In the Configured Client Routes table to the right of the route that is o...

Page 297: ...in the following fields Resource Name A descriptive name of the resource for identification and management purposes Service From the Service pull down menu select the type of service to which the reso...

Page 298: ...right of the new resource in the Action column click the edit table button A new screen displays Figure 8 17 shows some examples 4 Complete the fields and make your selection from the pull down menu...

Page 299: ...ject Type From the pull down menu select one of the following options IP Address The object is an IP address You must enter the IP address or the FQDN in the IP Address Name field IP Network The objec...

Page 300: ...t rule has been configured to allow FTP access to the predefined network resource with the name FTP Servers The FTP Servers network resource includes the following addresses 10 0 0 5 10 0 0 20 and the...

Page 301: ...ick User to view group policies and choose the relevant user s name from the pull down menu 3 Click the Display action button The List of SSL VPN Policies table displays the list for your selected Que...

Page 302: ...Policy For Select one of the following radio buttons to specify the type of SSL VPN policy Global The new policy is global and excludes all groups and users Group The new policy must be limited to a...

Page 303: ...agement purposes Defined Resources From the pull down menu select the network resource that you have defined on the Resources screen see Using Network Resource Objects to Simplify Policies on page 8 2...

Page 304: ...The policy is applied only to port forwarding All The policy is applied both to a VPN tunnel and to port forwarding Permission From the pull down menu select whether the policy permits PERMIT or denie...

Page 305: ...save your settings The policy is added to the List of SSL VPN Policies table on the Policies screen The new policy goes into effect immediately Note In addition to configuring SSL VPN user policies en...

Page 306: ...ProSecure Unified Threat Management UTM10 or UTM25 Reference Manual 8 38 Virtual Private Networking Using SSL Connections v1 0 September 2009...

Page 307: ...ncludes administrators and SSL VPN clients Accounts for IPsec VPN clients are required only if you have enabled Extended Authentication XAUTH in your IPsec VPN configuration Users connecting to the UT...

Page 308: ...al In User Service RADIUS MIAS A network validated PAP or CHAP password based authentication method that functions with Microsoft Internet Authentication Service MIAS which is a component of Microsoft...

Page 309: ...isk Authentication Type The authentication method that is assigned to the domain Portal Layout Name The SSL portal layout that is assigned to the domain Action The edit table button that provides acce...

Page 310: ...on on page 7 39 From the pull down menu select the authentication method that the UTM applies Local User Database default Users are authenticated locally on the UTM This is the default setting You do...

Page 311: ...the Authentication Server and LDAP Base DN fields Select Portal The pull down menu shows the SSL portals that are listed on the Portal Layout screen From the pull down menu select the SSL portal with...

Page 312: ...ctions and access controls Like the default domain of the UTM the default group is also named geardomain The default group geardomain is assigned to the default domain geardomain You cannot delete the...

Page 313: ...following fields Checkbox Allows you to select the group in the table Name The name of the group If the group name is appended by an asterisk the group was created by default when you created the doma...

Page 314: ...reen displays see Figure 9 4 on page 9 9 With the exception of groups that are associated with domains that use the LDAP authentication method you can only modify the idle timeout settings Table 9 3 V...

Page 315: ...r group When you create a group you must assign the group to a domain that specifies the authentication method Therefore you should first create any domains then groups then user accounts You can crea...

Page 316: ...box Allows you to select the user in the table Name The name of the user If the user name is appended by an asterisk the user is a default user that came pre configured with the UTM and cannot be dele...

Page 317: ...ction via a NETGEAR ProSafe VPN Client and only when the XAUTH feature is enabled see Configuring Extended Authentication XAUTH on page 7 37 Guest User User who can only view the UTM configuration tha...

Page 318: ...n also require or prohibit logging in from certain IP addresses or from particular browsers Configuring Login Policies To configure user login policies 1 Select Users Users from the menu The Users scr...

Page 319: ...he Action column of the List of Users table click the policies table button for the user for which you want to set login policies The Policies submenu tabs appear with the Login Policies screen in vie...

Page 320: ...heckbox to the left of the address that you want to delete or click the select all table button to select all addresses 2 Click the delete table button Configuring Login Restrictions Based on Web Brow...

Page 321: ...lect one of the following radio buttons Deny Login from Defined Browsers Deny logging in from the browsers in the Defined Browsers table Allow Login only from Defined Browsers Allow logging in from th...

Page 322: ...the select all table button to select all browsers 2 Click the delete table button Changing Passwords and Other User Settings For any user you can change the password user type and idle timeout setti...

Page 323: ...cate cannot be used for secure web management The extKeyUsage would govern the certificate acceptance criteria on the UTM when the same digital certificate is being used for secure web management Tabl...

Page 324: ...Thawte or you can generate and sign your own digital certificate Because a commercial CA takes steps to verify the identity of an applicant a digital certificate from a commercial CA provides a stron...

Page 325: ...submitted to CAs and CAs may or may not have issued digital certificates for these requests Only the digital self certificates in the Active Self Certificates table are active on the UTM see Managing...

Page 326: ...roves the digital certificate for validity and purpose the digital certificate is added to the Trusted Certificates CA Certificates table To delete one or more digital certificates 1 In the Trusted Ce...

Page 327: ...st generate a Certificate Signing Request CSR for and on the UTM The CSR is a file that contains information about your company and about the device that holds the certificate Refer to the CA for guid...

Page 328: ...tificates screen 2 of 3 Table 9 7 Generate Self Certificate Request Settings Setting Description or Subfield and Description Name A descriptive name of the domain for identification and management pur...

Page 329: ...160 bit 20 byte message digest slightly stronger than MD5 Signature Algorithm Although this seems to be a pull down menu the only possible selection is RSA In other words RSA is the default to genera...

Page 330: ...o the website of the CA b Start the SCR procedure c When prompted for the requested data copy the data from your saved text file including BEGIN CERTIFICATE REQUEST and END CERTIFICATE REQUEST d Submi...

Page 331: ...ertificate the table lists the following information Name The name that you used to identify this digital certificate Subject Name The name that you used for your company and that other organizations...

Page 332: ...that issued the CRL Last Update The date when the CRL was released Next Update The date when the next CRL will be released 2 In the Upload CRL section click Browse and navigate to the CLR file that yo...

Page 333: ...pacity The maximum bandwidth capacity of the UTM in each direction is as follows LAN side UTM25 or UTM10 2000 Mbps two LAN ports at 1000 Mbps each WAN side 2000 Mbps in load balancing mode UTM25 only...

Page 334: ...MZ WAN Outbound Rules Service Blocking You can control specific outbound traffic from LAN to WAN and from the DMZ to WAN The LAN WAN Rules screen and the DMZ WAN Rules screen list all existing rules f...

Page 335: ...erally referred to as the Network Database which is described in Managing the Network Database on page 4 13 PCs and network devices are entered into the Network Database by various methods that are de...

Page 336: ...otification Settings on page 6 5 Keyword file extension and file name blocking You can reject e mails based on keywords in the subject line file type of the attachment and file name of the attachment...

Page 337: ...ring If you want to reduce outgoing traffic by preventing Internet access by certain PCs on the LAN you can use the source MAC filtering feature to drop the traffic received from the PCs with the spec...

Page 338: ...ations to be covered by an inbound rule If the desired service or application does not appear in the list you must define it using the Services screen see Services Based Rules on page 5 3 and Adding C...

Page 339: ...to Block or Allow Specific Traffic on page 5 39 QoS Profile You can define QoS profiles and then apply them to inbound rules to regulate the priority of traffic To define QoS profiles see Creating Qu...

Page 340: ...13 dedicated SSL VPN tunnels Each tunnel requires extensive processing for encryption and authentication thereby increasing traffic through the WAN ports For information about IPsec VPN tunnels see Ch...

Page 341: ...be used to monitor the traffic conditions of the firewall and content filtering engine and to monitor the users access to the Internet and the types of traffic that they are allowed to have See Monit...

Page 342: ...including the password 1 Select Users Users from the menu The Users screen displays Figure 10 1 shows the UTM s default users admin and guest and as an example several other users in the List of User...

Page 343: ...fault the administrator can log in from a WAN interface Deny or allow login access from specific IP addresses By default the administrator can log in from any IP address Deny or allow login access fro...

Page 344: ...remote management 3 As an option you can change the default HTTPS port The default port number is 443 Note When remote management is enabled and administrative access through a WAN interface is grante...

Page 345: ...https address Note The first time that you remotely connect to the UTM25 with a browser via an SSL connection you might get a warning message regarding the SSL certificate If you are using a Windows...

Page 346: ...or conditions that warrant administrative attention SNMP exposes management data in the form of variables on the managed systems which describe the system configuration These variables can then be que...

Page 347: ...ity The community string to allow an SNMP manager access to the MIB objects of the UTM for the purpose of reading only The default setting is public Set Community The community string to allow an SNMP...

Page 348: ...to scan primary and secondary actions and so on Update settings Update source update frequency and so on Anti spam settings Whitelist blacklist content filtering settings and so on Back up your UTM s...

Page 349: ...re 10 5 on page 10 16 next to Restore save settings from file click Browse 2 Locate and select the previously saved backup file by default backup pkg 3 When you have located the file click the restore...

Page 350: ...he Backup Restore Settings screen remains visible during the reboot process The reboot process is complete after several minutes when the Test LED on the front panel goes off Updating the Firmware The...

Page 351: ...ware versions 1 Select Administration System Update from the menu The System Update submenu tabs appear with the Signatures Engine screen in view 2 Click the Firmware submenu tab The Firmware screen d...

Page 352: ...led firmware should be the secondary firmware and not the active firmware Select the Activation radio button for he secondary firmware that is the newly installed firmware 6 Click the Reboot button th...

Page 353: ...t LED on the front panel goes off Updating the Scan Signatures and Scan Engine Firmware To scan and detect viruses spyware and other malware threats the UTM s scan engine requires two components A pat...

Page 354: ...2009 The Info section shows the following information fields for the scan engine firmware and pattern file Current Version The version of the files Last Updated The date of the most recent update To...

Page 355: ...the Update Frequency settings below Update From Set the update source server by selecting one of the following radio buttons Default update server Files are updated from the default NETGEAR update ser...

Page 356: ...re accurate To set time date and NTP servers 1 Select Administration System Date Time from the menu The System Date Time screen displays The bottom of the screen displays the current weekday date time...

Page 357: ...oth of which you must specify in the fields that become available with this menu selection Note If you select this option but leave either the Server 1 or Server 2 field blank both fields are set to t...

Page 358: ...ProSecure Unified Threat Management UTM10 or UTM25 Reference Manual 10 26 Network and System Management v1 0 September 2009...

Page 359: ...ying Logs and Generating Reports on page 11 32 Using Diagnostics Utilities on page 11 43 Enabling the WAN Traffic Meter If your ISP charges by traffic volume over a given period of time or if you want...

Page 360: ...ormance v1 0 September 2009 The Internet Traffic Statistics section in the lower part of the screen displays statistics on Internet traffic via the WAN port If you have not enabled the traffic meter t...

Page 361: ...hly limit field below Monthly Limit Enter the monthly traffic volume limit in MB The default setting is 0 MB Increase this month limit by Select this checkbox to temporarily increase a previously spec...

Page 362: ...f traffic for each protocol and the total volume of traffic is displayed Traffic counters are updated in MBs the counter starts only when traffic passed is at least 1 MB In addition the popup screen d...

Page 363: ...l notification server must be configured and e mail notification must be enabled If the e mail notification server is not configured or e mail notification is disabled you can still query the logs and...

Page 364: ...from the menu The Logs Reports submenu tabs appear with the Email and Syslog screen in view see Figure 11 4 on page 11 7 Table 11 2 E mail Notification Settings Setting Description or Subfield and De...

Page 365: ...ProSecure Unified Threat Management UTM10 or UTM25 Reference Manual Monitoring System Access and Performance 11 7 v1 0 September 2009 Figure 11 4...

Page 366: ...file to an e mail address Send to The e mail address of the recipient of the log file Click Send Now to immediately send the logs that you first must have specified below Frequency Select a radio but...

Page 367: ...specify the maximum size of each file in MB Send Logs via Syslog Enable Select this checkbox to enable the UTM to send a log file to a syslog server SysLog Server The IP address or name of the syslog...

Page 368: ...teria are based on the number of malware threats detected within a specified period of time IPS Alert Sent when the UTM detects an attack IPS Outbreak Alert Sent when the IPS outbreak criteria that yo...

Page 369: ...Table 11 4 Alerts Settings Setting Description or Subfield and Description Enable Update Failure Alerts Select this checkbox to enable update failure alerts Enable License Expiration Alerts Select thi...

Page 370: ...are detected Note When the specified number of detected malware threats is reached within the time threshold the UTM sends a malware outbreak alert Protocol Select the checkbox or checkboxes to speci...

Page 371: ...Filtering on page 5 40 and packets that are dropped because the session limit see Setting Session Limits on page 5 23 bandwidth limit see Creating Bandwidth Profiles on page 5 36 or both have been ex...

Page 372: ...of the size of the Dashboard screen it is divided and presented in this manual in three figures Figure 11 7 on page 11 15 Figure 11 8 on page 11 17 and Figure 11 9 on page 11 19 each with its own tabl...

Page 373: ...ProSecure Unified Threat Management UTM10 or UTM25 Reference Manual Monitoring System Access and Performance 11 15 v1 0 September 2009 Figure 11 7 Dashboard screen 1 of 3...

Page 374: ...nti Virus and Notification Settings on page 6 5 E mails that matched filters to configure see E mail Content Filtering on page 6 8 Spam to configure see Protecting Against E mail Spam on page 6 11 Web...

Page 375: ...or the various applications Note IMBlock stands for instant messaging applications blocked P2PBlock stands for peer to peer applications blocked IPSSisMatch stands for IPS signatures matched Total Tra...

Page 376: ...attack Count The number of times that the attack was detected Percentage The percentage that the attack represents in relation to the total number of detected attacks IM Peer to Peer Application The...

Page 377: ...of detected viruses and attacks Total Files Blocked The total number of downloaded files that were blocked Total URLs Blocked The total number of URL requests that were blocked These statistics are ap...

Page 378: ...ng important components of the UTM CPU memory and hard disk status and the number of active connections per protocol Firmware versions and update information of the UTM software versions and update in...

Page 379: ...us screen Figure 11 10 System Status screen 1 of 3 Table 11 9 System Status Status and System Information Setting Description or Subfield and Description Status System The current CPU memory and hard...

Page 380: ...time since last reboot Firmware Information The firmware version and most recent download for the active and secondary firmware of the UTM and for the scan engine pattern file and firewall License Exp...

Page 381: ...ription WAN1 Configuration WAN2 Configuration UTM25 or WAN Configuration UTM10 WAN Mode Single Port Load Balancing or Auto Rollover WAN State UP or DOWN NAT Enabled or Disabled Connection Type Static...

Page 382: ...ate that the user logged in To disconnect an active user click the disconnect table button to the right of the user s table entry Viewing VPN Tunnel Connection Status To review the status of current I...

Page 383: ...Monitoring Active Users VPNs from the main menu The Active Users VPN submenu tabs appear with the Active Users screen in views Figure 11 14 Table 11 12 IPsec VPN Connection Status Information Item Des...

Page 384: ...ess are listed in the table with a timestamp indicating the time and date that the user connected To disconnect an active user click the disconnect table button to the right of the user s table entry...

Page 385: ...tabs appear with the WAN1 ISP Settings screen in view see Figure 11 18 on page 11 28 which shows the UTM25 screen On the UTM10 the WAN ISP Settings screen displays Figure 11 17 Table 11 13 Port Trigge...

Page 386: ...28 Monitoring System Access and Performance v1 0 September 2009 2 Click the WAN Status option arrow at the top right of the WAN1 ISP Settings screen UTM25 or WAN1 ISP Settings screen UTM10 The Connec...

Page 387: ...e LAN Groups screen 1 Select Network Config LAN Settings from the menu The LAN Settings submenu tabs appear with the LAN Setup screen in view see Figure 11 20 on page 11 30 which contains some profile...

Page 388: ...M25 Reference Manual 11 30 Monitoring System Access and Performance v1 0 September 2009 2 Click the LAN Groups submenu tab The LAN Groups screen displays Figure 11 21 shows some examples in the Known...

Page 389: ...evice is assigned a static IP address you need to update this entry manually after the IP address on the PC or device has changed MAC Address The MAC address of the PC or device s network interface Gr...

Page 390: ...system reports and e mailing these reports to specified recipients For information about e mailing logs and sending logs to a syslog server see Configuring and Activating System E mail and Syslog Logs...

Page 391: ...Peer to Peer Logs All instant messaging and peer to peer access violations Firewall Logs The firewall logs that you have specified on the Firewall Logs screen see Configuring and Activating Firewall L...

Page 392: ...15 Logs Query Settings Setting Description or Subfield and Description Log Type Select one of the following log types from the pull down menu Traffic All scanned incoming and outgoing traffic Spam All...

Page 393: ...events View All Select one of the following radio buttons View All Display or download the entire selected log Search Criteria Query the selected log by configuring the search criteria that are availa...

Page 394: ...mail filters log keyword file type file name password and size limit For the Content filters log URL file type and size limit Spam Found By This field is available only for the Spam log Select a check...

Page 395: ...s that are queried This field is available only for the Traffic log Event The type of event that is queried These events are the same events that are used for syslog server severity indications EMERG...

Page 396: ...ination IP address on a regular basis If you find a client exhibiting this behavior you can run a query on that client s HTTP traffic activities to get more information Do so by running the same HTTP...

Page 397: ...each protocol HTTP HTTPS and FTP the report shows the following information per day both in tables and graphics Number of connections Traffic amount in MB Number of malware incidents Number of files b...

Page 398: ...graphics The number of SMPT POP3 and IMAP incidents the top 10 e mail malware threats by count and the top 10 infected e mail clients by count The number of HTTP HTTPS and FTP incidents the top 10 Web...

Page 399: ...king its download table button The reports download as a zipped file that contains both CSV and HTML files Figure 11 24 Table 11 16 Generate Report Settings Setting Description or Subfield and Descrip...

Page 400: ...ck the Schedule Reports submenu tab The Schedule Reports screen displays 3 Enter the settings as explained in Table 11 17 Figure 11 25 Table 11 17 Schedule Report Settings Setting Description or Subfi...

Page 401: ...toring Diagnostics from the menu To facilitate the explanation of the tools the Diagnostics screen is divided and presented in this manual in three figures Figure 11 26 on page 11 44 Figure 11 27 on p...

Page 402: ...t usually means that the destination is unreachable However some network devices can be configured not to respond to a ping The ping results are displayed on a new screen click Back on the Windows men...

Page 403: ...t NETGEAR Technical Support to diagnose routing problems To display the routing table 1 Locate the Network Diagnostics section on the Diagnostics screen 2 Next to Display the Routing Table click the d...

Page 404: ...c Diagnostics section on the Diagnostics screen 2 In the Source IP address field enter the IP address of source of the traffic stream that you want to analyze 3 In Destination IP address enter the IP...

Page 405: ...thering Important Log Information To gather log information about your UTM 1 Locate the Gather Important Log Information section on the Diagnostics screen 2 Click Download Now You are prompted to save...

Page 406: ...ot the UTM 1 Locate the Reboot the System section on the Diagnostics screen 2 Click the reboot button The UTM reboots If you can see the unit the reboot process is complete when the Test LED on the fr...

Page 407: ...ng the Web Management Interface on page 12 3 A time out occurs Go to When You Enter a URL or IP Address a Time out Error Occurs on page 12 4 I cannot access the Internet or the LAN Troubleshooting the...

Page 408: ...r see the appropriate following section Power LED Not On If the Power and other LEDs are off when your UTM is turned on make sure that the power cord is properly connected to your UTM and that the pow...

Page 409: ...a standard straight through Ethernet cables or an Ethernet crossover cables Troubleshooting the Web Management Interface If you are unable to access the UTM s Web Management Interface from a PC on yo...

Page 410: ...ave made in the Web Configuration Interface check the following When entering configuration settings be sure to click the Apply button before moving to another menu or tab or your changes are lost Cli...

Page 411: ...external site such as www netgear com 2 Access the Web Management Interface of the UTM s configuration at https 192 168 1 1 3 Select Network Security WAN Settings from the menu The WAN1 ISP Settings s...

Page 412: ...m your ISP that you have bought a new network device and ask them to use the UTM s MAC address or Configure your UTM to spoof your PC s MAC address You can do this in the Router s MAC Address section...

Page 413: ...the path is not functioning correctly you could have one of the following problems Wrong physical connections Make sure that the LAN port LED is on If the LED is off follow the instructions in LAN or...

Page 414: ...thernet MAC addresses of all but one of your PCs Many broadband ISPs restrict access by only allowing traffic from the MAC address of your broadband modem but some ISPs additionally restrict access to...

Page 415: ...twork Time Servers on the Internet Each entry in the log is stamped with the date and time of day Problems with the date and time function can include Date shown is January 1 2000 Cause The UTM has no...

Page 416: ...ling Remote Troubleshooting One of the advanced features that the UTM provides is online support through a support tunnel With this feature NETGEAR Technical Support staff is able to analyze from a re...

Page 417: ...a file to NETGEAR for analysis 1 Select Support Malware Analysis from the menu The Online Support screen displays 2 Enter the settings as explained in Table 12 1 Figure 12 3 Table 12 1 Malware Analys...

Page 418: ...ing Online Support v1 0 September 2009 3 Click Submit Accessing the Knowledge Base and Documentation To access NETGEAR s Knowledge Base for the UTM select Support Knowledge Base from the menu To acces...

Page 419: ...hat are shown in Table A 1 below Pressing the Reset button for a shorter period of time simply causes the UTM to reboot Table A 1 shows the default configuration settings for the UTM Table A 1 UTM Def...

Page 420: ...ing in from the Internet All communication denied Outbound communications from the LAN to the Internet All communication allowed Source MAC filtering Disabled Stealth mode Enabled Respond to ping on I...

Page 421: ...Specifications 4 LAN one of which is a configurable DMZ interface AutoSense 10 100 1000BASE T RJ 45 UTM25 2 WAN UTM10 1 WAN AutoSense 10 100 1000BASE T RJ 45 1 administrative console port RS 232 1 USB...

Page 422: ...figuration and status monitoring Number of concurrent users supported 5 UTM10 or 13 UTM25 dedicated SSL VPN tunnels SSL versions SSLv3 TLS1 0 SSL encryption algorithm DES 3DES ARC4 AES 128 AES 192 AES...

Page 423: ...o understand all of the choices that are available to you consider the following before you begin 1 Plan your network a Determine whether you will use one or both WAN ports For one WAN port you might...

Page 424: ...the UTM through separate physical facilities Each WAN port must be configured separately whether you are using a separate ISP for each WAN port or you are using the same ISP to route the traffic of bo...

Page 425: ...nt Interface To access the configuration menus on the UTM your must use a Java enabled Web browser that supports HTTP uploads such as Microsoft Internet Explorer 5 1 or higher Mozilla Firefox l x or h...

Page 426: ...anel Record all the settings for each section After you have located your Internet configuration information you might want to record the information in the following section Internet Connection Infor...

Page 427: ...me If your ISP s mail server is mail xxx yyy com then use xxx yyy com as the domain name ISP Host Name _______________________ ISP Domain Name _______________________ Fully Qualified Domain Name Some...

Page 428: ...of the tunnel endpoints must be known in advance in order for the other tunnel end point to establish or re establish the VPN tunnel Dual WAN Ports in Auto Rollover Mode Rollover for an UTM with dual...

Page 429: ...hich you have configured an inbound rule Instead of discarding this traffic you can configure the UTM to forward it to one or more LAN hosts on your network The addressing of the UTM s dual WAN port d...

Page 430: ...eliability In a dual WAN port auto rollover configuration the WAN port s IP address will always change when a rollover occurs You must use a FQDN that toggles between the IP addresses of the WAN ports...

Page 431: ...Configuration and WAN IP address Single WAN Port Configurations Reference Cases Dual WAN Port Configurations Rollover Modea a All tunnels must be re established after a rollover using the new WAN IP a...

Page 432: ...at a time and when it rolls over the IP address of the active WAN port always changes Therefore the use of an FQDN is always required even when the IP address of each WAN port is fixed Dual WAN Ports...

Page 433: ...ce Case In a single WAN port gateway configuration the remote PC client initiates the VPN tunnel because the IP address of the remote PC client is not known in advance The gateway WAN port must act as...

Page 434: ...own in advance After a rollover of the WAN port has occurred the previously inactive gateway WAN port becomes the active port port WAN2 in Figure B 11 and the remote PC client must re establish the VP...

Page 435: ...f the gateway WAN ports can be either fixed or dynamic If an IP address is dynamic you must use a FQDN If an IP address is fixed an FQDN is optional VPN Gateway to Gateway The following situations exe...

Page 436: ...of the gateway WAN ports at one end can initiate the VPN tunnel with the appropriate gateway WAN port at the other end as necessary to balance the loads of the gateway WAN ports because the IP address...

Page 437: ...end of the tunnel has a known gateway IP address to establish or re establish a VPN tunnel VPN Gateway to Gateway Dual Gateway WAN Ports for Load Balancing In a configuration with two dual WAN port V...

Page 438: ...dual gateway WAN ports for increased reliability before and after rollover Dual gateway WAN ports for load balancing VPN Telecommuter Single Gateway WAN Port Reference Case In a single WAN port gatew...

Page 439: ...of the remote NAT router is not known in advance The gateway WAN port must act as the responder The IP addresses of the gateway WAN ports can be either fixed or dynamic but you must always use a FQDN...

Page 440: ...Telecommuter Dual Gateway WAN Ports for Load Balancing In a dual WAN port load balancing gateway configuration the remote PC client initiates the VPN tunnel with the appropriate gateway WAN port that...

Page 441: ...C 16 This appendix uses the following log message terms Table C 1 Log Message Terms Term Description or Subfield and Description UTM System identifier kernel Message from the kernel CODE Protocol code...

Page 442: ...em daemons NTP the WAN daemon and others System Startup This section describes log messages generated during system startup Reboot This section describes log messages generated during a system reboot...

Page 443: ...Table C 5 System Logs NTP Message 1 Message 2 Message 3 Message 4 Message 5 Message 6 Example Nov 28 12 31 13 UTM ntpdate Looking Up time f netgear com Nov 28 12 31 13 UTM ntpdate Requesting time fro...

Page 444: ...ction None Message Nov 28 14 55 09 UTM seclogin Logout succeeded for user admin Nov 28 14 55 13 UTM seclogin Login succeeded user admin from 192 168 1 214 Explanation Secure login logout of user admin...

Page 445: ...e Detection method This section describes the logs that are generated when the WAN mode is set to auto rollover System Logs WAN Status Auto Rollover Message Nov 17 09 59 09 UTM wand LBFO WAN1 Test Fai...

Page 446: ...secondary link is active have the same timestamp and so they happen in the same algorithm state machine cycle So although it appears that the failover did not happen immediately after three failures...

Page 447: ...13 12 49 UTM pppd secondary DNS address 202 153 32 3 Nov 29 11 29 26 UTM pppd Terminating connection due to lack of activity Nov 29 11 29 28 UTM pppd Connect time 8 2 minutes Nov 29 11 29 28 UTM pppd...

Page 448: ...Starting PPP connection process Message 2 Message from server for authentication success Message 3 Local IP address assigned by the server Message 4 Server side IP address Message 5 primary DNS confi...

Page 449: ...1 Traffic Meter screen see Enabling the WAN Traffic Meter on page 11 1 all the incoming and outgoing traffic might be stopped Note For WAN2 interface see the settings on the WAN2 Traffic Meter screen...

Page 450: ...ble C 1 Recommended Action None Table C 17 System Logs Invalid Packets Message 2007 Oct 1 00 44 17 UTM kernel INVALID NO_CONNTRACK_ENTRY DROP SRC 192 168 20 10 DST 192 168 20 2 PROTO TCP SPT 23 DPT 54...

Page 451: ...17 UTM kernel INVALID SHORT_PACKET DROP SRC 192 168 20 10 DST 192 168 20 2 PROTO TCP SPT 23 DPT 54899 Explanation Short packet Recommended Action None Message INVALID INVALID_STATE DROP SRC 192 168 20...

Page 452: ...shows the date and time protocol client IP address server IP address URL reason for the action and action that is taken Recommended Action None Message 2009 08 01 00 00 01 HTTP 192 168 1 3 192 168 35...

Page 453: ...ocol client IP address server IP address URL reason for the action and action that is taken Recommended Action None Table C 19 Content Filtering and Security Logs Spam Message 2009 02 28 23 59 59 SMTP...

Page 454: ...address server IP address sender recipient and Web URL or e mail subject line Recommended Action None Table C 21 Content Filtering and Security Logs Virus Message 2008 02 29 23 59 00 POP3 OF97 Jerk De...

Page 455: ...otocol client IP address client port number server IP address server port number IPS category and reason for the action Recommended Action None Table C 24 Content Filtering and Security Logs Port Scan...

Page 456: ...essage Nov 29 09 19 43 UTM kernel LAN2WAN ACCEPT IN LAN OUT WAN SRC 192 168 10 10 DST 72 14 207 99 PROTO ICMP TYPE 8 CODE 0 Explanation This packet from the LAN to the WAN has been allowed by the fire...

Page 457: ...8 10 10 PROTO ICMP TYPE 8 CODE 0 Explanation This packet from the LAN to the WAN has been allowed by the firewall For other settings see Table C 1 Recommended Action None Table C 30 Routing Logs DMZ t...

Page 458: ...ProSecure Unified Threat Management UTM10 or UTM25 Reference Manual C 18 System Logs and Error Messages v1 0 September 2009...

Page 459: ...ords and the presence of firewalls are no longer enough to protect the networks from being compromised IT professionals and security experts have recognized the need to go beyond the traditional authe...

Page 460: ...something you have This new security method can be viewed as a two tiered authentication approach because it typically relies on what you know and what you have A common example of two factor authent...

Page 461: ...on by end users dramatically reducing implementation and maintenance costs Here is an example of how WiKID works 1 The user launches the WiKID token software enter the PIN that has been given to them...

Page 462: ...login page and enters the generated one time passcode as the login password Note The one time passcode is time synchronized to the authentication server so that the OTP can only be used once and must...

Page 463: ...ions http documentation netgear com reference enu winzerocfg vistaxpconfig pdf TCP IP Networking Basics http documentation netgear com reference enu tcpip index htm Wireless Networking Basics http doc...

Page 464: ...ProSecure Unified Threat Management UTM10 or UTM25 Reference Manual E 2 Related Documents v1 0 September 2009...

Page 465: ...fying alerts to send via e mail 11 10 ALG 5 24 allowing applications services 6 21 e mails 6 14 URLs 6 32 Web categories 2 22 application services protection 6 19 6 21 Application Level Gateway See AL...

Page 466: ...rowsers user login policies 9 15 Web Management Interface 2 2 button Reset 1 12 buttons Web Management Interface action 2 6 help 2 7 table 2 6 C CA 7 30 cache control SSL VPN 8 4 8 21 card service reg...

Page 467: ...19 updating 3 21 wildcards 3 21 Dead Peer Detection See DPD debug logs 11 47 defaults configuration settings A 1 configuration restoring 12 8 content filtering settings 6 2 factory 10 18 12 8 IPsec VP...

Page 468: ...1 B 9 load balancing 3 9 3 10 B 7 B 8 B 10 network planning B 1 overview 1 3 duplex half and full 3 23 Dynamic DNS See DDNS Dynamic Host Configuration Protocol See DHCP 1 6 DynDNS org 3 19 3 21 E e co...

Page 469: ...lash objects 6 24 6 28 FQDNs auto rollover mode UTM25 3 19 dual WAN ports UTM25 7 1 7 2 B 1 B 9 load balancing mode UTM25 3 19 SSL VPN port forwarding 8 18 VPN tunnels 7 2 front panel LEDs 1 10 ports...

Page 470: ...c DMZ port 10 7 exposed hosts 10 8 overview 10 5 port forwarding 5 7 10 5 port triggering 10 7 VPN tunnels 10 8 initial configuration Setup Wizard 2 7 initial connection 2 1 Installation Guide 2 1 ins...

Page 471: ...igning 4 14 managing 4 12 hosts managing 4 12 Known PCs and Devices table 4 14 4 15 LEDs 1 11 12 3 network database 4 12 4 13 ports 1 2 1 9 secondary IP addresses 4 11 security checks 5 22 settings us...

Page 472: ...s 7 28 ModeConfig 7 45 RIP 2 4 26 self certificate requests 9 23 VPN policies 7 36 Media Access Control See MAC memory usage 11 21 Message Digest algorithm 5 See MD5 meter WAN traffic 11 1 metric stat...

Page 473: ...ackage contents UTM 1 9 packets accepted and dropped 11 14 PAP See also RADIUS PAP MIAS PAP or WiKID PAP 9 2 Password Authentication Protocol See PAP password protected attachments 6 8 passwords chang...

Page 474: ...explanation of WAN and LAN 1 10 front panel 1 9 LAN 1 9 numbers 5 31 5 44 numbers for SSL VPN port forwarding 8 12 8 24 USB non functioning 1 9 WAN 1 9 portscan logs 11 9 11 33 11 35 Post Office Proto...

Page 475: ...2 troubleshooting 10 13 remote troubleshooting enabling 12 10 remote users assigning addresses via ModeConfig 7 42 reports administrator e mailing options 11 43 e mail address for sending reports 2 24...

Page 476: ...3 logging dropped packets 11 14 Setup Wizard initial configuration 2 7 severities syslog 11 9 SHA 1 IKE policies 7 28 ModeConfig 7 45 self certificate requests 9 23 VPN policies 7 36 shutting down 11...

Page 477: ...8 24 IP addresses 8 23 port numbers 8 12 8 24 using SSL VPN Wizard 8 11 portal accessing 8 14 options 8 1 settings configuring manually 8 18 settings using SSL VPN Wizard 8 3 specifications A 4 statu...

Page 478: ...functioning 12 2 browsers 12 4 configuration settings using sniffer 12 4 date and time 12 9 defaults 12 4 ISP connection 12 5 LEDs 12 2 12 3 NTP 12 9 remote management 10 13 remotely 12 10 testing yo...

Page 479: ...gateway dual WAN ports load balancing B 15 gateway to gateway single WAN port mode B 13 Road Warrior dual WAN mode auto rollover B 11 Road Warrior dual WAN mode load balancing B 13 Road Warrior single...

Page 480: ...or counter 11 1 warning SSL certificate 2 3 Web audio and video files filtering 6 28 categories blocked recent 5 and top 5 11 18 blocking 2 22 6 24 6 29 compressed files filtering 6 28 executable file...

Reviews: