ProSecure Unified Threat Management UTM10 or UTM25 Reference Manual
Network and System Management
10-15
v1.0, September 2009
2.
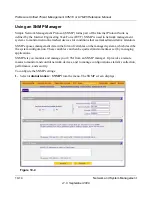
Enter the settings as explained in
Table 10-1
.
3.
Click
Apply
to save your settings.
Managing the Configuration File
The configuration settings of the UTM are stored in a configuration file on the UTM. This file can
be saved (backed up) to a PC, retrieved (restored) from the PC, or cleared to factory default
settings.
Once the UTM is installed and works properly, make a back-up of the configuration file to a
computer. If necessary, you can later restore the UTM settings from this file.
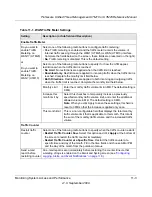
Table 10-1. SNMP Settings
Setting
Description (or Subfield and Description)
Settings
Do You Want to
Enable SNMP?
Select one of the following radio buttons:
•
Yes
. Enable SNMP.
•
No
. Disable SNMP. This is the default setting.
Read Community The community string to allow an SNMP manager access to
the MIB objects of the UTM for the purpose of reading only.
The default setting is public.
Set Community
The community string to allow an SNMP manager access to
the MIB objects of the UTM for the purpose of reading and
writing. The default setting is private.
Contact
The SNMP system contact information that is available to
the SNMP manager. This setting is optional.
Location
The physical location of the UTM. This setting is optional.
Trusted SNMP Hosts
Enter the IP addresses of the computers and devices to which you want to grant read-only (“GET”) or
write (“SET”) privileges on the UTM. Separate IP addresses by a comma. To allow any trusted SNMP
host access, leave the field blank, which is the default setting.
SNMP Traps
Enter the IP addresses of the SNMP management stations that are allowed to receive the UTM’s SNMP
traps. Separate IP addresses by a comma. If you leave the field blank, which is the default setting, no
SNMP management station can receive the UTM’s SNMP traps.


