background image


User Guide


User Guide 

9-59 


9.3.6.1


Forward Unconditional 

How To:  

1)


Press *72 on your telephone dial-pad.  

2)


You will hear an alert tone very briefly, following which you can enter the number you 
want to forward call to; then press # again.  

3)


If you enter a number, then the VOIP ATA will attempt to call the number to which you 
intend to forward. Once you disconnect the attempted call, in subsequent call attempts 
you will listen stutter dial tone indicating that 

Forward Unconditional

 is enabled.  


9.3.6.2


Forward When Busy 

How To:  

1)


Press *74 on your telephone dial-pad.  

2)


You will hear an alert tone very briefly, following which you can enter the number you 
want to forward call to; then press # again.  

3)


If you enter a number, then the VOIP ATA will attempt to call the number to which you 
intend to forward. Once you disconnect the attempted call, in subsequent call attempts 
you will listen normal dial tone only, but Call Forward when Busy will be enabled. 


9.3.6.3


Forward On No Answer 

How To:  

1)


Press *75 on your telephone dial-pad.  

2)


You will hear an alert tone very briefly, following which you can enter the number you 
want to forward call to; then press # again.  

3)


If you enter a number, then the VOIP ATA will attempt to call the number to which you 
intend to forward. Once you disconnect the attempted call, in subsequent call attempts 
you will listen normal dial tone only, but Call Forward on No Answer will be enabled.  

4)


You  can  set  the  CallFwdNoAnswer  time  from  the  webpage,  which  indicates  the  time 
after which Call forwarding will take place. This timer is applicable for this feature only. 

Summary of Contents for Network Adapater

Page 1: ...User Guide User Guide 1 1 Netopia VOIP ATA User sGuide ...

Page 2: ...User Guide User Guide 1 2 REVISION STATUS ...

Page 3: ...via GUI 4 13 4 1 Access to VOIP ATA s GUI 4 13 4 1 1 Accessing GUI Using Static IP 4 13 4 1 2 Accessing GUI Using Hub Switch 4 15 4 2 Setup Mode 4 17 Chapter 5 Basic Mode 5 19 5 1 Overall Status 5 19 5 2 DHCP Client Status 5 20 5 3 TCP Status 5 21 5 4 System Log 5 22 Chapter 6 Basic Configurations 6 23 6 1 WAN Configuration 6 23 6 2 DNS Configuration 6 24 6 3 Save Settings Reboot 6 26 Chapter 7 Ad...

Page 4: ...Consultation Hold 9 56 9 3 2 Blind Transfer 9 56 9 3 3 Attended Transfer 9 57 9 3 4 3 Way Conferencing 9 57 9 3 5 Call Waiting 9 57 9 3 6 Call Forwarding 9 58 9 3 6 1 Forward Unconditional 9 59 9 3 6 2 Forward When Busy 9 59 9 3 6 3 Forward On No Answer 9 59 9 3 6 4 Canceling Call Forwarding 9 60 9 3 7 Call Return 9 60 9 3 8 IP Dialing 9 60 9 3 8 1 IP Address 9 60 9 3 8 2 Through Server 9 60 Chapt...

Page 5: ...User Guide User Guide 1 5 B1 2 Explanation of the Rules 10 66 B2 Calling Other Service Provider Numbers through Pulver 10 68 ...

Page 6: ...address the needs of small office environments and the emerging VoIP voice services whereby ISPs value add their ADSL or Cable Modem offering with VoIP services by turning their analog devices into IP devices The VOIP ATA is installed at the subscriber s premises and supports 1 voice FXS port The VOIP ATA supports 1 10 100BaseT AutoMDIX Ethernet ports This adaptor can make use of existing broadban...

Page 7: ...ependant on ITSP Setup Configuration Web Based Configuration Password Protection for Web Configuration Audio Codec Feature G 711 G 726 G 729a Voice Activity Detection Silence Compression Comfort Noise Generation Echo Cancellation Jitter Provisioning Protocols SIP v2 0 T 38 Fax over IP support Network Support Static IP Support NAT Traversal with STUN client NAT Traversal with outbound proxy DHCP Cl...

Page 8: ...onnect the VOIP ATA to your router or gateway using a Category 5 or better Ethernet network cable RJ 45 Press and hold the RESET button for 2 to 4 seconds will restore the VOIP ATA s WAN Static IP to 192 168 1 200 while keeping all the other settings intact RESET Press and hold the RESET button for more than 5 seconds will restore the VOIP ATA to default factory settings PHONE The PHONE port allow...

Page 9: ...with cable DSL modem Blinking The VOIP ATA is sending receiving dVoIP ATA to from the cable DSL modem ETH Off The VOIP ATA doesn t have an Ethernet connection with the cable DSL modem On This port s is registered to the Internet Phone Service Provider s Blinking The telephone s connected to this port s is are off hooked PHONE Off This port s isn t registered to the Internet Phone Service Provider ...

Page 10: ...modem before you can connect to the VOIP ATA It can be placed behind router or straight from the modem Check if your Computer Notebook has an Ethernet Port The Telephone set is connected to the RJ 11 3 1 1 ADSL Connection Diagram Figure 3 1 below shows a ADSL Modem Router connection diagram Figure 3 1 Connection via ADSL Modem Router ...

Page 11: ...User Guide User Guide 3 11 3 1 2 Cable Connection Diagram Figure 3 2 below shows a Cable Modem Router connection diagram Figure 3 2 Connection via Cable Modem Router ...

Page 12: ...uide 3 12 3 2 For Company Network Connection Please seek advise from your company s Network Administrator to open UDP port 5060 for SIP Signaling and UDP ports 5000 5020 for RTP Figure 3 3 Connection via Company Network ...

Page 13: ...tatic IP These instructions are for the Windows 98 Windows ME Windows 2000 and Windows XP operating systems 1 In Windows XP click Start Control Panel In Windows 98 ME 2000 click Start Settings Control Panel 2 In Windows XP click Network Connections In Windows 98 ME 2000 click Network and Dial up Connections 3 Right click Local Area Connection and then click Properties 4 Select Internet Protocol TC...

Page 14: ...User Guide User Guide 4 14 5 Select Use the following IP address and enter information as below IP address 192 168 1 XXX IP Address set must be unique Subnet mask 255 255 255 0 Default gateway Blank ...

Page 15: ...GUI Using Hub Switch Figure 4 2 Accessing GUI Using Hub Switch If your Router s LAN is already in the192 168 1 XXX subnet simply launch your web browser and enter 192 168 1 200 VOIP ATA s Static IP at the address bar and hit Enter If you Router s LAN is using subnet other than 192 168 1 XXX Steps 1 Access the VOIP ATA s GUI using Static IP Refer to 3 2 1 and set the VOIP ATA as a DHCP client 2 Acc...

Page 16: ...User Guide User Guide 4 16 4 Launch your web browser and enter the assigned IP Address at the address bar and hit Enter ...

Page 17: ... mode screen as shown in Figure 4 3 is displayed 2 Click Step 1 Network Selection to start configurating the VOIP ATA Figure 4 3 Overall Status 3 Depending to your System Setup select Connecting to a broadband router cable modem and click Proceed to Step 2 Please refer to Figure 4 4 ...

Page 18: ...you by your ITSP Internet Telephony Service Provider or network administrator Please refer to Figure 4 5 Figure 4 5 Step 2 5 Click Finish to save configuration and reboot the VOIP ATA Please refer to Figure 4 6 6 Click the Refresh button on your web browser after approximately 30 50 seconds Figure 4 6 Saving Configuration ...

Page 19: ...tration Status This field displays the current registration status as defined in Table 5 1 Registration Status Descriptions VOIP SERVICE DISABLED SIP is disabled REGISTRATION DISABLED Registration is disabled on GUI REGISTERING WAN is up and Registration is being attempted REGISTERED Registration succeeded REGISTRATION FAILED Registration failed UNREGISTERED Board is powered on but WAN is still do...

Page 20: ...11A as the selected codec VOICE CALL IN PROGRESS CODEC USED IS G729 Voice call in progress with G729 as the selected codec VOICE CALL HELD BY REMOTE END Remote endpoint has held the voice call VOICE CALL ON HOLD BY LOCAL END Local endpoint has put the voice call on hold Table 5 2 Description of Voice Call Status WAN Connection Type It shows the type of connection that is currently used WAN Statist...

Page 21: ... counters to clear all the attributes Figure 5 4 TCP Status Reset Counters This button allows user to reset the TCP Status counter General Total Packets DVoIP ATA Packets DVoIP ATA Bytes Out of Order Packets Out of Order Bytes Discarded Packets Bad Checksum Bad Offset Header Too Short Connections Initiated Accepted Established Closed ...

Page 22: ...ntains dynamic information and will refresh every 10 seconds Figure 5 5 System Log Clear Log This field allows you to clear the current contents of the System Log Save Log This field allows you to save the current contents of the System Log by right clicking here and select Save Target As to save it into a text file ...

Page 23: ... Mask is x x x x where 0 x 255 default is 255 255 255 0 Gateway Range for Gateway is x x x y where 0 x 255 and 1 y 254 default is 0 0 0 0 DHCP Clients DHCP Client This is to enable or disable the VOIP ATA WAN as a DHCP client DHCP Client is generally used in the following encapsulations 1483 Bridged IP LLC 1483 Routed IP LLC 1483 Bridged IP VC MUX 1483 Routed IP VC Mux and Classical IP over ATM Th...

Page 24: ...d When enabled default the DNS proxy will store the DNS server IP addresses obtained from DHCP client or PPP into the table All DNS query messages will be sent to the dynamically obtained DNS server Select this option when the DNS Server address is unknown but provided automatically by the ISP User Configured When enabled the DNS proxy will use the user configured DNS server All DNS query messages...

Page 25: ...up to 255 characters Host IP This is the IP address of the DNS Server DNS Proxy Setting This is a table of all DNS server IP addresses DNS Server Setting This is a table of all DNS sever URL names Save Configuration Clicking this will link the user to the Save Settings Reboot page ...

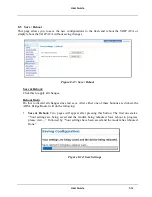
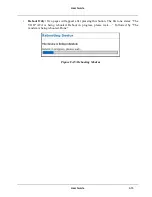
Page 26: ...idge Router will do the following Save Reboot Two pages will appear after pressing this button The first one states Your settings are being saved and the modem being rebooted Save reboot in progress please wait Followed by Your settings have been saved and the modem has rebooted Done Figure 6 4 Save Settings Reboot Only Two pages will appear after pressing this button The first one states The VOIP...

Page 27: ...User Guide User Guide 6 27 Figure 6 5 Rebooting Modem ...

Page 28: ... provider is chosen from the Drop down list the Login Account To Use drop down list is updated to reflect the login details available and configured for the selected service provider Login Account To Use This parameter holds the Login Account selected to work with the VOIP ATA for the above chosen Line and the Service Provider Different Login Account details can be configured by clicking the link ...

Page 29: ...User Guide User Guide 7 29 Note There will not be any Dial Tone when WAN interface is down or Registration is Failed ...

Page 30: ...vider added This can be edited accordingly New service providers can be defined and added manually by the user An existing service provider can be edited or even deleted New Service Provider New Service Provider is a text field where the user can enter the name of the new service provider to be added or a new string to rename an existing service provider The service provider edited will be the one...

Page 31: ...User Guide User Guide 7 31 This parameter is the IP address of the Outbound proxy server This is useful in cases where the VOIP ATA is behind a NAT ...

Page 32: ...o manipulate the various SIP and dial plan parameters for working service provider Parameters for a service provider can be displayed added and edited Display This is the default option selection of this option will display the selected service provider in the Working Service Provider field after clicking on the Submit button Add Selection of the Add option adds a new service provider after clicki...

Page 33: ...ded for every new login added This can be edited accordingly New logins can be defined and added manually by the user An existing login account can also be edited or even deleted New User Profile New User Name is a text field where the user can enter the name of the new login account to be added or a new string to rename an existing login account The login account edited will be the one chosen fro...

Page 34: ...eld parameters with the current parameters displayed on the web page The New Login field is optional and it needs to be filled only when the login account name also has to be changed Delete Selection of Delete option will delete the selected Login Account from the Login Account List Submit Changes Clicking on this button will save settings to the board RAM In order to save changes permanently to t...

Page 35: ...A will play the Ring when an incoming call has arrived and the phone is on hook After this timer period the VOIP ATA will automatically stop the ring and reject the call Disconnect Timeout Disconnect Timer indicates the time for which the fast busy tone is played once a call has been disconnected by the remote end At the end of this time the Warble tone will be played until the user hangs up the p...

Page 36: ...Timer indicates the period for which the call waiting tone will be played when an incoming call arrives in the connected state The Call Waiting tone is played at an interval of 10 sec It is configurable using the Call Waiting tone parameters ...

Page 37: ...ed when not answered by anyone This timer is applicable when Call Forwarding on No Answer is enabled Submit Changes Clicking on this button will save settings to the board RAM In order to save changes permanently to the firmware and to make them effective the setting must be saved by going to the Save Settings Reboot web page ...

Page 38: ...y Specific Ring Tones Working Country This selection is a drop down box which allows the user to select the country for which the VOIP ATA configuration must work Currently it is applicable for the ring tone parameters only When a country is selected from this dynamic list the country parameters are automatically displayed Supported Countries USA Singapore Hong Kong Australia New countries can be ...

Page 39: ...User Guide User Guide 7 39 The Ring Parameters are defined by five fields Frequency OnTime1 OffTime1 OnTime2 and OffTime2 Time values are in milliseconds Frequency is given in hertz ...

Page 40: ...ned by six fields Freq1 Freq2 OnTime1 OffTime1 OnTime2 and OffTime2 Stutter Dial Tone The stutter dial tone parameters are defined by five fields Freq1 Freq2 OnTime1 OffTime1 and Duration VMI Dial Tone The stutter dial tone parameters are defined by five fields Freq1 Freq2 OnTime1 OffTime1 and stutter Duration This plays a distinctive stutter dial tone on Off Hook when there are Voice Mails waitin...

Page 41: ...ld is optional and needs to be filled only when the country name also has to be changed Delete Selection of the Delete option will delete the selected Working Country from the country list Submit Changes Clicking on this button will save settings to the board RAM In order to save changes permanently to the firmware and to make them effective the setting should be saved by going to the Save Setting...

Page 42: ...range is 1 to 65535 Default port is 5060 Media Base Port Enter the Media Base Port also known as RTP port number This parameter provides the base value from the media RTP ports that are assigned for various lines and the different call sessions that may exist within an end point Odd port values are not recommended If an Odd Value is entered the next higher even value is used as the Media Base Port...

Page 43: ... to disable STUN VOIP ATA is not to use STUN for NAT traversal VOIP ATA also supports a proprietary implementation of NAT traversal where the Service provider is expected to provide some relay support If DISABLED is selected then based on the responses received the VOIP ATA will dynamically determine if the SIP Server supports the proprietary implementation ...

Page 44: ...ed as the NAT traversal technique STUN Port Enter the port number on which the STUN server listens for requests from the STUN Client on VOIP ATA The range is 1 to 65535 The default is 3478 This field is applicable only if USE STUN is selected as the NAT traversal technique Force Keep Alive Only valid when STUN is not used If STUN is not enabled and keep alive is still expected to be sent then sele...

Page 45: ...ook Address Book Table This table displays the current address book as configured for this endpoint Display Name Enter the Display Name for this address book entry Number The user phone number or name for this entry This field is optional if the IP Address is specified A phone number that can be reached through the current configured proxy server can also be added as an entry in which case the IP ...

Page 46: ...which the remote end will receive our call This is useful when you want to specify a non phone number entry where the call can be made directly without going through the configured proxy server When this field is not specified the default SIP port of 5060 will be assumed ...

Page 47: ...box DISPLAY Select DISPLAY for the selected speed dial code details to be displayed after clicking Submit Changes This is the default selection ADD Select ADD to add a new address book entry after clicking Submit Changes EDIT Select EDIT to overwrite the selected address book entry DELETE Select DELETE to delete the selected address book entry Submit Changes Click Submit Changes to save the settin...

Page 48: ...erver Access This field allows you to configure where these Web pages can be accessed from All When this field is checked it allows both WAN access to the Web pages Default is Enabled Restricted WAN Specified IP Subnet Mask This field allows the Web access from WAN side with a specify IP and subnet mask HTTP Server Port This field allows you to specify the port of the Web access Default is Port 80...

Page 49: ...n efficient method of obtaining the time from a Time Server Time Zone This specifies the time zone geographical location Daylight Saving Time Select to enable or disable Daylight Saving Option User Defined Time Server Specified the IP address of your preferred SNTP server TIP When the VOIP ATA is successfully connected to the SNTP server the system log will reflect the updated time 8 2 Admin Usern...

Page 50: ...User Guide User Guide 8 50 Note FTP uses the same Username and Password Ensure to click Submit and Save Settings for your configuration to take effect ...

Page 51: ... allows you to reset the VOIP ATA to original factory default configuration Figure 8 3 Restore Settings Click on Restore button to restore to factory default settings Note This feature produces the same effect as press the Reset Button for more than 5 seconds ...

Page 52: ...re 8 4 Firmware Update 8 4 1 How to Firmware Update 1 Access Firmware Update GUI at Advanced Firmware Update 2 On the Firmware Update GUI as in Figure 8 4 click Firmware Update and GUI as in Figure 8 5 will be displayed showing that VOIP ATA is preparing itself to attempt Firmware Update Figure 8 5 Preparing to Download ...

Page 53: ...ate 4 Click Cancel Update if you want to abort Firmware Update Warning As the uploading process will take about 1minutes please do not turn off the VOIP ATA 5 Firmware Updating is successful if GUI as shown in Figure 8 7 is displayed Figure 8 7 Firmware Update Successful 6 As by default the VOIP ATA is set to Static IP please refer to 4 1 1 on How to Access the GUI ...

Page 54: ...y all changes Reboot Only Do this to discard all changes since last save After either one of these buttons are clicked the ADSL Bridge Router will do the following Save Reboot Two pages will appear after pressing this button The first one states Your settings are being saved and the modem being rebooted Save reboot in progress please wait Followed by Your settings have been saved and the modem has...

Page 55: ... 8 55 Reboot Only Two pages will appear after pressing this button The first one states The VOIP ATA is being rebooted Reboot in progress please wait Followed by The modem is being rebooted Done Figure 8 15 Rebooting Modem ...

Page 56: ...to put the current remote party on hold and get a dial tone 3 You can now dial another number 4 When you are finished press flash to come back to the first call You can also alternate between calls 9 3 2 Blind Transfer This feature allows a user transferor to transfer an existing call transferee to another telephone number transfer target without calling it How To 1 During an existing call press t...

Page 57: ...call with the first party press the flash button on the telephone handset This will put the first party on hold and you will get a dial tone 3 Dial a another number and talk to the second party 4 To conference with both callers at the same time perform a hook flash 5 To drop the second call perform a hook flash Note If you hang up during conferencing both of them will be disconnected from the call...

Page 58: ...rwarding at the end point level There are three types of call forwarding Forward Unconditional Forwards every call that comes in Forward When Busy Forwards calls when the line is busy Forward on No Answer Forwards calls when the telephone is not answered after the configured period ...

Page 59: ...n 3 If you enter a number then the VOIP ATA will attempt to call the number to which you intend to forward Once you disconnect the attempted call in subsequent call attempts you will listen normal dial tone only but Call Forward when Busy will be enabled 9 3 6 3 Forward On No Answer How To 1 Press 75 on your telephone dial pad 2 You will hear an alert tone very briefly following which you can ente...

Page 60: ...e phone doesn t have caller id facility or doesn t support call waiting caller id How To Press 69 followed by on your telephone dial pad to return the last incoming call 9 3 8 IP Dialing 9 3 8 1 IP Address 1 Press 47 on A s dial plan followed by the URL of B followed by a sign to send out the call immediately 2 The B s URL has the following syntax IP Segment 1 IP Segment 2 IP Segment 3 IP Segment ...

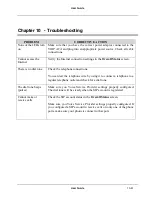
Page 61: ... telephone connections You can test the telephone wire by using it to connect a telephone to a regular telephone outlet and check for a dial tone The dial tone beeps pulses Make sure you Voice Service Provider settings properly configured The dial tone will be steady when the SIP account is registered Cannot make or receive calls Check the SIP account status in the Overall Status screen Make sure ...

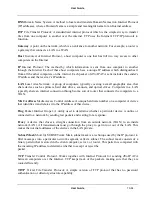
Page 62: ...d the Callee Transferor The End transferring the call Transferee The End being transferred Transfer Target The End to whom the transferee is being transferred A3 Definitions CPE Customer Premises Equipment This specifies equipment on the customer or LAN side CRC Cyclic Redundancy Checking A method for checking errors in a dVoIP ATA transmission between two computers CRC applies a polynomial functi...

Page 63: ...nistrators to manage and assign IP addresses to computers within the network DHCP provides a unique address to a computer in the network which enables it to connect to the Internet through Internet Protocol IP DHCP can lease and IP address or provide a permanent static address to those computers who need it servers etc ...

Page 64: ...AN typically share an internet connection through some sort of router that connects the computers to a WAN MAC Address Media Access Control Address A unique hardware number on a computer or device that identifies it and relates it to the IP address of that device Ping Packet Internet Groper A utility used to determine whether a particular device is online or connected to a network by sending test ...

Page 65: ... User DVoIP ATAgram Protocol A protocol that is used instead of TCP when reliable delivery is not required Unlike TCP UDP does not require an acknowledgement handshake from the receiving end UDP sends packets in one way transmissions ...

Page 66: ...ny Pulver Number up to 9 digits but minimum 3 digits 18x 8t8xt2 Call any Toll Free Number through Pulver Account 484x 7t4 Call any Global Village Number This rule demands a minimum and a maximum or 7 digits following 484 1 72 x etfxt2 Enable Unconditional Call Forwarding 2 73 t4 Disable Unconditional Call Forwarding 3 74 x etfxt2 Enable On Busy Call Forwarding 4 75 x etfxt2 Enable No Answer Call F...

Page 67: ...User Guide User Guide 10 67 ...

Page 68: ...l 333 Service Provider Partner Recommended Dial Plan Rule NIC at 011x x et8xt2 Vonage 2431x x et8xt2 CallUK 285x x et8xt2 iConnectHere 333x x et8xt2 iConnectHere account 334x x et8xt2 Earthlink 356x x et8xt2 Intertex 468x x et8xt2 IPTel 478x x et8xt2 InterViVo 488x x et8xt2 Livedoor com 555x x et8xt2 XS4all 3991 666x x et8xt2 MyPhones 393 697x x et8xt2 SIPPhone Inc 747x x et8xt2 sipgate de 777x x ...

Page 69: ...User Guide User Guide 10 69 Copyright September 2005 All Rights Reserved P N 040 511XXX 101 Ref VOIP ATA ...

Reviews: