background image

[ENG] NetPing 2 IP PDU ETH 53R14 & NetPing 2 IP PDU GSM3G 203R15, User guide -[ENG][2PWR] Where to Get the Document with 

the Firmware Description?

[ENG][2PWR] Where to Get the Document with the Firmware Description?

                             – 

1.


2.

3.

[ENG][2PWR] Where to Get the Document with the Firmware 
Description?

Configurations and operating order with management interfaces of a device are given in the document 

«Firmware 

Description»

. The documentation is updated according to the changes that are made to the firmware

 To find a current version of the 

«Firmware Description» at the


manufacturer's website

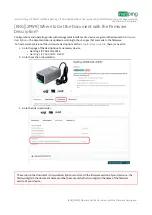
, there is a need to:

Go to the page of the description of a necessary device:

NetPing 2 IP PDU ETH 53R14;

NetPing 2 IP PDU GSM3G 203R15.

Go to the section

 «Downloads

»:

Go to the link

 «User Guide

»:

The version in the document «Firmware Description» must match the firmware version of your device, i.e. the 

first two digits in the document name must be the same as the first two digits in the name of the firmware 

version of your device.

Summary of Contents for 2 IP PDU ETH 53R14

Page 1: ... ENG NetPing 2 IP PDU ETH 53R14 NetPing 2 IP PDU GSM3G 203R15 User guide ...

Page 2: ... the Device 12 Front View 12 Back View 14 ENG 2PWR Connection Installion and Initial Configuration of the Device 16 Step 1 16 Step 2 16 Step 3 17 Step 4 18 Step 5 19 Step 6 20 ENG 2PWR Autonomous operation 22 ENG 2PWR Connecting External Sensors and Accessories 23 The description of contacts 23 i2C Connecting sensors and devices to the i2C bus 24 Sensors of the Dry contact type 27 Two wire sensors...

Page 3: ...ectric Parameters of IO Lines 32 ENG 2PWR Resetting Parameters to Default Values 34 ENG 2PWR Operating Storage Transportation and Disposal Information 36 ENG 2PWR Safety Precautions 37 ENG 2PWR Firmware Update 38 ENG 2PWR Warranty 39 ENG 2PWR Where to Get the Document with the Firmware Description 40 ENG 2PWR What to Do if There Are Still Some Questions 41 ...

Page 4: ... ENG NetPing 2 IP PDU ETH 53R14 NetPing 2 IP PDU GSM3G 203R15 User guide ...

Page 5: ...rfaces and peculiarities of the usage A User Guide is designed for network administrators and users who set up or operate a device To work with a device properly a user must have an idea about the principles of building and functioning of local networks as well as possess the next knowledge and skills Basic knowledge in the area of local and global networks Basic knowledge in the area of architect...

Page 6: ...nd to expectations of a user and his her opinion about where and how to use all the above All copyrights on supplied devices described in this User Guide as well as firmware and software of devices and this User Guide belong to NetPing global Ltd Сopying replication and translation of this user guide to other languages are not allowed without a prior written permission of a rightholder Copying rep...

Page 7: ...e Device ENG 2PWR Shipping Kit for The Device This shipping kit includes NetPing 2 IP PDU ETH 53R14 or NetPing 2 IP PDU GSM3G 203R15 1 pc mate terminal block STK 15EDGK 3 5 8P 1 pc power cord 1 pc GSM antenna for the version of the model NetPing 2 IP PDU GSM3G 203R15 1 pc screwdriver 1 pc quick start guide 1 pc package cardboard box 1 pc ...

Page 8: ...e Spreading the load capacity between the two channels is random The load connected to the device is controlled using the own web interface SNMP protocol using HTTP API and by SMS for a NetPing 2 IP PDU GSM3G 203R15 device with a built in GSM modem The device has a feature of a watchdog that allows to reboot connected equipment automatically if it freezes or according to a previously specified sch...

Page 9: ... ENG NetPing 2 IP PDU ETH 53R14 NetPing 2 IP PDU GSM3G 203R15 User guide ENG 2PWR Overview and Key Features ENG 2PWR Overview and Key Features Back view ...

Page 10: ... Specifications Device Specifications Value Switched load power up to 1 5 kW in total for both channels with the random distribution between the channels Device power consumption 8 5 W Supply voltage frequency 100 250В 50 60 Hz Temperature range 30С 50С non condensing normal humidity Device dimensions 145 x 78 x 57 Packaging dimensions 225 x 93 x 82 ...

Page 11: ... ENG NetPing 2 IP PDU ETH 53R14 NetPing 2 IP PDU GSM3G 203R15 User guide ENG 2PWR Overview and Key Features ENG 2PWR Overview and Key Features Device Specifications Value Weight 357 g ...

Page 12: ... LEDs and Sockets on a Case of the Device ENG 2PWR Features of Local Controls LEDs and Sockets on a Case of the Device ENG 2PWR Features of Local Controls LEDs and Sockets on a Case of the Device Front View Element Description Power Input A socket for connecting the device to the power grid 100 250В 50 60 Hz ...

Page 13: ...ed on while a microprogram is loading Blinks 15 20 times when resetting parameters of a device to default parameters Blinks sometimes when a device sends packages to the Ethernet Blinks intensely when shows a firmware update mode SIM card slot A slot to insert a SIM card of the format Mini SIM It is included only to the model NetPing 2 IP PDU GSM3G 203R15 that has a built in GSM modem Reset A Rese...

Page 14: ...e of the Device Back View Element Description Socket PWR1 and Socket PWR2 Output sockets for remote control switching on off rebooting the load Switched load power is up to 1 5 kW in total for both channels with a random distribution between the channels PWR1 LED and PWR2 LED Socket LEDs Glowing when switched on there is the voltage at the output not glowing when switched off there is no voltage a...

Page 15: ...ing external sensors of dry contact and controlling running devices Specification of the line in the input mode the voltage of the logic 1 8 2 V the voltage of the logic 0 3 5 V Line specification in the output mode the voltage of the logic 1 push pull 12V up to 200mA the voltage of the logic 0 0V до 200mA SC SD A bus for connecting the i2C sensors 5B Power voltage for external sensors or running ...

Page 16: ...on of the Device Step 1 Unpack the device and install it on a horizontal surface Step 2 Plug a GSM antenna to the device and locate it in the area of the strong signal of a cell operator The signal strength can be controlled using a cell phone according to the number of segments of the signal indicator on the display The page shows the photos of the device NetPing 2 IP PDU GSM3G 203R15 in the text...

Page 17: ...on and Initial Configuration of the Device Step 3 Insert a SIM card in a corresponding slot at the front panel of a device until you can hear a click Pay attention to turning a SIM card contacts down and a cut off corner into a device For the model NetPing 2 IP PDU GSM3G 203R15 with a built in GSM modem A SIM card should be inserted only in the device that is powered off ...

Page 18: ...nes of a device see the details in the section Connecting Installing and Initial Configuration of a Device External sensors and load should be connected only when a device is powered off Important It is not recommended to connect the real network and computer equipment to the device at once at the first switching on and getting acquainted with the operation logic of the device Frequent cycles of s...

Page 19: ... the power grid The power indicator is glowing of the CPU LEDs at Ethernet ports at the front panel of a device In the process of the device initialization LEDs blink several times which shows switching on a device and after this they will be glowing constantly Important A device is designed for plugging to the power grid of the voltage 100 V 250 V and the frequency of 50 60 Hz Do not plug a devic...

Page 20: ...n and Initial Configuration of the Device Step 6 Connect a device to the local network or the computer Glowing of the Link LED at the corresponding Ethernet port at the front panel of a device will mean that the physical connection is successfully established The second Ethernet port can be used for connecting any Ethernet devices including other NetPing devices in a chain ...

Page 21: ... The device that has been just purchased or the device with parameters that have been reset to default values requires the initial configuration of network addresses and parameters for controlling the loads After this a device can be installed in the existing network It can be configured further by using remote access to a device More information on the configuration see in the document Firmware D...

Page 22: ...Autonomous operation The full charge of the built in super capacitor is 2 hours The time of an autonomous operation of the device from the built in super capacitor is 1 6 minutes depending on the number and type of connected sensors and actuators This information is related to the NetPing 2 IP PDU GSM3G 203R15 with a built in super capacitor ...

Page 23: ...nsors to the device conveniently use the terminal block Use a slotted screwdriver with a slot width of 2 5 mm to secure the wires in the terminal block The pinout of the contacts on the terminal block is as follows Contact Description I1 I4 IO line 1 4 It is prohibited to plug sensors and external modules into NetPing devices when a power supply is on You can find the information about configurati...

Page 24: ...ensors and devices of own design are supported these include Temperature sensor T811 up to 8 pc Humidity sensor WS 2 1 pc NetPing IRC TR v2 1 pc A sensor is packaged with an inseparable cable with connectors on the ends A cable length can be increased with the help of flat cable extenders of RC 4 sensor which are sequentially plugged one into another Otherwise it can be done independently with the...

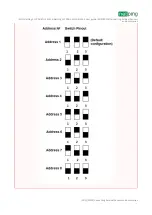
Page 25: ...ccessories Important It is prohibited to connect temperature sensors with the same numbers ID to the device Set each temperature sensor with its own number using the switches on the sensor board To set the switches remove the top cover of the sensor Depending on the ID the temperature sensor will be displayed on the corresponding channel in the device s web interface ...

Page 26: ... ENG NetPing 2 IP PDU ETH 53R14 NetPing 2 IP PDU GSM3G 203R15 User guide ENG 2PWR Connecting External Sensors and Accessories ENG 2PWR Connecting External Sensors and Accessories ...

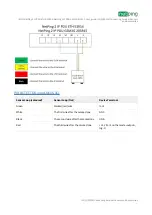
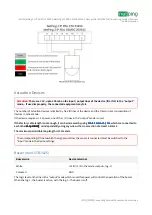
Page 27: ...sor NetPing Supply Voltage Sensor 995S2 N Z and N O contacts 3 wires in total see the sensor documentation for details Door sensor metal Air Flow Sensor model AMC520 Liquid sensor mod 2605 Sensor Loop Device Terminal Green I1 I4 Yellow G Brown White G Attention There are 12 V up to 200 mA on the input output lines of the device IO1 IO4 in the output mode If used improperly the connected equipment ...

Page 28: ...ENG 2PWR Connecting External Sensors and Accessories PIR DETECTOR mod M105 1E Sensor Loop coloured Sensor Loop flat Device Terminal Green Marked red wire I1 I4 White The first wire after the marked one GND Black The second wire after the marked one GND Red The third wire after the marked one 12 V I1 I4 on the mode output log 1 ...

Page 29: ...lines of the device IO1 IO4 in the output mode If used improperly the connected equipment may fail If the factory cable length is not enough it can be increased by using which are connected to each other or independently using any wire with a cross section of at least 0 4 mm2 Cable 4 extender 4m Cable 4 extender 4m sequentially sequentially Cable 4 extender 4m Cable 4 extender 4m sequentially sequ...

Page 30: ...tPing AC DIN socket uses a relay with normally closed contacts to switch the load This means that if the control wire is not connected anywhere 220 V will be present on the socket and the load will be turned on In the log 0 condition 220 V will be present on the IO control line at the output of the socket the load will be turned on In the log 1 condition the socket will be de energized the load wi...

Page 31: ... ENG NetPing 2 IP PDU ETH 53R14 NetPing 2 IP PDU GSM3G 203R15 User guide ENG 2PWR Connecting External Sensors and Accessories ENG 2PWR Connecting External Sensors and Accessories ...

Page 32: ...age 12 V from an external source A controlled socket NetPing AC DIN socket can be used for connecting IO lines In addition we can advise ready assembly relays which can be connected to our devices BM8070D a power relay 16А 250V for DIN rail check out the compatibility of this relay with the NetPing device model on the relay web page on the site MP701 executive element 4 independent channels 2 kW 1...

Page 33: ...Ping 2 IP PDU GSM3G 203R15 User guide ENG 2PWR Using IO Lines in the Output Mode for Controlling External Devices ENG 2PWR Using IO Lines in the Output Mode for Controlling External Devices the voltage of logic 0 3 5 V Equivalent circuit ...

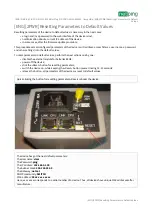
Page 34: ...her settings into the default values To reset parameters in default values perform the next actions one by one disable the external module for batteries 85M2 power off the device click the Reset button for resetting parameters switch the device on while keeping the Reset button pressed during 15 20 seconds release the button all parameters of the device are reset to default values Quick clicking t...

Page 35: ...rameters to Default Values ENG 2PWR Resetting Parameters to Default Values After resetting parameters to default values there is a need to perform the initial configuration of the device more information see in the document Firmware Description Where to Get a Document with a Firmware Description ...

Page 36: ...ters remotely and centrally for a large number of devices The device can be stored at the temperature between 40 С and 70 С and the atmospheric pressure from 675 to 800 mm Hg It can be stored in the conditions of the extreme values of the range for no more than 6 hours In storage rooms the content of dust vapors of acids and alkalis corrosive gases and other harmful impurities that cause corrosion...

Page 37: ... than 1500 W must be grounded It is prohibited to open the case of a device Do not drop a device and avoid impact of force on it Protect a device from high humidity levels It is prohibited to touch a device and a connected equipment with wet hands Use devices only indoors Do not place a device at a surface or inside heating devices such as microwaves stoves and heaters Do not use a device in locat...

Page 38: ...de ENG 2PWR Firmware Update ENG 2PWR Firmware Update ENG 2PWR Firmware Update The device supports firmware update through the web interface of the device You can find more information in the document Firmware Description Where to Get a Document with a Firmware Description ...

Page 39: ...vide an update for the customer Only the errors that block normal use of the device at conditions and for performing functions described in this User Guide are a subject to mandatory fix This warranty does not apply to cases when defects appear because of a misuse of a device any modifications of a device without a written permission of the manufacturer opening up a device a warranty sticker on th...

Page 40: ...tion The documentation is updated according to the changes that are made to the firmware To find a current version of the Firmware Description at the manufacturer s website there is a need to Go to the page of the description of a necessary device NetPing 2 IP PDU ETH 53R14 NetPing 2 IP PDU GSM3G 203R15 Go to the section Downloads Go to the link User Guide The version in the document Firmware Desc...

Page 41: ...ith examples of using the devices and news on issuing new firmware versions If any problems arise when using a device or there is a need for additional information contact a technical support by the address support netpingdevice com The pages of the devices at the manufacturer s website are as follows NetPing 2 IP PDU ETH 53R14 NetPing 2 IP PDU GSM3G 203R15 Information about the functionality of t...

Reviews: