background image


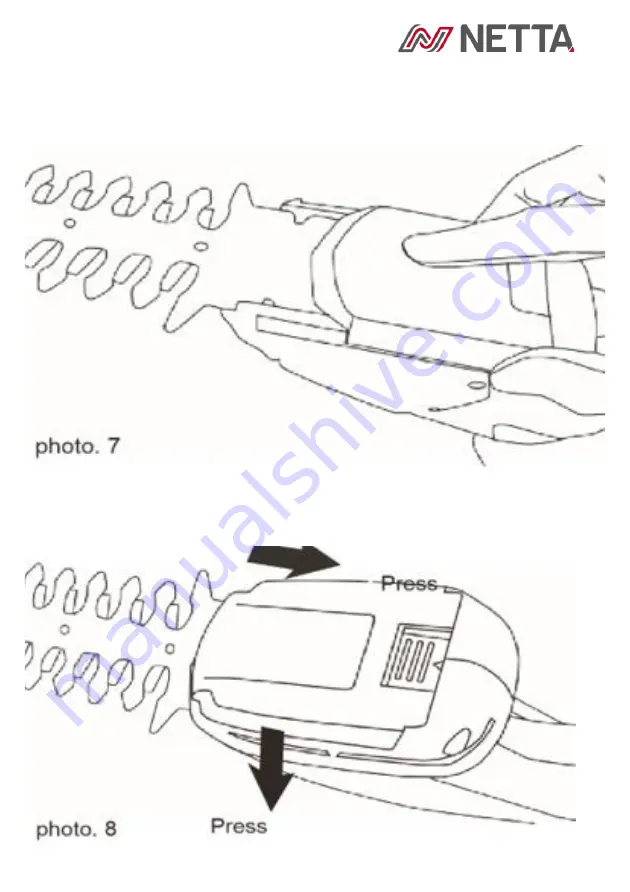
5. When the blade is in the appropriate position, the blade shield can be 
replaced (photo. 7) 


6. Move the blade shield forward until it jumps to its place and shoots. 
The device is then ready to use (photo. 8) 


Summary of Contents for 103089

Page 1: ...ES MANUAL DE INSTRUCCIONES Y OPERACIONES PARA EL USUARIO DE BENUTZERANLEITUNG BETRIEBSANLEITUNG FR MANUEL D UTILISATION ET D UTILISATION IT ISTRUZIONI PER L USO E MANUALE OPERATIVO NET WEIGHT 1 2KG R...

Page 2: ...ual please visit our official website www nettadirect com You can download a copy of up to date user manuals at any time in electronic format We do not supply you with a paper based user manual after...

Page 3: ...rating label and voltage information on this manual or the rating label on back of the machine Always connect the device to a socket with Residual Current Device RCD fitted with your home circuits If...

Page 4: ...roper balance at all times Do not wear loose clothing or jewellery Take a break if you feel vibration related discomfort DO NOT operate any appliance with a damaged cord or plug or after the appliance...

Page 5: ...PRODUCT OVERVIEW...

Page 6: ...NOTE PLEASE PULL OUT THE SAFETY LOCK 8 BEFORE CHANGING BLADES...

Page 7: ...r replace the blade place the device on a hard surface Turn the device upside down with one hand gently push the blade shield down with the other hand Then gently move the blade shield Photo 3 2 Gentl...

Page 8: ...e required blade into the engine housing photo 5 4 Align the centre edge tooth roll with the gear in the centre of the device so that the blade lies flat on the housing and an appropriate fit is ensur...

Page 9: ...5 When the blade is in the appropriate position the blade shield can be replaced photo 7 6 Move the blade shield forward until it jumps to its place and shoots The device is then ready to use photo 8...

Page 10: ...her untrained people Maintain this tool with care Hold the tool by the insulated gripping surfaces to prevent accidents Charging and Recharging the Unit Before charging the unit with the AC charger ma...

Page 11: ...discharged battery The battery is fully charged when green LEDs are on Your tool is then ready to use 5 Once charged first remove the charger from an AC outlet and then unplug the charger from the ch...

Page 12: ...eme care Follow the instructions concerning the maintenance and cleaning of the device Trimming Shrubs and Hedges Make sure to cut stems up to 7 5mm 0 29 thick When trimming the hedge evenly move the...

Page 13: ...spray them with a metal spray Blunt bent or damaged blades must be replaced Only use original spare parts Store the blades in the cover It is recommended to clean the tool immediately after each use E...

Page 14: ...bsite and use search bar to find the parts available You can also find this code on the back of this User Manual For our Repair Service please contact our customer support with email on support nettad...

Page 15: ...needs replacing you need purchase separately from our website Please quote with your original proof of purchase invoice and name or delivery address postcode so we can locate you when you contact us...

Page 16: ...tents from website manuals will violate worldwide copyright trademark and associated laws We reserve the right to proceed with lawsuits to anyone who is found breaching our copyrights policy For more...

Reviews: