background image


13 

Once the fuel container has been emptied, replace it with a full one and start the pump again (see 
point c). 
The pump will stop when the tank is full and message (“Beep” + RESERVOIR FULL) is displayed. 

d)


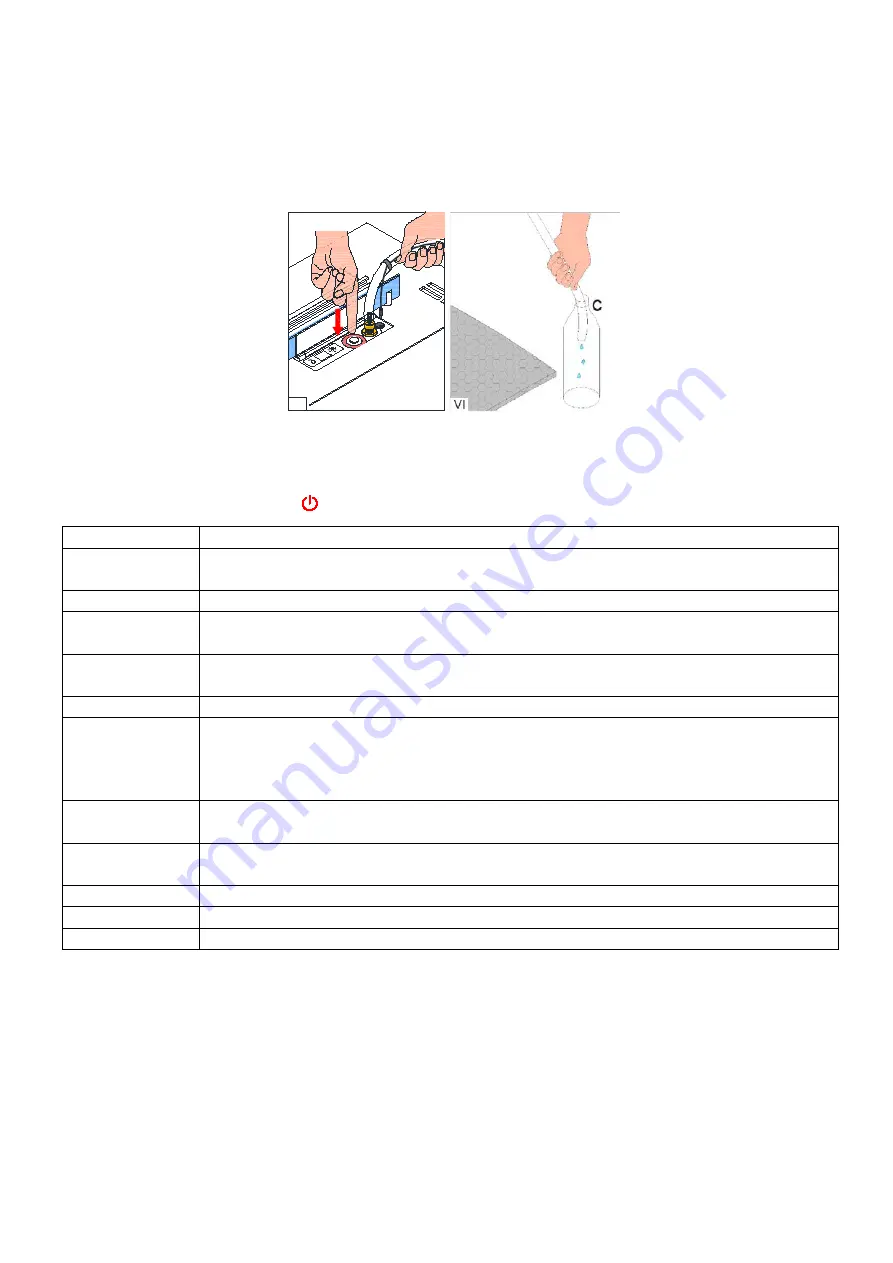
Disconnect the power cable ‘B’. To disconnect the pump, hold the end of the hose ‘A’ and firmly press 
the button in the place marked with a sticker (V). Close the fuel inlet. 

e)


Shake the remaining fuel from the hose ‘C’ into the container and place the pump in the bag (VI). 


5.3 Menu 

The menu is available when message (READY) or (NO FUEL) is displayed. To enter the menu, press and 

hold for 8 seconds. Scroll through the settings with + and accept by pressing . To quit the menu, wait 
for couple of seconds or press  . 

SETTING 

DESCRIPTION 

Device IP 

View the IP address to configure wireless connection (only if a Wi-Fi network is 
configured). 

WIFI CONFIG 

Wireless control configuration (see the next page).  

Lock the device  Control panel lock. Enable by pressing – in the menu. To disable, press and hold 

START/STOP for 5 seconds. 

Child lock 

Child lock – flame ignition is initiated by pressing START/STOP for 3 seconds. 

Choose ON/OFF to enable/disable the function. 

Set time 

Set the hour by pressing +, next press  and set minutes. Accept with 

Remote Control 

Programming a new remote or connecting one remote with multiple burners. Press 
– to start the configuration. Press and hold STARTSTOP+– for 1 second, 

respectively. Message (PROGRAMMING FINISHED) informs that the configuration 

has been successfully completed. 

Display off 

If inactive for 1 minute, the display will turn off. Choose ON/OFF to enable or 

disable the option. 

Fast start 

Faster flame ignition (enabled by default). The power consumption is 100W higher 
when the burner is ready for flame ignition. Choose OFF to disable. 

Serial number  View the burner serial number. 

Software 

View the software version. 

History 

View 40 recent messages. 

5.4 Functions 
a)


Flame ignition  

Message (READY) indicates that the burner is ready to ignite the flame.  

Press START. Flame ignition will take 2-10 minutes while the message (PLEASE WAIT) is displayed. The 

message (WORKING) indicates that the flame has been ignited and the burner reached the working 

temperature. 

b)


Flame height regulation 

When the flame is ignited and the message (WORKING) is displayed, press + or  to make the flame 

higher or lower in 6 levels. The default flame height is 4. 

V

B

A

Summary of Contents for AA-11-04745

Page 1: ...e installing or operating the NetZero FLA Burner NetZero FLA Burner Series Models AA 11 04745 NZ40B AA 11 04746 NZ48B AA 11 04747 NZ60B AA 11 04748 NZ72B AA 11 04749 NZ90B AA 11 04750 NZ108B WARNING I...

Page 2: ...ptional Equipment 5 3 CLEARANCES AND INSTALLATION 6 3 1 Burner Clearances and Cavity Measurements 6 3 2 Burner Clearances and Cavity Measurements for Multiple Burners 8 3 3 Placing the Burner 9 3 4 In...

Page 3: ...emperatures keep children clothing and furniture away 4 Risk of indoor air pollution use unvented decorative appliance only in well ventilated areas People with breathing problems should consult a phy...

Page 4: ...e appliance rating at maximum burner adjustment See Table A for recommended minimum room size If the burner is installed in a room smaller than the recommended minimum room size or in a home of unusua...

Page 5: ...NZ90B 1 1 1 4 2 4 2 NZ108B 1 1 1 6 2 6 2 2 2 Optional Equipment Applies to see through peninsula and island installations For information on installing the large glass barrier kits reference the large...

Page 6: ...2B 58 72 NZ90B 115V 60 Hz min 20A 77 90 NZ108B 97 108 Ensure that burner flame is positioned a minimum of 40 inches away from curtains flammable materials and other sources of ignition Be aware of dra...

Page 7: ...between the material can be left open or insulated with mineral wool Method for creating an air gap behind non combustible finishing material Hardibacker 500 or other non combustible rated cement boa...

Page 8: ...be calculated from the total length of the burners placed together An example is given below Measurements Burner Model L in A in B in C in D in E in F in G in H in NZ40B 31 1 8 10 1 4 16 Total Length...

Page 9: ...click to watch the video instruction https www youtube com watch v b5dETFNTBW4 feature youtu be 3 4 Installing Technical Glass Scan or click to watch the video instruction https www youtube com watch...

Page 10: ...Installations Installation Requiring Large Glass Barrier Kit See Through Peninsula and Island Installations For these installations the Large Glass Barrier Kit must be used For additional information...

Page 11: ...gle Sided Left Corner Right Corner and Three Sided Installations See Through and Peninsula Installations If an air conditioning vent or fan is located near the burner the vent or fan must be positione...

Page 12: ...the tank is empty the message NO FUEL is displayed Open the fuel inlet I and firmly connect the pump hose A click and power cable B II the message REFUELLING PLEASE WAIT is displayed c Place the fuel...

Page 13: ...OP for 3 seconds Choose ON OFF to enable disable the function Set time Set the hour by pressing next press and set minutes Accept with Remote Control Programming a new remote or connecting one remote...

Page 14: ...i Fi CONFIG in the menu Time to finish the configuration is 5 minutes c Enable the Wi Fi connection on your mobile device and connect to planika123 network if the network is not visible on the list di...

Page 15: ...Turn the burner OFF wait for a min 5 minutes and turn the burner ON ERROR 02 03 04 10 16 31 32 41 51 61 Contact the Service Department 6 MAINTENANCE NetZero burners are considered maintenance free me...

Reviews: