6
untouched.
Skin that forms on the top of paint can clog the
sprayer. Remove skin before mixing. Strain with
a funnel with a filter attached or through hosiery
to remove any impurities that could clog system.
Before starting have gloves, paper towels, rags
etc. available for unexpected spills.
Filing the Canister
1. Unscrew the Canister. Stand the canister on a
smooth and horizontal surface.
2. Pour the properly thinned and strained
material to be sprayed into the canister.
3. Clean any residual liquid from the threads or
sides of the canister and sprayer.
4. Starting the threads evenly, screw the lid,
completely onto the top fill canister. Check
the lid to make sure it is threaded on
squarely and completely before picking up
the sprayer.
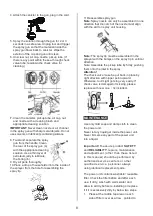
Adjust Spray Pattern
The spray pattern shape is adjusted by turning
the ears of the air cap to either the vertical,
horizontal, or diagonal position. The position of
the air cap and the corresponding spray pattern
shape are shown below.
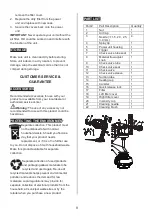
Material Flow Adjustment
Set the material volume by turning the regulator
on the trigger of the spray gun.
Turn to “+” mark direction increase the flow of
liquid and turn to “-“ direction decrease the flow of
liquid.
For thicker materials, it is recommended that you
start with the highest material flow setting and
then gradually decrease the flow to suit your
particular spraying needs.
For thinner materials, it is recommended that you
start with a low material flow setting and then
gradually increase the flow to suit your particular
spraying needs.
Always test the spray pattern on scrap cardboard
or similar material first, Begin with flow control
knob on highest flow setting. If less flow is
desired, dial the flow control knob to decrease the
flow of liquid.
Heavier, thicker material should be sprayed with
the flow control knob on high flow setting.
Thinner material should be sprayed with the flow
control knob on low flow setting.
Proper Spraying Technique
If spraying with an HVLP spray system is new or
unfamiliar to you. It is advisable to practice on a
piece of scrap wood or cardboard before
beginning on your intended workpiece.
Surface Preparation
All objects to be sprayed should be thoroughly
cleaned before spraying material on them. Areas
not to be sprayed may, in certain cases, need to
be masked or covered.
Spray Area Preparation
The spray area must be clean and free of dust in
order to avoid blowing dust onto your freshly
sprayed surface.
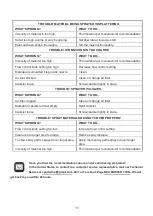
Nozzle size pickup
Select right size of nozzle base upon the material
you are going to use and the surface targeting
finishing. The small size of nozzle reflected to
finer coating. Dilute material if needed for better
quality of the coating
Nozzle
size
Recommended
material
Project Example
1.5mm
(White)
sealers, stains,
enamel,
varnish, dyes
Table, chair, bicycle,
shutter, cabinets,
wooden toy, model
2.0mm
(Red)
polyurethane,
chalk and milk
type paint
Railings, multi-frame
window frames,
heating pipes, boats,
yard furniture, garage
doors, metal garden
fences.
2.5mm
(Black)
low viscosity
primer, wall
paint
Internal wall, wooden
garden fence, wooden
pile, corridor
3.0mm
(Grey)
Latex plus
primers,
primer, wall
paint, latex, oil
enamels
External walls, outdoor
floors, deck
Nut
Air cup


