8 of 12
SMB-189
SERVICE MANUAL BULLETIN
SMB-189
The New Flyer vehicles described in this manual may be protected by one or more
patents and design applications or registrations in the United States and Canada,
and in other countries. Refer to “Vehicle Patent Information” in this manual.
Copyright © 2019 New Flyer Industries Canada ULC
PART THREE
3.
De-Energizing & Energizing
Procedures for all Battery
Electric Vehicles without
Manual Service Disconnects
(MSD)
NEVER try to connect or disconnect cir-
cuit components such as cables, fuses,
or connectors while there is current
flowing in the circuit.
3.1.
De-Energizing Procedure
1. Prepare the work area. Refer to “Service
Preparation” in your New Flyer Service
Manual for information information on how
to safely prepare the work area.
2. Ensure the DC high voltage charging
cables are disconnected from the vehicle.
3. Lock out and Tag Out the Battery Discon-
nect and High Voltage Interlock switch.
Refer to 1. “Lockout / Tagout Procedure for
all Battery Electric Vehicles” on page 2
in
this bulletin for procedure.
4. Wear High Voltage Personal Protection
Equipment (PPE). Refer to “PPE Require-
ments” in your New Flyer Service Manual
for guidelines.
☞
NOTE:
Refer to “Equipment Requirements” in your
New Flyer Service Manual for information
on the type of multimeter required for the
following test.
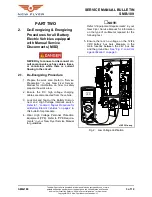
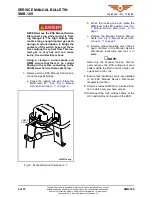
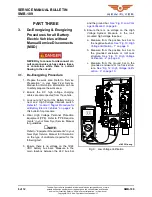
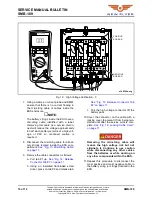
5. Ensure there is no voltage on the 12/24
VDC battery bus bars. Measure in the
main fusebox between the 24V bus bar
and the ground bar.
See “Fig. 9: Low Volt-
age Verification” on page 8.
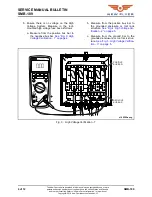
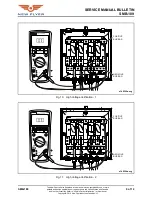
6. Ensure there is no voltage on the High
Voltage System. Measure in the roof-
mounted high voltage fuse box.
a. Measure from the positive bus bar to
the negative bus bar.
See “Fig. 10: High
Voltage Verification - 1” on page 9.
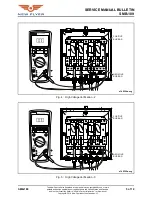
b. Measure from the positive bus bar to
the grounded enclosure or roof rack
structure.
See “Fig. 11: High Voltage
Verification - 2” on page 9.
c. Measure from the ground bar to the
grounded enclosure or roof rack struc-
ture.
See “Fig. 12: High Voltage Verifi-
cation - 3” on page 10.
Fig. 9: Low Voltage Verification
2))
9
9
,168/$7,21
,168/$7,21
7(67
,168/$7,21
08/7,0(7(5
9
,168/$7,21
9&$7
9&$7
P$
)86('
s145301a.svg


