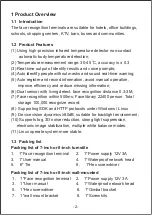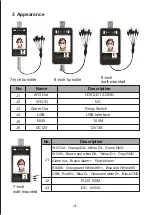
background image

-5-

-6-

Ple

ase 

stand here

!

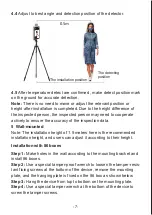
4.1  Adjust angle of temperature detector

After the temperature measurement access control is fully activated, 

the human face is directly facing the device. Observe the face image 

on the device screen. Make sure that the bare skin on the forehead is 

placed in the "temperature measurement area" (optimal temperature 

detector distance 0.5m). After that, paste the "Please stand here" 

detection position mark at the corresponding distance.

4.3  Wall-mounted face recognition terminal 

Attach the cable tie from the “Accessory Pack” to the tripod for the 

temperature measurement access control on the column.

Turnstile face recognition terminal

Mount the gimbal bracket in the “Accessory Pack” to the tripod for the 

wall-mounted temperature measurement access control. Connect the 

power supply and network cable. 

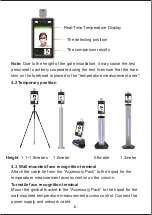
4.2 Temporary position

Note:

 Due to the height of the gate installation, it may cause the test 

personnel to actively cooperate during the test to ensure that the bare 
skin on the forehead is placed in the "temperature measurement area".

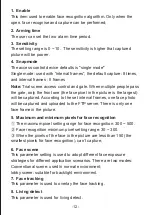
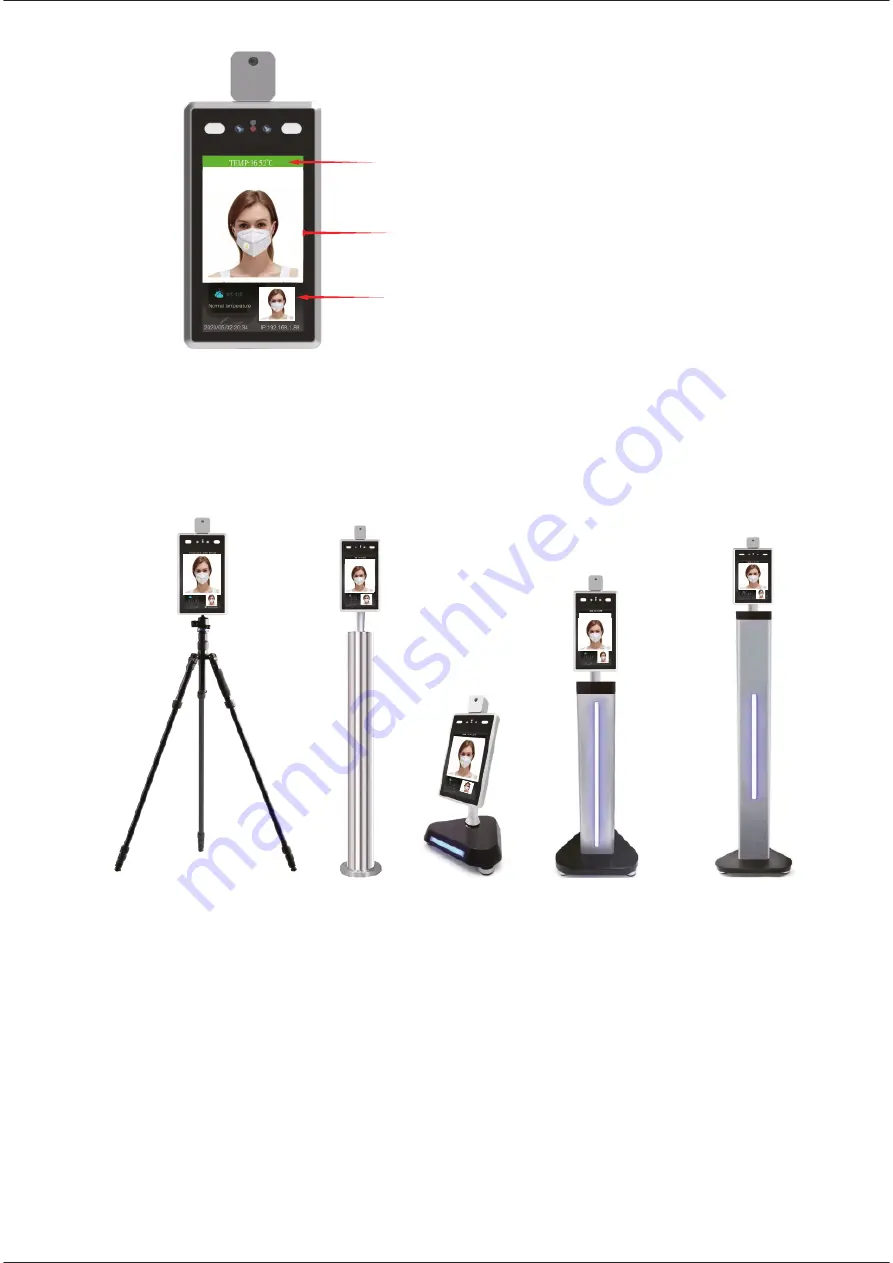
Real-Time Temperature Display

The detecting position

The comparison results

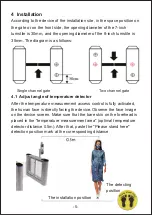
4  Installation

According to the device of the installation site, in the space position on 
the gate or on the front side, the opening diameter of the 7-inch 
turnstile is 30mm, and the opening diameter of the 8-inch turnstile is 
35mm. The diagram is as follows:

The installation position

The detecting

position

Single channel gate

Two channel gate

1.1~1.8meters

1.0meter

1.2meter

0.6meter

Height

Summary of Contents for FACETEMP-SCAN

Page 1: ...FACETEMP SCAN User manual User manual FACETEMPSCAN V 20200608 ENGLISH ...

Page 2: ...ill be lower than the actual temperature Make sure there is no hair or clothing covering this area 1 Face Recognition Terminal User manual Note 1 Device working temperature 10 40 Ć Do not Install under the vent and ensure that there is no heating source within 3 meters 2 People entering the room from a cold outdoor environment will affect measurement accuracy The forehead temperature test needs to...

Page 3: ... 1 Gimbal bracket 7 1 wall mount bracket 8 1 Screw kits Packing list of 7 inch or 8 inch wall mounted 2 1 3 Packing list 1 1 Face recognition terminal 2 1 Power supply 12V 3A 3 1 User manual 4 1 Waterproof network head 5 6 Tie 6 1 Hex screwdriver 1 1 Introduction The face recognition terminals are suitable for hotels office buildings schools shopping centers KTV bars buses and communities 1 2 Prod...

Page 4: ... 3 2 Specification 1 7 inch turnstile 3 8 inch turnstile 2 7 inch wall mounted 4 8 inch wall mounted ...

Page 5: ...y GND J3 Alarm outὉBrown Alarm njPurple Alarm RS485ὉOrange and White 485 njBlue and White 485 USBὉRed 5VnjBlue D njGreen and white D njBlack GND 3 Appearance 7 inch turnstile 8 inch turnstile 8 inch wall mounted No Name Description J1 WG Out 1 D0 2 D1 3 GND J2 WG IN NC J3 Alarm Out Relay Switch J4 USB USB Interface J5 RJ45 100M J6 DC12V 12V 3A ...

Page 6: ...m is as follows The installation position The detecting position Single channel gate Two channel gate 5 P l ease stand he r e 4 1 Adjust angle of temperature detector After the temperature measurement access control is fully activated the human face is directly facing the device Observe the face image on the device screen Make sure that the bare skin on the forehead is placed in the temperature me...

Page 7: ...Display The detecting position The comparison results 1 1 1 8meters 1 0meter 1 2meter 0 6meter Height 6 4 3 Wall mounted face recognition terminal Attach the cable tie from the Accessory Pack to the tripod for the temperature measurement access control on the column Turnstile face recognition terminal Mount the gimbal bracket in the Accessory Pack to the tripod for the wall mounted temperature mea...

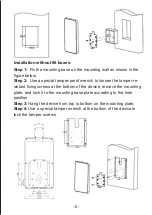
Page 8: ...difference of the inspected person the inspected person may need to cooperate actively to ensure the accuracy of the inspection data The installation position The detecting position Installation with 86 boxes Step 1 Make holes in the wall according to the mounting bracket and install 86 boxes Step 2 Use a special tamper proof wrench to loosen the tamper resis tant fixing screws at the bottom of th...

Page 9: ...er proof wrench to loosen the tamper re sistant fixing screws at the bottom of the device remove the mounting plate and lock it to the mounting base plate according to the hole position Step 3 Hang the device from top to bottom on the mounting plate Step 4 Use a special tamper wrench at the bottom of the device to lock the tamper screws ...

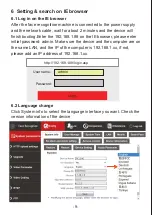
Page 10: ...eck the version information of the device Login User nameὉ http 192 168 1 88 login asp Password admin 9 6 Setting search on IE browser 6 1 Log in on the IE browser After the face recognition machine is connected to the power supply and the network cable wait for about 2 minutes and the device will finish booting Enter the 192 168 1 88 on the IE browser please enter initial password admin Make sure...

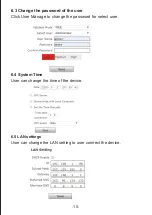
Page 11: ...nge the LAN setting to user connect the device 6 4 System Time User can change the time of the device 10 6 3 Change the password of the user Click User Manage to change the password for select user 6 5 LAN settings User can change the LAN setting to user connect the device 6 4 System Time User can change the time of the device ...

Page 12: ...ogntion maximun pixel FaceQuality Face test minimun pixels Human Min pixel Live detection Face scene FaceTrack Snapmode Function First 8 NO 5 Face Picture 500 99 300 Filter Tracking 200 Close Lobby scene Open Single mode Speed First 0 0 23 59 Time 1 9 ἷ1 100Ἰ ἷ30 300Ἰ ἷ0 500Ἰ ἷ300 500Ἰ ἷ1 1500Ἰ Save 0 0 23 59 Time 2 ...

Page 13: ...tional scene used in normal environment lobby scene suitable for backlight environment 7 Face tracking This parameter is used to overlay the face tracking 8 Living detect This parameter is used for living detect Note Trial scene access control and gate When multiple people pass the gate only the front one the face pixel in the picture is the largest will be captured According to the set interval f...

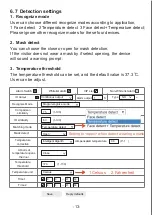
Page 14: ...y Alarm output 1 S Recognize Mode Type NO Temperature detect Save Reply defaults Continuous output 13 13 6 7 Detection settings 1 Recognize mode User can choose different recognize modes according to application 1 Face detect 2 Temperature detect 3 Face detect Temperature detect Please ignore other recognize modes for these four devices 2 Mask detect You can choose the close or open for mask detec...

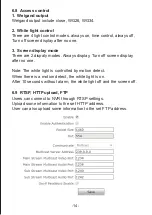
Page 15: ...some information to the set HTTP address User can also upload some information to the set FTP address 14 6 8 Access control 1 Weigand output Weigand output include close WG26 WG34 2 White light control There are 4 light control modes always on time control always off Turn off screen display after no one 3 Screen display mode There are 2 dispaly modes Always display Turn off screen display after no...

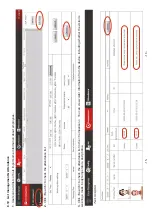
Page 16: ...nt Attendance 1 Users can add lists or bulk import some information about employees 3 Click Search to check the attendance list in the Comparison You can view visitor information from the device including whether the visitor is wearing a mask body temperature and photos ...

Page 17: ...Pol Ind Sud Oest C Bernat de Rocabertí 16 Sabadell Barcelona 08205 Tel 93 721 97 55 e mail info newgate es www newgate es ...

Reviews: