background image

Engine - Engine and crankcase

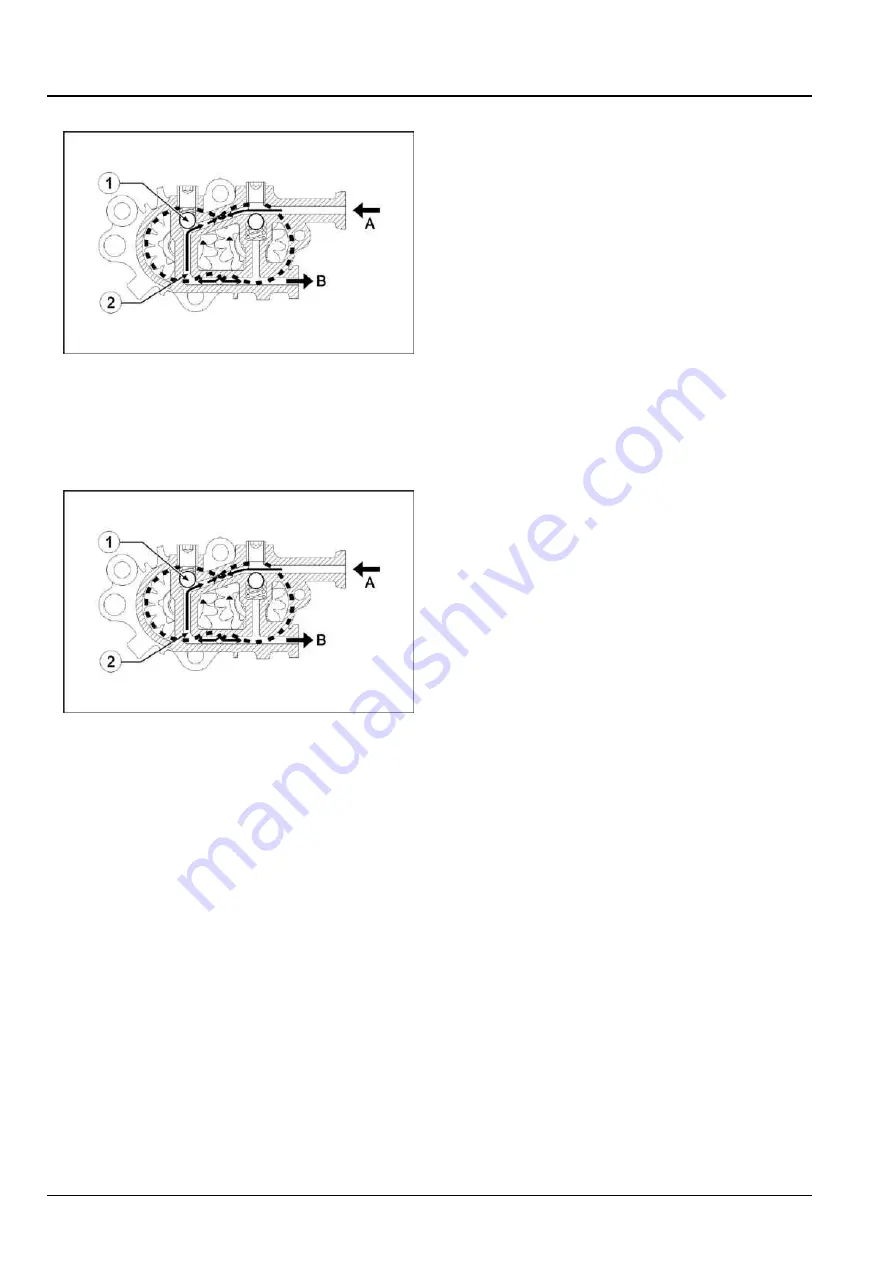
Pressure control mode

RAIL15TR00370AA

34

When the fuel Pressure exceeds

5.0 bar

(

72.5 psi

), the

supply pump relief valve open opens and fuel is routed
to the inlet side of the pump.

(A) Supply fuel drawn from pre-filter
(B) Supply fuel to final filter
(1) Fuel supply relief valve

5.0 bar

(

72.5 psi

)

(2) Supply pump bypass valve (for bleeding)

Bypass mode

RAIL15TR00370AA

35

During lift pump operation, fuel will bypass the gear
pump through a check valve that opens at about

0.138

- 0.345 bar

(

2.0 - 5.0 psi

).

(A) Supply fuel drawn from pre-filter
(B) Supply fuel to final filter
(1) Fuel supply relief valve

5.0 bar

(

72.5 psi

)

(2) Supply pump bypass valve (for bleeding)

47917988 24/09/2015

10.1 [10.001] / 24

Summary of Contents for SmartTrax T8.320

Page 1: ...410 SmartTrax T8 435 SmartTrax Continuously Variable Transmission CVT Tractor PIN ZFRE05001 and above Printed in U S A 2015 CNH Industrial America LLC All Rights Reserved New Holland is a trademark registered in the United States and many other countries owned by or licensed to CNH Industrial N V its subsidiaries or affiliates ...

Page 2: ...5001 T8 380 CVT TIER 4B ZFRE05001 T8 380 SmartTrax CVT TIER 4B ZFRE05001 T8 410 CVT TIER 4B ZFRE05001 T8 410 SmartTrax CVT TIER 4B ZFRE05001 T8 435 CVT TIER 4B ZFRE05001 T8 435 SmartTrax CVT TIER 4B ZFRE05001 47917988 24 09 2015 EN Find manuals at https best manuals com ...

Page 3: ...8 380 CVT TIER 4B ZFRE05001 North America F2CFE614D B003 T8 410 CVT TIER 4B ZFRE05001 North America F2CFE614C B002 T8 410 CVT TIER 4B ZFRE05001 Australia New Zealand F2CFE614C B002 T8 435 CVT TIER 4B ZFRE05001 Australia New Zealand F2CFE614A B002 T8 435 CVT TIER 4B ZFRE05001 North America F2CFE614A B002 T8 380 SmartTrax CVT TIER 4B ZFRE05001 North America F2CFE614D B002 T8 410 SmartTrax CVT TIER 4...

Page 4: ...SCR exhaust treatment 10 11 Power coupling 19 19 100 Drive shaft 19 1 19 110 Flywheel damper 19 2 19 120 Drive shaft shield assembly 19 3 Transmission 21 21 504 Continuously Variable Transmission CVT 21 1 21 505 Continuously Variable Transmission CVT external controls 21 2 21 506 Continuously Variable Transmission CVT lubrication system 21 3 21 507 Continuously Variable Transmission CVT internal c...

Page 5: ...ed rear Power Take Off PTO 31 2 31 114 Two speed rear Power Take Off PTO 31 3 31 146 Front Power Take Off PTO 31 4 Brakes and controls 33 33 110 Parking brake or parking lock 33 1 33 202 Hydraulic service brakes 33 2 33 220 Trailer brake hydraulic control 33 3 33 224 Trailer brake pneumatic control 33 4 Hydraulic systems 35 35 000 Hydraulic systems 35 1 35 102 Pump control valves 35 2 35 106 Varia...

Page 6: ... wheels 44 1 Tracks and track suspension 48 48 100 Tracks 48 1 48 130 Track frame and driving wheels 48 2 48 134 Track tension units 48 3 48 138 Track rollers 48 4 Cab climate control 50 50 100 Heating 50 1 50 200 Air conditioning 50 2 50 300 Cab pressurizing system 50 3 Electrical systems 55 55 000 Electrical system 55 1 55 010 Fuel injection system 55 2 55 012 Engine cooling system 55 3 55 013 E...

Page 7: ...55 301 Alternator 55 15 55 302 Battery 55 16 55 408 Warning indicators alarms and instruments 55 17 55 512 Cab controls 55 18 55 513 Cab transmission controls 55 19 55 518 Wiper and washer system 55 20 55 640 Electronic modules 55 21 55 988 Selective Catalytic Reduction SCR electrical system 55 22 55 DTC FAULT CODES 55 23 Platform cab bodywork and decals 90 90 100 Engine hood and panels 90 1 90 10...

Page 8: ...INTRODUCTION 47917988 24 09 2015 1 Find manuals at https best manuals com ...

Page 9: ...eneral maintenance safety 5 Safety rules Personal Protective Equipment PPE 6 Safety rules Do Not Operate tag 7 Safety rules Ecology and the environment 8 Torque Minimum tightening torques for normal assembly 9 Capacities 14 Product identification 15 47917988 24 09 2015 2 Find manuals at https best manuals com ...

Page 10: ...s caused by parts and or components not approved by the manu facturer including those used for the servicing or repair of the product manufactured or marketed by the manufacturer In any case no warranty is given or attributed on the product manufactured or marketed by the manufacturer in case of damages caused by parts and or components not approved by the manufacturer The information in this manu...

Page 11: ...th or serious injury CAUTION indicates a hazardous situation that if not avoided could result in minor or moderate injury FAILURE TO FOLLOW DANGER WARNING AND CAUTION MESSAGES COULD RESULT IN DEATH OR SERIOUS INJURY Machine safety NOTICE Notice indicates a situation that if not avoided could result in machine or property damage Throughout this manual you will find the signal word Notice followed b...

Page 12: ...can cause accidents When you tow a disabled machine follow the procedure in this manual Use only rigid tow bars Stop the engine remove the key and relieve pressure before you connect or disconnect fluid lines Stop the engine and remove the key before you connect or disconnect electrical connections Scalding can result from incorrect removal of coolant caps Cooling systems operate under pressure Ho...

Page 13: ...ules Personal Protective Equipment PPE Personal Protective Equipment PPE Wear Personal Protective Equipment PPE such as hard hat eye protection heavy gloves hearing protection pro tective clothing etc 47917988 24 09 2015 6 ...

Page 14: ...RODUCTION Safety rules Do Not Operate tag Do Not Operate tag Before you start servicing the machine attach a Do Not Operate warning tag to the machine in an area that will be visible 47917988 24 09 2015 7 ...

Page 15: ...contain substances that may be harmful to your health Modern oils contain additives Do not burn contaminated fuels and or waste oils in ordinary heating systems Avoid spillage when draining off used engine coolant mixtures engine gearbox and hydraulic oils brake fluids etc Do not mix drained brake fluids or fuels with lubricants Store them safely until they can be disposed of in a proper way to co...

Page 16: ...in 25 N m 217 lb in 26 N m 234 lb in 35 N m 311 lb in 17 N m 151 lb in 24 N m 212 lb in M10 37 N m 27 lb ft 49 N m 36 lb ft 52 N m 38 lb ft 70 N m 51 lb ft 33 N m 25 lb ft 48 N m 35 lb ft M12 64 N m 47 lb ft 85 N m 63 lb ft 91 N m 67 lb ft 121 N m 90 lb ft 58 N m 43 lb ft 83 N m 61 lb ft M16 158 N m 116 lb ft 210 N m 155 lb ft 225 N m 166 lb ft 301 N m 222 lb ft 143 N m 106 lb ft 205 N m 151 lb ft...

Page 17: ...9 N m 343 lb in 18 N m 163 lb in 27 N m 240 lb in M10 40 N m 30 lb ft 54 N m 40 lb ft 57 N m 42 lb ft 77 N m 56 lb ft 37 N m 27 lb ft 53 N m 39 lb ft M12 70 N m 52 lb ft 93 N m 69 lb ft 100 N m 74 lb ft 134 N m 98 lb ft 63 N m 47 lb ft 91 N m 67 lb ft M16 174 N m 128 lb ft 231 N m 171 lb ft 248 N m 183 lb ft 331 N m 244 lb ft 158 N m 116 lb ft 226 N m 167 lb ft M20 350 N m 259 lb ft 467 N m 345 lb...

Page 18: ...ft 7 16 48 N m 36 lb ft 65 N m 48 lb ft 68 N m 50 lb ft 91 N m 67 lb ft 50 N m 37 lb ft 71 N m 53 lb ft 1 2 74 N m 54 lb ft 98 N m 73 lb ft 104 N m 77 lb ft 139 N m 103 lb ft 76 N m 56 lb ft 108 N m 80 lb ft 9 16 107 N m 79 lb ft 142 N m 105 lb ft 150 N m 111 lb ft 201 N m 148 lb ft 111 N m 82 lb ft 156 N m 115 lb ft 5 8 147 N m 108 lb ft 196 N m 145 lb ft 208 N m 153 lb ft 277 N m 204 lb ft 153 N...

Page 19: ...85 lb ft 153 N m 113 lb ft 74 N m 55 lb ft 104 N m 77 lb ft 9 16 117 N m 86 lb ft 156 N m 115 lb ft 165 N m 122 lb ft 221 N m 163 lb ft 106 N m 78 lb ft 157 N m 116 lb ft 5 8 162 N m 119 lb ft 216 N m 159 lb ft 228 N m 168 lb ft 304 N m 225 lb ft 147 N m 108 lb ft 207 N m 153 lb ft 3 4 287 N m 212 lb ft 383 N m 282 lb ft 405 N m 299 lb ft 541 N m 399 lb ft 261 N m 193 lb ft 369 N m 272 lb ft 7 8 4...

Page 20: ...8 4 Grade Identification Grade Corner Marking Method 1 Flats Marking Method 2 Clock Marking Method 3 Grade A No Notches No Mark No Marks Grade B One Circumferential Notch Letter B Three Marks Grade C Two Circumferential Notches Letter C Six Marks 47917988 24 09 2015 13 ...

Page 21: ...ck Continuously Variable transmission CVT with heavy duty rear axle 184 l 48 5 US gal 40 4 UK gal Mechanical Front Drive MFD axles TUTELA HYPOIDE EP GEAR LUBE or NEW HOLLAND AMBRA HYPOIDE 140 Class 4 75 fixed and saddle suspended front axle Differential 16 5 l 17 4 US qt 29 0 UK pt Planetary each 4 3 l 9 1 US pt 7 6 UK pt Class 5 0 fixed and saddle suspended front axle Differential 16 5 l 17 4 US ...

Page 22: ...ires 3 Year of construction Permissible towable mass 4 Model year 10 Unbraked towable mass 5 Product identification number 11 Independently braked towable mass 6 Total permissible mass 12 Inertia braked towable mass 7 Permissible front axle load 13 Towable mass fitted with an assisted braking system hydraulic or pneumatic Model Serial number NOTE Located on right hand front casting Pin plate may b...

Page 23: ...o the left hand side of the engine block just below the oil cooler RAIL12TR02140AA 4 Transmission serial number NOTE Located on the right hand side of the transmission to the left of the main hydraulic filter RAIL12TR01410AA 5 Powershift transmission RAIL12TR02191AA 6 Auto Command 47917988 24 09 2015 16 ...

Page 24: ...ON Axle serial number Located on the rear left hand side of the class 4 75 fixed 4 75 saddle suspended 5 0 fixed and 5 0 saddle suspended front axle housings example shown RAIL12TR02142AA 7 47917988 24 09 2015 17 ...

Page 25: ...INTRODUCTION 47917988 24 09 2015 18 ...

Page 26: ...8 350 CVT TIER 4B ZFRE05001 T8 380 CVT TIER 4B ZFRE05001 T8 380 SmartTrax CVT TIER 4B ZFRE05001 T8 410 CVT TIER 4B ZFRE05001 T8 410 SmartTrax CVT TIER 4B ZFRE05001 T8 435 CVT TIER 4B ZFRE05001 T8 435 SmartTrax CVT TIER 4B ZFRE05001 47917988 24 09 2015 10 ...

Page 27: ... 216 Fuel tanks 10 4 10 218 Fuel injection system 10 5 10 254 Intake and exhaust manifolds and muffler 10 6 10 304 Engine lubrication system 10 7 10 310 Aftercooler 10 8 10 400 Engine cooling system 10 9 10 414 Fan and drive 10 10 10 500 Selective Catalytic Reduction SCR exhaust treatment 10 11 47917988 24 09 2015 10 ...

Page 28: ...T8 350 CVT TIER 4B ZFRE05001 T8 380 CVT TIER 4B ZFRE05001 T8 380 SmartTrax CVT TIER 4B ZFRE05001 T8 410 CVT TIER 4B ZFRE05001 T8 410 SmartTrax CVT TIER 4B ZFRE05001 T8 435 CVT TIER 4B ZFRE05001 T8 435 SmartTrax CVT TIER 4B ZFRE05001 47917988 24 09 2015 10 1 10 001 1 ...

Page 29: ...Contents Engine 10 Engine and crankcase 001 FUNCTIONAL DATA Engine Overview 3 Overview Special Tools 33 SERVICE Engine Remove 41 Install 50 47917988 24 09 2015 10 1 10 001 2 ...

Page 30: ...ng our featured visibility around the hood and chassis The Cursor 9 engine was introduced in the CNH combines in 2006 and migrated into the T9 series tractors It has proven itself to be a consistent reliable performer The introduction in the T8 series brings it to new heights with up to 275 kW 374 Hp rated and 316 kW 429 Hp in power boost mode 6 cylinder 24 valve turbocharged and aftercooled Singl...

Page 31: ...PT model number designation NOTE The FPT engine designation code has evolved over the years This is the best current information and may not be applicable to previous FPT engines RAIL15TR01380GA 2 47917988 24 09 2015 10 1 10 001 4 ...

Page 32: ...r and closet to the center line of the engine 2 A two piece valve cover assembly that allows for valve adjustment without removing the entire cover 3 The rear cover is an oval shape where on other Cursor 9 engines it s round 4 The flywheel speed sensor is located on the right side of the engine others have on the left side of the engine 5 The turbocharger is moved higher and toward the center line...

Page 33: ...ing an additional braking effect All Cursor engines are equipped with an advanced engine brake system the Iveco Turbo Brake IBT system Decompression engine brake Quick responding Integrated in the engine control Linked to cruise control Linked to EBS Advantage Less brake pad wear Automatically engaged Benefit Reduced operation cost Operator ease The engine brake is controlled by the Tractor Contro...

Page 34: ...r is supplied to the inlet by a waste gate turbocharger or a Variable Geometry Turbocharger VGT RAIL15TR00376BA 5 Wastegate turbocharger The wastegate turbocharger allows for a larger tur bocharger to be installed producing higher boost pres sures in the low and midrange rpm while not over boosting at high rpm Intake pressure builds against a diaphragm in the waste gate and opens a valve allowing ...

Page 35: ... to direct exhaust toward the turbine controlling both the velocity and angle the exhaust contacts the turbine This gives the ECU the ability to dynamically tune the boost pressure at any given engine speed and load Improving performance and fuel economy Fully open the velocity slows and the angle is decreased therefore the turbine and compressor turn slower producing less boost When needed the va...

Page 36: ...rsor engines t has two 96 pin electrical connectors one for the engine components and one for the tractor connections Pin connections will be common for all the CNH FPT engines using this controller 1 Tractor connector 2 Engine connector RAIL14TR00234PA 10 The EDC17CV41 controls all engine and Selective Catalytic Reduction SCR functions 47917988 24 09 2015 10 1 10 001 9 ...

Page 37: ...f the engine The oil pump also has an over pressurization relief valve 3 set at approximately 10 bar 145 psi RAIL15TR00367AA 12 RAIL15TR00389BA 13 A 5 bar 72 5 psi oil pressure control valve 1 is located on the left hand side of the engine The oil pump assembly 2 includes an over pressurization relief valve 3 that protects the pump The valve opens at 9 4 10 8 bar 136 3 156 6 psi 47917988 24 09 201...

Page 38: ...ugh the center of the camshaft and exits at the front This filter must be replaced at regular intervals or the en gine will build up excessive pressure in the crank case RAIL15TR00366AA 14 Built into the cover at the front is a valve that allows blow by pressures out but will not allow atmospheric pressure into the crankcase This filtered air is directed back into the inlet and re burned RAIL15TR0...

Page 39: ...e to the cap rod mating area requires that the rod be replaced Connecting rod weight class and color Bore diameter and color designation 85 987 58 996 Yellow 85 997 86 005 Green 3450 3470 grams Grade A Yellow 86 006 86 013 Blue 85 987 58 996 Yellow 85 997 86 005 Green 3471 3490 grams Grade B Green 86 006 86 013 Blue 85 987 58 996 Yellow 85 997 86 005 Green 3491 3510 grams Grade C Blue 86 006 86 01...

Page 40: ...rnal CRANKIDENTIFY 18 Standard crankshaft connecting rod bearing selection Connecting rod bore Standard crankshaft connecting rod journals Class 1 Yellow paint Class 2 Green paint Class 3 Blue paint Green Green Yellow Class 1 81 915 to 81 925 mm Green Yellow Yellow Red Green Green Class 2 81 925 to 81 935 mm Green Green Yellow Red Red Green Class 3 81 935 to 81 945 mm Red Green Green NOTE It may b...

Page 41: ...g selection Main bearing bore fit class Standard crankshaft journals Class 1 Class 2 Class 3 Green Black Green Black Yellow Black Class 1 92 843 to 92 853 mm Green Black Yellow Black Yellow Black Red Black Green Black Green Black Class 2 92 853 to 92 863 mm Green Black Green Black Yellow Black Red Black Red Black Green Black Class 3 92 863 to 93 872 mm Red Black Green Black Green Black With the va...

Page 42: ...ne damage can occur if procedures are not followed carefully NOTE All references to flywheel rotation will be made as viewed from the rear of the engine NOTE The A B and C holes are marked with one hash mark l and the D hole with two hash marks ll RAIL15TR00406FA 20 Position the flywheel at TDC 1 and 6 the B hole at the bottom This can be done by locating the D hole at the bottom view hole in the ...

Page 43: ... the cam drive must be installed with the three phonic wheel mounting holes making an arrow pointing to the right If this is not done the phonic wheel will not be able to be timed The slotted holes must be centered on the camshaft bolt holes to make fine adjustments to the cam later in this process Install the bolts and tighten but do not torque yet they will be loosened later in this procedure RA...

Page 44: ... gear to idler back lash Only measure the back lash between the upper idler gear and the camshaft gear Install the dial indicator tangential to a camshaft gear tooth Hold the idler so that it does not move and rock the camshaft gear Correct back lash is 0 080 0 180 mm 0 003 0 007 in RAIL15TR01370BA 25 Rotate the flywheel clockwise until the D hole appears in the bottom view hole Install a dial ind...

Page 45: ... counterclockwise until the D hole is in the timing window and the timing pin will lock the flywheel Verify the reading on the dial indicator is 5 29 mm 0 21 in 0 05 mm 0 002 in NOTE For engines without an engine brake engine serial numbers 25342 and after set backlash to use 4 70 mm 0 19 in NOTE For engines with or without an engine brake prior to engine serial number 25342 set backlash to use 5 ...

Page 46: ... bolts to the specified torque RAIL15TR01372BA 27 Adjusting the valve lash Flywheel Cylinder B 1 A 4 C 2 B 6 A 3 C 5 The valves can only be adjusted when the piston is at TDC firing Rotate the engine counterclockwise to the B hole the first hole after the hole with the double mark Use the timing pin to lock the flywheel Now adjust the valves on cylinder number 1 Use the chart to the left to determ...

Page 47: ...y fuel filter 12 High pressure pump 4 Engine control module 13 Common rail 5 13 8 34 5 kPa 2 0 5 0 psi 2 5 psi check valve 14 High pressure relief 6 Gear pump 15 Rail pressure sensor 7 5 0 bar 72 5 psi relief valve 16 Injector 8 Fuel temp sender 17 Return line 9 Secondary fuel filter 18 Cooler 19 Filter separator option 47917988 24 09 2015 10 1 10 001 20 ...

Page 48: ...ngine Engine and crankcase High Pressure Common Rail HPCR RAIL15TR00407FA 29 1 Pressure sensor 4 Supply from high pressure pump 2 Common rail 5 Relief valve 3 Injector 47917988 24 09 2015 10 1 10 001 21 ...

Page 49: ... parts 1 Low pressure gear pump 2 Regulator valve Mprop 3 2Ω PWM Controls low pressure supply to high pressure pump therefore the common rail pressure 3 5 0 bar 72 5 psi low pressure control valve NOTE There are two 5 0 bar 72 5 psi pressure valves one in the gear pump and this one in the pump body 4 Drive gear 47917988 24 09 2015 10 1 10 001 22 ...

Page 50: ... common rail relief valve is mounted on the end of the common rail It functions to protect the system s compo nents in case of a failure of the rail pressure sensor or the pressure regulator that could cause the high pressure pump to provide more fuel than the system can safely han dle The common rail relief valve is a two stage valve When the rail pressure reaches 2000 bar 29000 psi the valve ope...

Page 51: ...y fuel to final filter 1 Fuel supply relief valve 5 0 bar 72 5 psi 2 Supply pump bypass valve for bleeding Bypass mode RAIL15TR00370AA 35 During lift pump operation fuel will bypass the gear pump through a check valve that opens at about 0 138 0 345 bar 2 0 5 0 psi A Supply fuel drawn from pre filter B Supply fuel to final filter 1 Fuel supply relief valve 5 0 bar 72 5 psi 2 Supply pump bypass val...

Page 52: ...st a common eccentric shaft In one revolution of the pump shaft each piston has completed a pumping cycle Each piston is spring loaded to push the piston against the rotary coupling on the ec centric shaft Each pumping element has an inlet valve and an outlet valve The valves act as check valves the inlet valve allows low pressure fuel that is metered by the regulator valve to inter the pumping ch...

Page 53: ...nkcase RAIL15TR00413GA 37 1 Pumping element 5 Piston 2 Rotary coupling 6 Eccentric pump shaft 3 Inlet valve 7 Low pressure fuel inlet 4 Outlet valve 8 Supply fuel ducts to pumping elements 47917988 24 09 2015 10 1 10 001 26 ...

Page 54: ...asing the volume the inlet valve will close The fuel is now trapped in the pumping chamber and the pressure will start to build When the pressure in the pumping chamber becomes higher than the pressure in the common rail the outlet valve will open the fuel will flow to the common rail RAIL15TR01379GA 38 1 Fuel to common rail 5 PWM metered fuel 2 Outlet valve 6 Low pressure supply fuel 3 Pumping el...

Page 55: ... 5 0 bar 72 5 psi supply pressure to charge the pumping elements NHIL13ENG1039GA 39 1 Pumping element inlet pressure 5 Pressure regulator 2 Pump lubrication passage 6 Pumping element inlet pressure 3 Pumping element inlet pressure 7 Relief valve outlet passage 4 Main supply passage 8 Fuel supply inlet from final filter passage to relief valve and regulator 47917988 24 09 2015 10 1 10 001 28 ...

Page 56: ...Engine Engine and crankcase HPFUELPUMP5 40 1 High pressure fuel passage to common rail 3 Outlet to common rail 2 High pressure fuel passage to common rail 47917988 24 09 2015 10 1 10 001 29 ...

Page 57: ...cranking and start up at idle and in case of high flow rates The rail has enough volume to minimize pressure spikes caused by the opening and closing of the injectors and the operation of the high pressure pump The fuel pressure sensor 5 sends a signal to the ECU this is feedback information in the calculation of the PWM signal sent to the regulator valve The relief valve 6 open at 1850 1950 bar 2...

Page 58: ...he dirty side of the filter to the clean and contaminate the fuel system RAIL15TR01377PA 42 To test the fuel supply pressure you will to procure a MC5315 x 4 x 12 fitting locally Pressure at filter with lift pump running 0 34 bar 5 00 psi Pressure while cranking 1 0 bar 14 5 psi Engine running 5 0 bar 72 5 psi RAIL15TR01378PA 43 47917988 24 09 2015 10 1 10 001 31 ...

Page 59: ...Engine Engine and crankcase EDC17CV41 Injector to ECU Connections RAIL15TR01375SA 44 RAIL15TR01376UA 45 47917988 24 09 2015 10 1 10 001 32 ...

Page 60: ... Internal Repair one set by dealer Included in Kits 380040121 and 380040128 2 Spacer To be used with 380000137 and 380000138 Cursor 10 and 13 Mandatory Level 1 One at every dealer location Included in Kits 380040127 and 380040129 RAIL15TR01299AA 3 Engine turning tool 380002822 Cursor 9 Except for T8 series tractors Mandatory Level 2 Internal repair one set by dealer Included in Kits 380002822 4 47...

Page 61: ...ry dealer location Included in Kit 380040121 380000151 6 Rocker arm shaft tool 380000148 Cursor 10 and 13 380000149 Cursor 8 and 9 Level 2 Internal repair one set by dealer 380000148 Cursor 10 and 13 included in kits 380040127 380040129 and 380040199 380000149 Cursor 9 included in kit 38040126 380000148 7 Camshaft timing tool 380002818 Cursor 9 Recommended Level 2 Internal repair one set by dealer...

Page 62: ...l 2 Internal repair one set by dealer Included in kit 380040121 380000127 10 Front seal removal tool 380000118 Cursor 8 and 9 380000120 Cursor 10 and 13 Level 2 Internal repair one set by dealer 380000118 included in kit 380000120 included in kit 380040121 380000120 11 Front seal installation tool 00409463 Cursor 8 and 9 380000126 Cursor 10 and 13 Mandatory Level 2 Internal repair one set by deale...

Page 63: ...h 380000165 Cursor 8 380002823 Cursor 9 380000167 Cursor 10 380000117 Cursor 13 Mandatory Level 2 Internal repair one set by dealer Included in kits 380000117 14 Crankshaft lifting tool 380000362 Generic Mandatory Level 3 Safety related tool Included in kit Purchase locally 380000362 15 Ring compressor 380000220 Generic 60 0 125 0 mm 2 4 4 9 in Recommended Level 2 Internal repair one set by dealer...

Page 64: ...ed in kits 380000144 18 Cylinder sleeve removal tool 380000366 Cursor 8 9 10 and 13 Tool works with specific rings Mandatory Level 2 Internal repair one set by dealer Included in kits 380000366 19 Cylinder sleeve removal rings 380000152 Cursor 8 and 9 115 mm 380000153 Cursor 10 125 mm 380000116 Cursor 13 135 mm Used with the 380000366 sleeve pulling tool Recommended Level 2 Internal repair one set...

Page 65: ...ded Level 2 Internal repair one set by dealer Included in kits 380000142 22 Sleeve compression plate 380000143 Cursor 10 380000115 Cursor 13 Used with 380000140 and 380000142 Recommended Level 2 Internal repair one set by dealer Included in kits 380000115 23 Sleeve compression plate and spacers 380000141 Cursor 8 and 9 Tool to be used with 380000140 Mandatory Level 2 Internal repair one set by dea...

Page 66: ...ecommended Level 2 Internal repair one set by dealer Included in kits 380000364_3A 26 Dial indicator 380000225 Cursor 8 9 10 and 13 Used with 380000364 Recommended Level 2 Internal repair one set by dealer Included in kits 380000229 380000228 27 Piston ring extender 380000324 Generic 110 00 150 00 mm 4 33 5 91 in Recommended Level 2 Internal repair one set by dealer Included in kits 380000324 28 4...

Page 67: ...vel 2 Internal repair one set by dealer 380000145 Cursor 8 Included in kit 380040127 380000146 Cursor 10 and 13 included in kits 380040127 380040129 and 380040199 RAIL15TR01303AA 29 Injector cup extractor 380000123 Cursor 8 9 10 and 13 Mandatory Level 2 Internal repair one set by dealer 380000123 30 47917988 24 09 2015 10 1 10 001 40 ...

Page 68: ... operation Engine cooling system Remove 10 400 Prior operation Diesel Oxidation Catalyst DOC Remove 10 500 NOTE Clean all fittings before disconnecting NOTE Cap or plug all lines and ports when disconnecting hydraulic components 1 Disconnect the harness connector to the humidity sen sor 1 and the air restriction sensor 2 Disengage the hose clamp 3 and disconnect the hose from the air in take tube ...

Page 69: ...he hood support 2 RAIL13TR04204AA 3 4 Disconnect the starter cables 1 and the auxiliary wire 2 RAIL13TR04209AA 4 5 Remove the three bolts 1 securing the hood support to the frame RAIL13TR04209AA 5 6 Remove the hood support RAIL13TR04212AA 6 47917988 24 09 2015 10 1 10 001 42 ...

Page 70: ... or cap all ports and lines RAIL13TR04230AA 7 8 Remove the two bolts 1 from the rear engine mount plate RAIL13TR04243AA 8 9 Remove the engine mount cover plate RAIL13TR04244AA 9 10 Disconnect the suspended axle electrical connectors 1 if equipped RAIL13TR04237AA 10 47917988 24 09 2015 10 1 10 001 43 ...

Page 71: ...3TR04232AA 11 12 On the front of the engine remove the tube clamp 1 for the oil cooler tubes RAIL13TR04234AA 12 13 Disconnect the oil cooler tubes 1 and set them aside RAIL13TR04235AA 13 14 On the rear of the engine remove the oil cooler tube clamp 1 RAIL13TR04236AA 14 47917988 24 09 2015 10 1 10 001 44 ...

Page 72: ...A 15 16 Disengage the hose clamp and disconnect the engine controller oil line 1 RAIL13TR04227AA 16 17 Remove the three mounting bolts 1 securing the fuse panel bracket NOTE Cut any wire ties securing the harness RAIL13TR04216AA 17 18 Remove the fuse panel RAIL13TR04214AA 18 47917988 24 09 2015 10 1 10 001 45 ...

Page 73: ...ply cable 2 RAIL13TR04219AA 19 20 Disconnect the vent hose 1 from the intake manifold RAIL13TR04218AA 20 21 Disconnect the harness connector 1 for the fan drive RAIL13TR04220AA 21 22 Remove the A C compressor mounting bolt 1 and disconnect the ground wire 2 RAIL13TR04224AA 22 47917988 24 09 2015 10 1 10 001 46 ...

Page 74: ...223AA 23 24 Disconnect the alternator excite wire connector 1 and the CAN bus connector 2 RAIL13TR04221AA 24 25 Remove the nut and disengage the alternator output cable 1 RAIL13TR04231AA 25 26 Disconnect the harness connector 1 to the engine controller RAIL13TR04226AA 26 47917988 24 09 2015 10 1 10 001 47 ...

Page 75: ...Mark the alignment of the drive shaft 1 Remove the four bolts and disengage the drive shaft from the flywheel RCPH10CCH817AAB 28 29 Remove the bolts 1 from the plate 2 for the right hand rear engine mount RCPH10CCH925AAB 29 30 Under the front frame remove the front engine mount nut RAIL13TR04246AA 30 47917988 24 09 2015 10 1 10 001 48 ...

Page 76: ...7AA 31 32 Remove the right hand ear engine mount Inspect for wear and or damage Replace as required Repeat for the left side RCPH07CCH166AAB 32 33 Remove the four bolts 1 securing the brackets 2 for the front engine mount 34 Remove the bolt 3 securing the front engine mount 4 35 Inspect the mount for wear and or damage Replace as required RCPH10CCH833AAB 33 Next operation Engine Install 10 001 479...

Page 77: ...113 N m 75 83 lb ft 3 Torque the ISO mount support bolt nut 3 to 160 220 N m 118 162 lb ft RCPH10CCH833AAB 1 4 Install the right shown and left rear engine ISO mounts RCPH07CCH166AAB 2 5 Properly support the engine Raise and move the en gine into the front support frame RAIL13TR04248AA 3 6 Install the front engine mounting nut RAIL13TR04246AA 4 47917988 24 09 2015 10 1 10 001 50 ...

Page 78: ... ft RCPH10CCH925AAB 5 11 Using the alignment marks 1 made earlier attach the engine output drive shaft to the engine flywheel 12 Using the four bolts 2 removed earlier to secure the drive shaft to the flywheel 13 Torque the bolts to 101 113 N m 75 83 lb ft RCPH10CCH817AAB 6 14 Install the engine output drive shaft cover 1 Use the bolts 2 removed earlier to secure the cover to the flywheel housing ...

Page 79: ...AA 9 17 Connect the alternator excite wire connector 1 and the CAN bus connector 2 RAIL13TR04221AA 10 18 Connect the harness connector to the high pressure switch 1 RAIL13TR04223AA 11 19 Connect the ground wire 1 and secure the wire with the A C compressor mounting bolt 2 RAIL13TR04224AA 12 47917988 24 09 2015 10 1 10 001 52 ...

Page 80: ...ve RAIL13TR04220AA 13 21 Connect the vent hose 1 to the intake manifold RAIL13TR04218AA 14 22 Connect the harness connector 1 for the engine grid heater and the power supply cable 2 RAIL13TR04219AA 15 23 Install the fuse panel RAIL13TR04214AA 16 47917988 24 09 2015 10 1 10 001 53 ...

Page 81: ...This as a preview PDF file from best manuals com Download full PDF manual at best manuals com ...

Reviews: