•
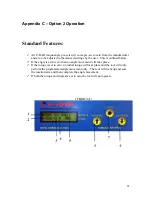
To change units of measurements press on UNITS. The units will cycle
between Ft.Lb, Nm and Kg.F.
•
Set the torque to the setting required for your application.
•
To perform a torque operation:
o
Make sure the torque setting is correct
o
Couple the hand held tool with socket onto the bolt
o
Make sure the direction switch is set to forward (verify display if in
question as this will show REVERSE / ACTUAL TORQUE (forward)
on the bottom row)
o
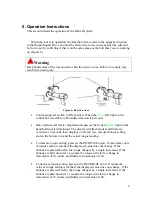
Make sure reaction arm has a proper and safe point of reaction
(Figure 6)
o
Press the trigger and hold it down until the hand held tool stops
rotating and the
Pass
light illuminates. The hand held tool operates
until the actual torque reaches the preset value (Pass indicator
Illuminated), and then stops automatically. If the Trigger is released
before the set torque is reached, or the tool fails to reach the required
torque, the
Fail
indicator light is illuminated.
o
To clear an error or a failed indicator illumination set the direction
switch to REVERSE (bottom line of LCD displays “REVERSE”)
Any error or failed indicator illumination is cleared;
Pressing the Trigger causes the tool to operate in the reverse
direction as long as the Trigger is pressed.
o
If the tool is unable to reach the correct torque, switch the Direction
switch to reverse, back the bolt off and then repeat the torque
operation.
IMPORTANT NOTE:
If the tool is running for more than 20 seconds and the correct torque is not
reached, the tool stops, and the Red Failed indicator illuminates on the handgrip.
o
Once the set torque is reached and the green
Pass
light is illuminated,
the tool reverses direction for a short pulse motion to release the
reaction arm from the bolt.
•
Upon completion of the bolting job or at the end of the day, power down the
controller by turning the ON/OFF switch to OFF. It is not necessary to
disconnect the cables from the controller.
•
Download the torque records to a Personal Computer (windows based) if
desired (recommended at the end of a job). See section 8.
9


