39
B. Near Boiler Piping Design
Proper operation of this boiler requires that the water flow rate through it remain within the limits shown in Table
9.1 any time the boiler is firing. At flow rates below the minimum shown, the boiler’s flow switch and/or temperature
rise limit function may prevent the boiler from firing. Flow rates through the boiler in excess of the maximum shown in
Table 9.1 can result in excessive noise or erosion damage to piping
Use of primary-secondary piping (described below) is strongly recommended for connection of the boiler to the
system. Additional information on hydronic system design can be found in the
I=B=R
Guide RHH published by the
Air-Conditioning, Heating and Refrigeration Institute (AHRI).
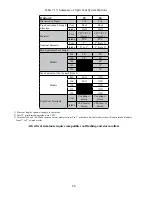
Table 9.1: Flow Limitations
Flow (GPM)
Model
Minimum
Maximum
80MBH
5.0
13.3
100MBH
5.1
13.3
120MBH
6.2
13.3
150MBH
7.7
13.3
180MBH
9.3
13.3
Primary-secondary piping can be used in heat-only applications as shown in Figure 9.2 or with an indirect water heater
as shown in Figure 9.3A or Figure 9.3B. In either system, the flow rate through the boiler (“secondary loop” or “boiler
loop”) is completely independent of the flow rate through the system (“primary loop”). Use the following guidelines to
ensure that the boiler will have the required flow shown in Table 9.1 regardless of the flow in the heating system.
1) System Loop Piping - Size the system circulator and piping to obtain the design flow rate through the heating system
as you would on any other heating system. All piping between the expansion tank and secondary connection tees must
be at least 1”. In order to keep the flow rates in the system and boiler loops independent of each other, provide at least
8 diameters of straight pipe upstream of the first tee and 4 diameters downstream of the second tee. Keep the distance
between the expansion tank and the first secondary tee as short as practical.
2) Boiler Loop Piping – The boiler loop circulator is supplied by the installer. The circulators in Table 9.5 will provide
the required boiler loop flow provided both of the following conditions are met:
• All piping in the boiler loop has a nominal size of at least 1”
• The equivalent length of all piping in the boiler loop is 60ft or less.
To verify that the 60ft, equivalent length is not exceeded, do the following:
a) Count all fittings in the planned boiler loop (the shaded piping in Figure 9.6). In doing so, do not count the
secondary connection tees, unions, or the fittings supplied with the boiler (these have already been accounted for).
b) Using Table 9.4, find the equivalent lengths of all fittings in the boiler loop. Total these equivalent lengths and add
them to the total length of planned straight pipe in the boiler loop.
c) The result is the total equivalent length of the planned boiler loop. If the equivalent length calculated in (b) is under
the limit shown in Table 9.5, the boiler pump will achieve a flow rate and temperature rise approximately equal to that
shown in this table. Otherwise, the equivalent length must be reduced.
Summary of Contents for GHE Series
Page 10: ...9 Figure 5 1 Wall Layout Mounting Hole Location...
Page 11: ...10 Figure 5 2 Boiler Mounting Bracket Installation Boiler Wall Mounting...
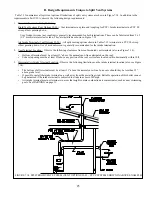
Page 17: ...16 FIGURE 7 4 WALL PENETRATION CLEARANCES FOR PVC VENT PIPE...
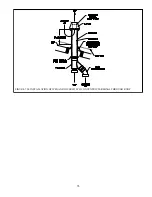
Page 34: ...33 FIGURE 7 24 INSTALLATION OF IPEX AND DIVERSITECH CONCENTRIC TERMINAL THROUGH ROOF...
Page 41: ...40 FIGURE 9 2 NEAR BOILER PIPING HEATING ONLY BOILER LOOP PIPING SHOWN SHADED...
Page 42: ...41 FIGURE 9 3a NEAR BOILER PIPING HEATING PLUS INDIRECT WATER HEATER...
Page 43: ...42 FIGURE 9 3b NEAR BOILER PIPING HEATING PLUS INDIRECT WATER HEATER...
Page 47: ...46 This page is intentionally left blank...
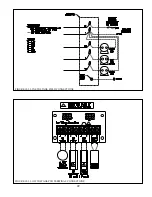
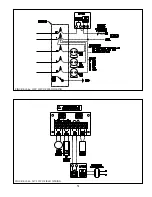
Page 50: ...49 FIGURE 10 2 LINE VOLTAGE FIELD CONNECTIONS FIGURE 10 3 LOW VOLTAGE PCB TERMINAL CONNECTIONS...
Page 52: ...51 FIGURE 10 4a 120V LWCO FIELD WIRING FIGURE 10 4b 24V LWCO FIELD WIRING...
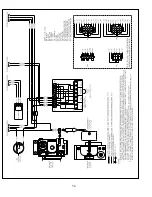
Page 54: ...53 FIGURE 10 6 INTERNAL WIRING CONNECTIONS DIAGRAM...
Page 55: ...54...
Page 62: ...61 Lighting and Operating Instructions...
Page 82: ...81 FIGURE 14 6 CONTROLS LOCATION FIGURE 14 7 PRESSURE SWITCH TUBING CONNECTIONS...
Page 87: ...86 Blower Gas Valve Assembly for 150 180...
Page 90: ...89...
Page 103: ...102...

