68
E. Diagnostic Mode
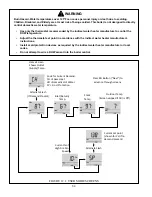
Enter Diagnostic Mode by pressing and holding both the LH and RH buttons for at least 3s. The RH (“Next”) button navigates
between screens. The LH (“Done”) button returns to User Mode. All Diagnostic Mode screens are shown in Figure 12.7. A
description of each is below. For more information on troubleshooting, see Section XIV.
uA – Flame signal in micro-Amps
. This is shown as “---“ when the burner is off.
Alert – Not used
(screen will always read zero).
Lockout – Shows the code for the most recent lockout that occurred
. If none have occurred since this control was powered up, this
screen will read zero. A list of lockout codes is shown in Section XIV.
T
– Shows the current difference between the supply and return temperatures.
LF – Forces the burner to run at low fire if it is on
(used for combustion testing). Pressing the LH (“Done”) button returns the user
to User mode and also returns the burner to automatic modulation. If no button on pressed while on this screen for 15 minutes,
control panel will automatically return to User Mode and burner will return to automatic operation.
HF - Forces the burner to run at high fire if it is on
(used for combustion testing). As with the HF screen, pressing the LH
(“Done”) button or staying on this screen for 15 minutes without touching a button returns the user to User Mode and also restores
automatic modulation.
From
User
Mode
Flame
Signal
Alert
Code
(Not
Used)
Code
for
Last
Lockout
Current
Boiler
Water
Δ
T
Low
Fire
Hold
High
Fire
Hold
Diagnostic
Mode
Button
Usage:
LH
(Done)
–
Return
to
User
Mode
RH
(Next)
–
Move
to
next
screen
Automatic
modulation
restored
when
not
on
HF
or
LF
screen
For
a
list
of
Hold
and
Lockout
Codes,
see
Section
XIV
FIGURE 12.7: DIAGNOSTIC MODE SCREENS
Summary of Contents for GHE Series
Page 10: ...9 Figure 5 1 Wall Layout Mounting Hole Location...
Page 11: ...10 Figure 5 2 Boiler Mounting Bracket Installation Boiler Wall Mounting...
Page 17: ...16 FIGURE 7 4 WALL PENETRATION CLEARANCES FOR PVC VENT PIPE...
Page 34: ...33 FIGURE 7 24 INSTALLATION OF IPEX AND DIVERSITECH CONCENTRIC TERMINAL THROUGH ROOF...
Page 41: ...40 FIGURE 9 2 NEAR BOILER PIPING HEATING ONLY BOILER LOOP PIPING SHOWN SHADED...
Page 42: ...41 FIGURE 9 3a NEAR BOILER PIPING HEATING PLUS INDIRECT WATER HEATER...
Page 43: ...42 FIGURE 9 3b NEAR BOILER PIPING HEATING PLUS INDIRECT WATER HEATER...
Page 47: ...46 This page is intentionally left blank...
Page 50: ...49 FIGURE 10 2 LINE VOLTAGE FIELD CONNECTIONS FIGURE 10 3 LOW VOLTAGE PCB TERMINAL CONNECTIONS...
Page 52: ...51 FIGURE 10 4a 120V LWCO FIELD WIRING FIGURE 10 4b 24V LWCO FIELD WIRING...
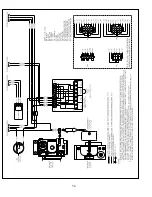
Page 54: ...53 FIGURE 10 6 INTERNAL WIRING CONNECTIONS DIAGRAM...
Page 55: ...54...
Page 62: ...61 Lighting and Operating Instructions...
Page 82: ...81 FIGURE 14 6 CONTROLS LOCATION FIGURE 14 7 PRESSURE SWITCH TUBING CONNECTIONS...
Page 87: ...86 Blower Gas Valve Assembly for 150 180...
Page 90: ...89...
Page 103: ...102...

