background image

More user manuals on 

ManualsBase.com


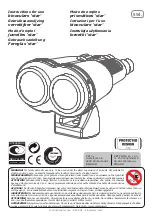
2. DEVICE APPEARANCE  


          Fig. 1. 

Front view 


1 - Eyepiece 

2 - Objective lens  

3 - Laser emitter lens 

4 - Receiver lens 

5 - M (Mode)


button 

6 - A (Action) button 

7 - Body of the device 

8 - Rubber grip 

Summary of Contents for LRM 2200SI

Page 1: ...More user manuals on ManualsBase com Operation Manual LRM 2200SI LASER RANGE FINDER MONOCULAR 105 Sparks Ave Toronto ON M2H 2S5 Canada...

Page 2: ...More user manuals on ManualsBase com ii...

Page 3: ...EVER disassemble the unit This may be hazardous for you due to high voltage currents in the system NEVER aim the unit at highly reflective objects like mirrors and retroreflective surfaces which are i...

Page 4: ...Caution use of optical instruments such as binoculars loupes mirrors lenses etc with this product increases eye hazard Avoid eye exposure to direct laser beam or its close reflection Prevent bright l...

Page 5: ...OPERATION INSTRUCTIONS 9 Changing battery 10 Measuring procedure 11 Maximum distance 11 Target selection logic 12 Operation and service modes 13 Accuracy correction 14 Compass calibration 16 Gating mo...

Page 6: ...with CFR 21 Part 1040 10 High quality multi coated optics are combined in this device with complex circuitry design to create a system that can outperform other product in its class Principle of oper...

Page 7: ...tal circuitry allows ranging through most types of glass bushes and other obstacles Distance is displayed in meters or yards Speed is displayed in km h or mph On board memory stores results of last 10...

Page 8: ...uals on ManualsBase com 4 2 3 4 5 6 7 1 8 2 DEVICE APPEARANCE Fig 1 Front view 1 Eyepiece 2 Objective lens 3 Laser emitter lens 4 Receiver lens 5 M Mode button 6 A Action button 7 Body of the device 8...

Page 9: ...More user manuals on ManualsBase com 5 Fig 2 Rear view 1 Eyepiece 10 Tripod socket 9 Battery compartment cover 12 Classification 11 Identification imprint imprint shown below 9 11 1 12 10...

Page 10: ...6 3 DELIVERY SET Standard delivery set LRM 2200SI is supplied in a set comprised of the following Qty LRM 2200SI 1 9V Lithium non magnetic battery 1 Soft carrying case Cleaning cloth 1 1 Neck strap 1...

Page 11: ...view Type of coating 7x 25 mm 3 6 mm 8 Fully multi coated optics Range Finder Laser Measuring range Accuracy First last and auto target selection Meters Yards display Last 10 readings recall Reticle T...

Page 12: ...0 km h Accuracy 2 km h Power Battery 9V Lithium non magnetic Battery capacity Min 5 000 measurements Scanning regime Low Battery indicator Yes Environmental Operational temperature range Storage tempe...

Page 13: ...S 1 Low battery indicator 2 Reticle either or 3 Units of measurement 4 Measurement result 5 Target quality indicator 6 Laser active indicator 7 Setup mode indicator 8 Ready mode indicator 4 6 2 1 5 3...

Page 14: ...Slide the battery compartment cover down Fig 2 Shake the rangefinder gently towards the open end of the battery compartment Pull out the battery The unit is fully operational when battery voltage is...

Page 15: ...measurement the target must be at least 10 m away If more than one parameter is chosen to measure e g distance and elevation the results will replace each other on the display every second Maximum di...

Page 16: ...remor decreases the accuracy of long distance ranging Use of a tripod is highly recommended Target selection logic On its way towards the target the laser beam may reflect off various objects in the a...

Page 17: ...ing Mode button 5 Fig 1 1 in Ready mode switches the unit between modes of operation To activate any desired mode from the menu you must confirm your selection by pressing the Action button Fig 1 1 Th...

Page 18: ...cross to rectangle o CAL Calibration CALc Compass calibration corr Accuracy correction of active measurement parameters Display Test 1 in default the following modes are set distance in meters elevat...

Page 19: ...ll unit at 1 meter1 from a flat target2 C Azimuth Put unit on a level plane and aim it to the North direction 3 E dE Elevation Put unit on the horizontal level 1 Accuracy of correction will depend on...

Page 20: ...ay diminish To return the compass into working condition Select CALc from CAL menu Keeping the unit horizontal perform one full rotation around vertical axis within half a minute and then one full rot...

Page 21: ...nds Gating feature helps measure remote targets in unfavourable atmospheric and environmental conditions by eliminating reflections from snowflakes raindrops industrial wires tree branches etc At the...

Page 22: ...only distance is measured the set will consist of one number if distance and azimuth are measured the set will consist of two numbers To enter Data Recall mode select rEc from mode menu First measurem...

Page 23: ...yed in yards or meters elevation may or may not be measured Indicates that only azimuth or elevation is measured KMH or MPH Indicated speed is displayed in either kilometres per hour or miles per hour...

Page 24: ...m The closer to perpendicular you get the stronger will be the reflection 3 The unit deploys sophisticated software that tries to understand which target you are aiming at However due to beam divergen...

Page 25: ...o not use the device at temperatures higher than 50o C 122o F Do not touch optical surfaces Doing so may damage the anti reflection coating Clean optical surfaces only with professional camera lens cl...

Page 26: ...gain If this does not help perform compass calibration Black dots are visible on LCD Liquid Crystal Display may have small black dots scratches and other blemishes inherited from the manufacturing pro...

Page 27: ...ame or comparable model the product or part thereof which on inspection by Newcon is found to be defective in materials or workmanship What This Warranty Does Not Cover NEWCON is not responsible for w...

Page 28: ...nday Friday Eastern Standard Time At no time should equipment be sent back to Newcon without following the instructions of our technical support department NEWCON OPTIK accepts no responsibility for u...

Page 29: ...More user manuals on ManualsBase com 25 11 QUALITY CERTIFICATE The unit has passed the quality inspection Production date Serial number Quality Inspector Purchase date...

Page 30: ...More user manuals on ManualsBase com 26...

Page 31: ...More user manuals on ManualsBase com 27...

Page 32: ...NEWCON OPTIK Printed in Canada R1 02 12...

Reviews: