6
Getting to Know the Label Maker
Become familiar with the location of the feature and
function keys on your label maker. Refer to Figure 1. The
following sections describe each feature in detail.
Power
The
button turns the power on and off. After two
minutes of no activity, the power is switched off
automatically. The last label created is remembered and
displayed when the power is turned back on. The
previously selected style settings are also restored.
LCD Display
You can enter up to 99 characters and spaces. The
display shows about 13 characters at a time. The number
of characters displayed will vary due to proportional
spacing.
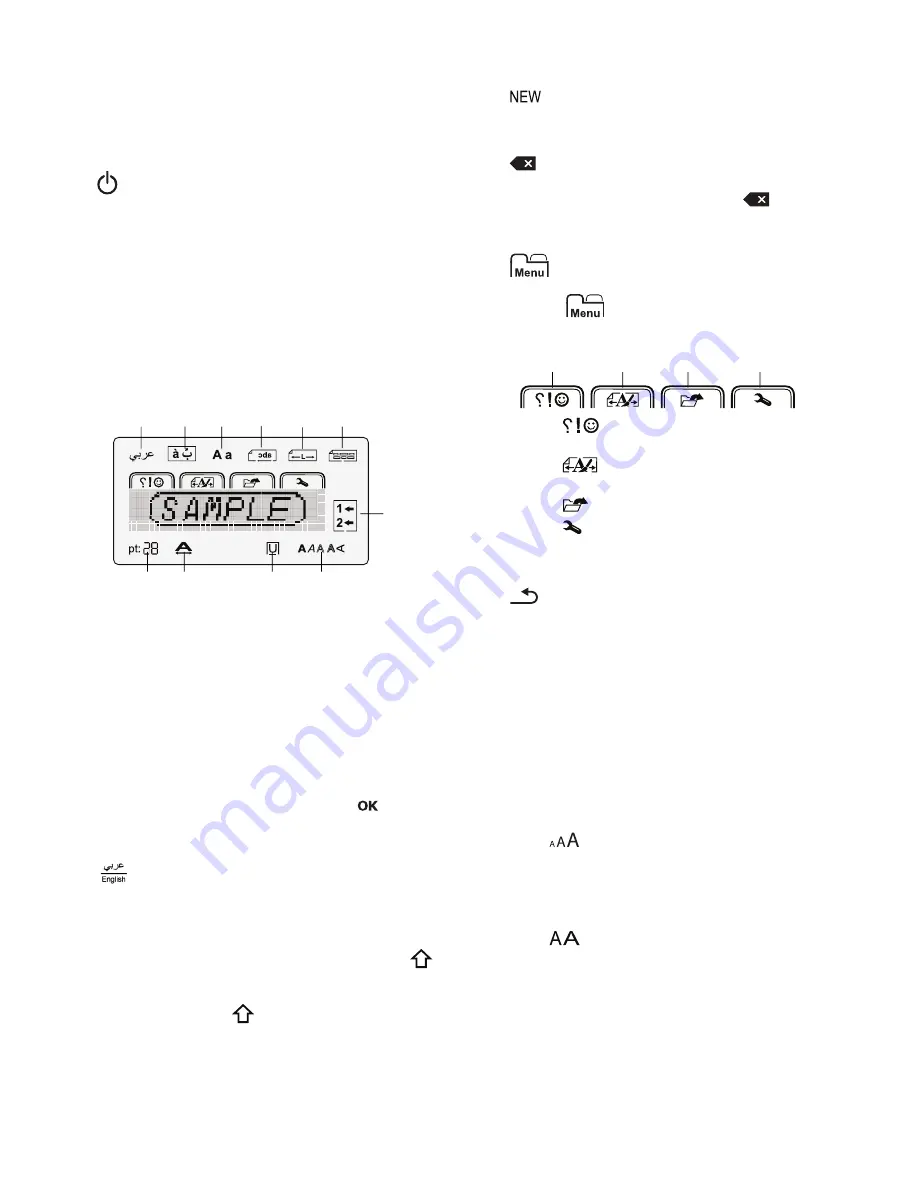
Feature indicators along the top and bottom of the LCD
display appear black when a feature or setting is selected.
Navigation Keys
You can review and edit your label using the left and right
navigation keys. You can move through menu selections
using all four navigation keys, and then press
to make
a selection.
Input Mode
The
key toggles between three input modes:
Arabic, Latin uppercase, and Latin lowercase. The default
setting is Arabic input.
Shift
When in Arabic input mode, pressing and holding the
key and then pressing a key, enters the secondary
character on that key. In Latin uppercase input mode,
pressing and holding the
key and then pressing a
character, enters a lowercase character and when in
lowercase mode enters an uppercase character.
NEW
The
key clears the current text and formatting from
the display, creating a new label.
Backspace/Cancel
The
key deletes the character to the left of the cursor
in Latin input mode and the character to the right of the
cursor in Arabic input mode. Holding the
key deletes
multiple characters.
Menu
The
key displays the Symbols/Clip Art, Format,
Memory, and Settings tabs.
Pressing the
key repeatedly scrolls through the
tabs.
Use the
symbols and clip art menu to insert
symbols and clip art on your labels.
Use the
format menu to set fixed label length,
mirror text, or alignment.
Use the
memory menu to open or save labels.
Use the
settings menu to change the language,
label width, and units of measure settings.
Cancel
The
key exits from a menu without making a
selection or cancels an action, such as printing.
Formatting Your Label
You can choose from several format options to enhance
the appearance of your labels.
Changing the Font Size
Five font sizes are available for your labels. The font size
applies to all characters on a label.
The font sizes that you can use depend on the label width
selected and whether a box or underline is added.
To change the font size
Press
until the desired font size is displayed.
Changing the Font Width
Two font widths are available: normal and wide.
To change the font width
Press
to toggle the font width from normal to
wide.
1
Arabic input mode
7
Current line
2
Accented characters
8
Font style
3
Uppercase/lowercase
9
Boxes/Underline
4
Mirror
10
Font width
5
Fixed length
11
Font size
6
Alignment
11
10
8
2
3
1
4
6
5
7
9
Symbols/
Clip Art
Settings
Format
Memory


