background image

6

PROCEDURE DI INSTALLAZIONE_ INSTALLATION PROCEDURE_ PROCÉDURES D’INSTALLATION_
INSTALLATIONSANWEISUNGEN_ INSTRUCCIONES DE MONTAJE

MINIMAL

ATTENZIONE! 

Assicurarsi che la parete sia perfettamente liscia e rettilinea per evitare difficoltà durante l’installazione.

WARNING! 

Make sure that the wall is perfectly smooth and straight to avoid problems during installation.

ALERTE! 

Assurez-vous que le mur soit parfaitement lisse et droite pour éviter des problèmes pendant l’installation.

ACHTUNG!

 Stellen Sie sicher, dass die Wand vollkommen glatt und gerade, um Probleme bei der Installation zu vermeiden.

ATENCIÓN! 

Asegúrarse de que la pared es perfectamente lisa y recta para evitar problemas durante la instalación.

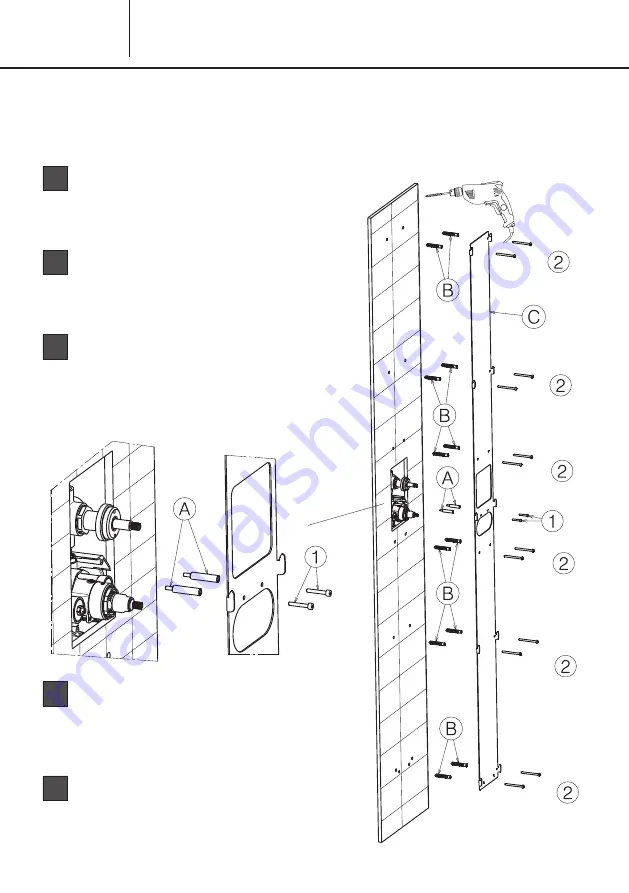
Dopo aver rimosso la parte frontale delle protezioni in plastica 

avvitare le prolunghe filettate (A), posizionare il supporto (C) e 

fissare con le viti (1). Tracciare a matita la posizione dei tasselli (B), 

svitare le viti (1) e rimuovere il supporto, forare e inserire i tasselli. 

Installare definitivamente il supporto tramite le viti (1-2)

After removing the front of the protection, screw the threaded 

extension (A), place the support (C) and fix it with screws (1). Draw 

with a pencil the position of the sleeve anchors (B), unscrew the 

screws (1) and remove the support, bore and insert the sleeve 

anchors. Finalize the installation of the support with the screws (1-2)

Après avoir enlevé la partie frontale des protections en plastique 

visser les rallonges filetées (A), placer le support (C) et le fixer avec 

les vis (1). Tracer au crayon la position de les chevilles (B), desserrer 

les vis (1) et enlever le support, percer et insérer les chevilles. 

Installer le support définitivement par les vis (1-2)


Nachdem Sie die Vorderseite der Kunststoffabdeckungen entfernt 

haben, die Gewindestange (A) anschrauben, den Träger (C) 

positionieren und mit Schrauben befestigen (1). Zeichnen Sie mit 

Bleistift die Position der Dübel (B), die Schrauben (1) abschrauben 

und den Träger entfernen, bohren und stecken Sie die Dübel. Den 

Träger mit den Schrauben (1-2) definitiv installieren.

Después de quitar la parte frontal de la protección en plastico, 

atornillar los prolongadores roscados (A), poner el soporte (C) 

y fijar con los tornillos (1). Marcar con un lápiz la posición de los 

tacos (B), destornillar los tornillos (1) y quitar el soporte, perforar y 

insertar los tacos. Instalar el soporte con los tornillos (1-2)

I

GB

F

D

E

Summary of Contents for MINIMAL 494

Page 1: ...istruzioni instructions instructions de montage Bedienungsanleitung instrucciones MINIMAL 495 494 ...

Page 2: ...t leave the residues of the packaging in the home environment Do not hinder the water flow Totally avoid using metallic or abrasive sponges and detergents or abrasive products in order not to damage the surfaces Especially with new installations in order to prevent impurities or debris penetrating into the tap and cau sing working problems purge the system before acti vating the mixer Clean only w...

Page 3: ...IA MINIMAL FILO DEL RIVESTIMENTO ESTERNO LINE OF THE EXTERNAL FACING FIL DU REVETEMENT EXTÉRIEURE AUSSENVERKLEIDUNGSDRAHT BORDE DE REVESTIMIENTO EXTERNO LIVELLA LEVEL NIVEAU WAAGE NIVEL SCHEMA DEVIATORE_ DIVERTER DIAGRAM_ SCHEMA DU DEVIATEUR_SCHEMA DES UMSCHALTERS ESQUEMA DESVIADOR 494 495 ...

Page 4: ...EFERENCIA ENCASTRE MINIMAL 494 495 I Per il mercato Americano e Canadese la filettatura è NPT GB For the American and Canadian market the thread is NPT F Pour le marché Américan et Canadien le filetage est NPT D Die Gewinde ist NPT für den amerikanischen und kanadischen Markt E Para el mercado Americano y Canadiense el filetado es NPT ...

Page 5: ...E RÉFÉRENCE_REFERENZANGABEN DATOS DE REFERENCIA MINIMAL CONSIGLI PER UNA CORRETTA INSTALLAZIONE ADVICES FOR PROPER INSTALLATION CONSEILS POUR UNE BONNE INSTALLATION TIPPS FÜR DIE ORDNUNGSGEMÄSSE INSTALLATION CONSEJOS PARA UNA INSTALACIÓN CORRECTA ...

Page 6: ... screw the threaded extension A place the support C and fix it with screws 1 Draw with a pencil the position of the sleeve anchors B unscrew the screws 1 and remove the support bore and insert the sleeve anchors Finalize the installation of the support with the screws 1 2 Après avoir enlevé la partie frontale des protections en plastique visser les rallonges filetées A placer le support C et le fi...

Page 7: ...bels Place the decor plate sliding down until it encaging it Engager à fond les tuyaux d alimentation en rilsan 3 conformément aux instructions de l étiquette Placer la plaque mural faisant la glisser vers le bas au point d à l accrocher Stecken Sie die beiden rilsan Versorgungsleitungen 3 gemäß den Anweisungen der Etiketten Die Dekorplatte legen indem man diese abwärts laufen läßt bis sie sich ha...

Page 8: ...e de l eau est supérieure ou inférieure à 38 placer un thermomètre sous l eau courante pour tenir sous contrôle la température et tourner la poignée J jusqu à atteindre 38 faire attention à placer le limiteur de température 3 comme indiqué à la Fig B EINSTELLUNG DER KARTUSCHE Vergewissern Sie sich dass der Endteil der thermostatischen Kartusche in der richtigen Stellung ist normalerweise nach unte...

Page 9: ...chevilles Installer le tête de douche définitivement par les vis 15 Faire passer le flexible 17 à travers de la couverture 16 et visser le flexible à la tête de douche Insérer complètement les deux raccords 18 conformément aux instructions de l étiquette Régler la position de la tête de douche avec deux vis M6 19 Fixer le couverture 20 avec les quatre vis 21 Positionieren Sie die Kopfbrause und ma...

Page 10: ...Avant de commencer les opérations de remplacement s assurer que l eau de l installation principale soit fermé Enlever les parties extérieures faire en sens contraire les opérations de montage décrites dans PROCÉDURES D INSTALLATION Dévisser la serre cartouche 1 extraire la cartouche 2 Remonter en sens contraire AUSTAUSCH DER KARTUSCHE Vor dem Austausch der Kartusche sicherstellen dass die Wasserha...

Page 11: ... SPARE PARTS_ PIECES DETACHEES_ ERSATZTEILE_ PIEZAS DE REPUESTO MINIMAL 1 11584 2 13350 3 10698 4 15652 5 11671 6 11672 7 15985 8 23184 9 23185 10 10870 11 10899 12 15711 13 25901 14 504 15 15144 16 22290 494 495 ...

Page 12: ...ressure pression Druck presión bar portata flow rate débit Wasserströmung caudal l min portata flow rate débit Wasserströmung caudal l min portata flow rate débit Wasserströmung caudal l min CASCATA_WATERFALL_CASCADE_WASSERFALL_CASCADA I utilizzato limitatore di portata max 12 l min GB flow rate limiter used max 12 l min F utilisé limiteur de débit max 12 l min D Der Strömungsminderer mit max 12 L...

Page 13: ...ressure pression Druck presión bar portata flow rate débit Wasserströmung caudal l min portata flow rate débit Wasserströmung caudal l min portata flow rate débit Wasserströmung caudal l min CASCATA_WATERFALL_CASCADE_WASSERFALL_CASCADA I utilizzato limitatore di portata max 12 l min GB flow rate limiter used max 12 l min F utilisé limiteur de débit max 12 l min D Der Strömungsminderer mit max 12 L...

Page 14: ...are environmental frien dly and recyclable Please be helpful and properly dispose of the packaging Do not leave it or parts of it in the environment In fact it could particularly concerning the plastic bags con stitute a danger of asphyxiation for children Sort out the materials of the packaging and deliver them to the nearest waste separate collection centres Proper disposal allows the recycling ...

Page 15: ...15 NOTE ...

Page 16: ...31 3 NEWFORM S p A via Marconi 25 A Frazione Vintebbio 13037 Serravalle Sesia VC Italy Tel 39 0163452011 r a Fax Amministrativo 39 0163458983 Fax Commerciale 39 0163459745 www newform it newform newform it ...

Reviews: