background image

7

NIO

PROCEDURE DI INSTALLAZIONE_ INSTALLATION PROCEDURE_ PROCÉDURES D’INSTAL-
LATION_ INSTALLATIONSANWEISUNGEN_ INSTRUCCIONES DE MONTAJE_ 

УСТАНОВКА

INSTALLATIONSPROCEDURER _ 

安装程序 _

بيكترلا تاءارجإ

2

FASE 2_PHASE 2_ÉTAPE 2_SCHRITT 2_FASE 2_ 2


ЭТАП

_FAS 2_

步骤二

_ 2

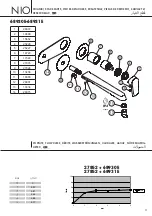
Fissaggio parti esterne.

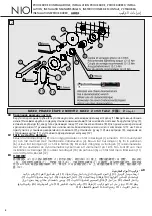
Avvitare il raccordo canna (2) nella parte incassata interponendo il decoro (1). Innestare la bocca (3) e 

fissarla con i 2 grani (4) in dotazione. Avvitare la boccola (5), inserire la cartuccia (6), avvitare la ghiera di 

fissaggio (7) ed inserire il cappuccio (8). 

Per una corretta chiusura della ghiera di fissaggio (7), si consiglia 

di utilizzare una chiave dinamometrica con un serraggio di 12-13 Nm

. Procedere quindi con l’installazione 

del decoro (9), montare la maniglia (10) sulla cartuccia (6) fissandola con il grano di fissaggio (11) e 

mettere il tappino (12) di copertura.

Fastening external parts.

Switch the junction of the spout (2) in the concealed part interposing the plate (1). Fit the spout (3) and fix it

with the 2 screw (4) included in the pack. Screw the bush (5), insert the cartridge (6), screw the fastening 

ring-nut (7) and insert the cap (8). 

For a correct fixing of the fastening ring- nut (7), we recommend to use a

dynamometric wrench with a torque of 12-13 Nm

. Then proceed with installation of decor plate (9), assemble 

the handle (10) on the cartridge (6) secure with the fixing screw (11) and put the cover cap (12).

Fixation pièces extérieures.

Visser le raccord du bec (2) dans la partie encastrée, en interposant le décor (1). Embrayer le bec (3) et le

fixer avec les 2 vis (4) fournis. Visser la boucle (5), insérer la cartouche (6), visser l’embout de fixation (7) et

insérer le bouchon (8). 

Pour une fermeture correcte de l’embout de fixation (7), on conseille d’utiliser une 

clé dynamométrique avec un serrage de 12-13 Nm

. Procéder donc avec l’installation de la plaque murale

(9), monter la poignée (10) sur la cartouche (6) en la fixant avec le grain de fixation (11), et mettre le 

bouchon (12) de couverture.

Befestigung der Aussenteile.

Die Auslaufverbindung (2) in den UP-Teil einschrauben, indem man die Dekorplatte (1) zwischenlegt. Den 

Auslauf (3) hineinstecken und mittels der 2 vorhandenen Dübel (4) befestigen. Die Buchse (5) anschrauben, 

die Kartusche (6) einführen und die Nutmutter (7) anschrauben, und die Kappe (8) einführen. 

Zu einem 

korrekten Schluss der Nutmutter (7), wird es empfohlen, einen Dynamometerschlüssel mit Spannung von 12-

13 Nm

. zu verwenden. Danach die Dekorplatte (9) installieren, den Griff (10) auf die Kartusche (6) montieren, 

indem man diesen mit dem Besfestigungsdübel (11) befestigt; die Kappe (12) dazu legen.

Fijación partes exteriores.

Roscar el racor del caño (2) en la parte encastre, interponiendo el embellecedor (1). Insertar el caño (3) 

y fijarlo con 2 roscas (4) incluidas. Atornillar el casquillo (5), insertar el cartucho (6), aprietar la tuerca de 

bloqueo (7) y insertar la tapita (8). 

Para un correcto cierre de la tuerca de bloqueo (7), se recomienda 

utilizar una llave dinamómetrica con una torsión de 12-13 Nm

. Proceder con la instalación del embellecedor 

(9), instalar la maneta (10) sobre el cartucho (6) con el grano (11) y poner la tapa (12) de cobertura.

IT

EN

FR

DE

ES 

Summary of Contents for NIO 68930E

Page 1: ...NIO 68930E 68931E S A V E WATER 5 L min S A V E WATER 5 L min istruzioni instructions instructions de montage Bedienungsanleitung instrucciones инструкции instruktioner 使用说明 تعليامت ...

Page 2: ...in case of use of the product with purposes other than those provided for Do not leave the residues of the packaging in the home environment Do not hinder the water flow Totally avoid using metallic or abrasive sponges and detergents or abrasive products in order not to damage the surfaces Especially with new installations in order to prevent impurities or debris penetrating into the tap and cau s...

Page 3: ...er i miljön Skapa inte hinder för vattnets passage Undvik i vilket fall som helst användning av svampar i metall eller som skulle kunna nöta eller nötande rengöringsmedel eller produkter som skulle kunna skada ytorna Framför allt vid nya installationer för att förhindra att smuts eller skräp skulle kunna tränga in på kranarnas insida och ge upphov till problem vid användning ska systemet tappas ur...

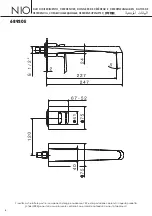
Page 4: ...EFERENCIA_СПРАВОЧНЫЕ ДАННЫЕ_REFERENSUPPGIFTER_参考数据_ املرجعية البيانات 68930E Si certifica che tutte le parti e i componenti d origine nazionale CEE e d importazione contenuti in questo prodotto L 166 2009 sono stati accuratamente controllati assemblati e collaudati nei nostri stabilimenti ...

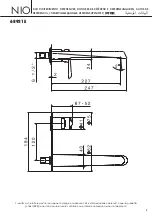
Page 5: ...EFERENCIA_СПРАВОЧНЫЕ ДАННЫЕ_REFERENSUPPGIFTER_参考数据_ املرجعية البيانات 68931E Si certifica che tutte le parti e i componenti d origine nazionale CEE e d importazione contenuti in questo prodotto L 166 2009 sono stati accuratamente controllati assemblati e collaudati nei nostri stabilimenti ...

Page 6: ...lever la protection en plastique et la bonde comme par le dessin Montage und Verbindung des Mischers Kunststoffkappen entfernen den Deckel entfernen wie in Bild gezeigt Fijación y conexión mezclador Quitar las tapas de plástico y el tapón como se muestra en la figura Крепление и подключение смесителя Снимите пластиковую защиту и заглушку как показано на рисунке Fäste och anslutning av blandaren Av...

Page 7: ...ie encastrée en interposant le décor 1 Embrayer le bec 3 et le fixer avec les 2 vis 4 fournis Visser la boucle 5 insérer la cartouche 6 visser l embout de fixation 7 et insérer le bouchon 8 Pour une fermeture correcte de l embout de fixation 7 on conseille d utiliser une clé dynamométrique avec un serrage de 12 13 Nm Procéder donc avec l installation de la plaque murale 9 monter la poignée 10 sur ...

Page 8: ... 3 och fäst det med de 2 medföljande ställskruvarna 4 Skruva fast bussningen 5 för in patronen 6 skruva fast låsringen 7 och för in hättan 8 För korrekt stängning av låsringen 7 rekommenderas det att du använder en dynamometrisk nyckel med ett vridmoment på 12 13 Nm Fortsätt sen med installation av beslaget 9 montera handtaget 10 på patronen 6 och fäst det med ställskruven 11 samt sätt på täcklock...

Page 9: ...onsejamos que limpien el filtro después de la primera utilización y que repitan periódicamente la operación para evitar una reducción del caudal MANTENIMIENTO Les recomendamos además que limpien los grifos utilizando exclusivamente agua y jabón evitando el empleo de detergentes abrasivos en polvo o líquidos esponjas abrasivas u otros productos que contienen alcohol ácidos u otras sustancias agresi...

Page 10: ...t avlägsna eventuella rester av smuts Det rekommenderas att du rengör det efter första användning och att du regelbundet upprepar detta ingrepp för att undvika flödesminskning UNDERHÅLL Det rekommenderas dessutom att du rengör kranarna uteslutande med tvål och vatten och undviker användning av nötande rengöringsmedel i pulverform eller flytande nötande svampar eller andra produkter som innehåller ...

Page 11: ...ES_ DÉBITS_ WASSERSTRÖMUNGEN_ CAUDALES_ НАПОР_ FLÖDESHASTIG HETER _ 总量_ الحموالت 1 28972 2 10698 3 15652 4 25228 5 25227 6 14720 7 17322 8 27076 9 27024 10 13408 11 10980 12 26801 13 13334 14 28975 68930E 68931E S A V E WATER 5 L min 0 2 4 6 8 10 0 1 2 3 4 5 l min bar l min 0 3 97 4 81 4 64 4 86 5 07 27852 68930E 27852 68931E l min bar ...

Page 12: ...INACIÓN DEL EMBALAJE УТИЛИЗАЦИЯ УПАКОВКИ BORTSKAFFANDE AV EMBALLAGET 包装处理 والتغليف التعبئة مواد من التخلص SMALTIMENTO DEI COMPONENTI A FINE VITA DISPOSAL OF THE EOL COMPONENTS ÉLIMINATION DES COMPOSANTS EN FIN DE VIE ENTSORGUNG DER BESTANDTEILE AM ENDER DER LEBENSDAUER ELIMINACIÓN DE LOS COMPONENTES A FINAL DE SU VIDA ÚTIL УТИЛИЗАЦИЯ ОТСЛУЖИВШИХ КОМПОНЕНТОВ BORTSKAFFANDE AV UTTJÄNTA KOMPONENTER 理处...

Reviews: