14
LEVELING ADJUSTMENT (2040+ ONLY)
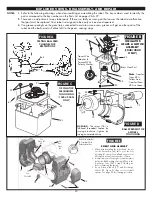
Robo-Pong 2040+ is designed to sit level when attached to
the table. In proper position (Figure 16), the CT Support
Legs fit underneath the table and the CT Front Support
Plate sits on top of the table. If the robot does not sit level,
balls will not feed properly. If this condition occurs, it is
necessary to make some leveling adjustments. The first
adjustment is to level the table top by placing shims under
the table legs until the table top is level.
If this does not cause the robot to sit level, then it will
be necessary to make adjustments to the robot itself. The
Support Legs come with 3 sizes of Rubber Tips and 4 rub-
ber spacer-washers to accommodate different table top
thicknesses, and cause the Center Trough to sit level. The
Rubber Tips are marked on their top with the table thick-
ness they are used with. The longest is used for
1/
2
″
tops.
The mid-size one is used on
3/
4
″
tops and comes pre-
installed. The shortest tip is used for 1
″
tops.
In addition to these different sized tips, there are 4 rub-
ber spacer-washers which are used with the Rubber Tips
for finer adjustments. Either one or two of these spacer-
washers (depending on how much adjustment you need)
are placed inside the Rubber Tips before the tips are placed
on the end of the Support Legs.
Another reason why your robot may not sit level is that
it is not properly seated on the locating tab. When seated
correctly, the Support Flange of the Back Panel sits flush on
the Locating Tab that protrudes from the top of the Center
Trough (see Figure 17). Your robot serial number is located
on top of this Support Flange.
Tip: If it is possible to adjust the level of the robot’s half
of the table independently from the player’s half, you may
choose to purposely give a slight slope to the robot’s half so
balls that end up on the table roll into the robot’s trays. If
you make the table unlevel, make sure the robot sits level
by adjusting the Rubber Tips as described above. In this
case, it may be necessary to use the Rubber Tip one size
larger than normal to level the robot.
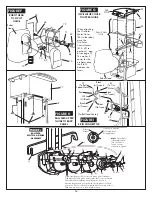
ADJUSTING NET TENSION (2040+ ONLY)
The Ball Return Trays should sit level with or just below the level of
your table top. If the tension of the Main Net is too tight, the trays
will be pulled up into a slight “V” shape with the top edge of the
trays above the level of the table top. To correct this situation, you
can loosen the adjustment straps shown in Figure 18 until the trays
sit level. If this adjustment is insufficient, stretch the net by grab-
bing it with two hands and pulling gently apart.
The Trap Net (the black net with large holes) slows down your
returns so more of them are captured. The size of the holes is slight-
ly smaller than the diameter of a ball. Hard hit shots force the ball
through the net and the ball becomes trapped between the Trap Net
and the Main Net. When slowly hit balls contact the Trap Net, they
do not have enough force to go through the net, so they immediate-
ly drop down into the trays.
The Trap Net is normally hung loosely so as to increase its
energy-absorbing capability. If you are practicing hard hit shots like
smashes or fast loops, you may find that a tighter Trap Net cap-
tures more of your shots. The tension of the Trap Net is adjusted by
tightening or loosening the velcro straps at the sides of the Trap Net
(see Figure 19).
MISCELLANEOUS ADJUSTMENTS (2040+ ONLY)
CENTER TROUGH ATTACHMENT
(2040+ ONLY)
FIGURE 16
ADJUSTING MAIN NET TENSION
(2040+ ONLY)
FIGURE 18
ADJUSTING TRAP NET TENSION
(2040+ ONLY)
FIGURE 19
Table Tennis
Table
Back Of Robot
To Control
Box
Velcro
Straps
Robot
8,9
CT Support
Legs
95
Connector
Cable
Serial #
Located
Here
10,11,12
CT Support
Leg Rubber
Tip—Come
In 3 Sizes
So Center
Trough Will
Sit Level.
Support Flange Of Robot Sits
Fully Down On Locating Tab Of
Center Trough or Ball Bucket
15
Ball Dam
In Storage
Position
5
CT Front
Support Plate
32
Wing
Nut
1
Center Trough
(Should Be Level)
SUPPORT FLANGE ALIGNMENT
& SERIAL # (2040+ ONLY)
FIGURE 17
Velcro
Straps
Summary of Contents for Robo-Pong 1040+
Page 27: ...TRAINING LOG 27 DATE TIME NOTES...
Page 28: ...28 DATE TIME NOTES...


