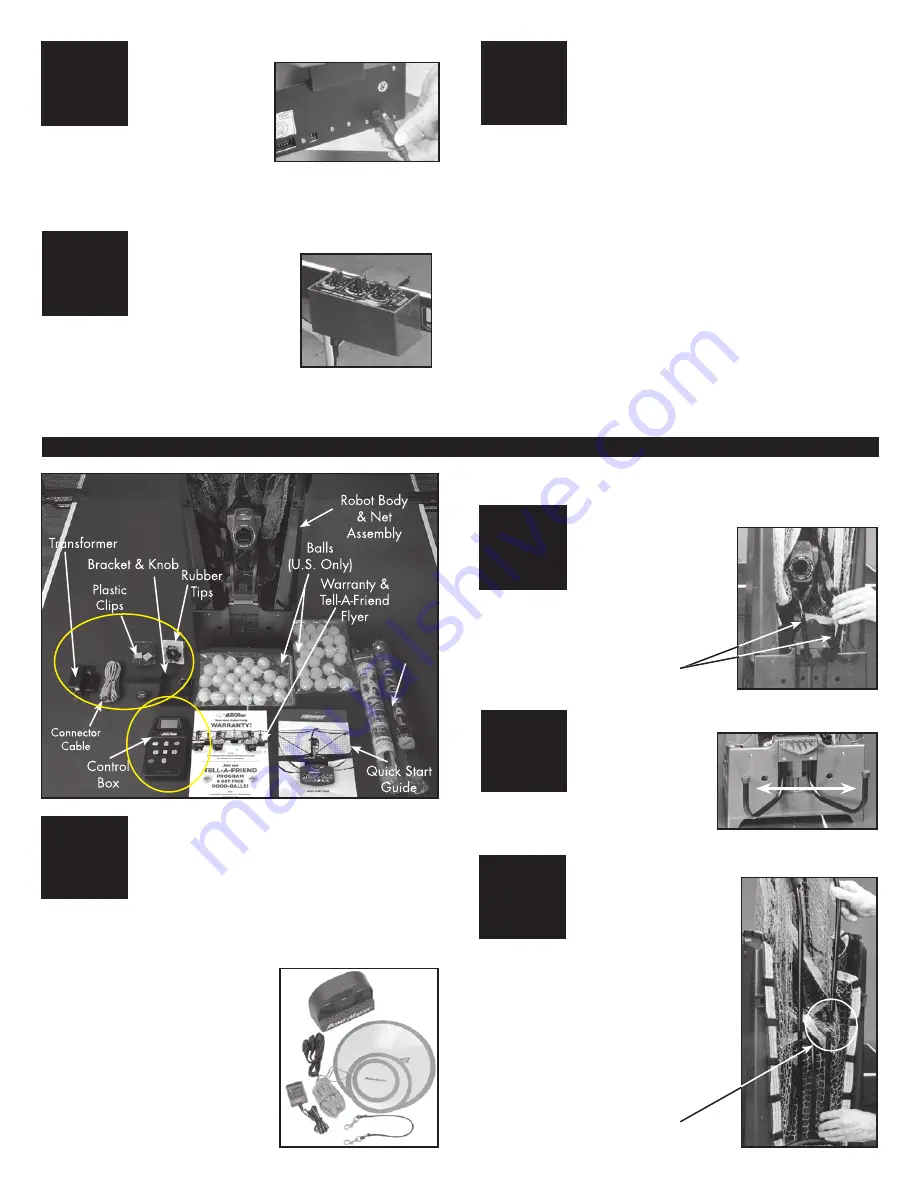
PULL DOWN SUPPORT LEGS
Place the robot on the
table with the open
front side facing you.
Pull the curved black
metal support legs
toward you.
5
CONNECT CABLES TO CONTROL BOX
Bring the free end
o f C o n n e c t o r
Cable to the play-
er ’s end of the
table. Plug the Connector Cable
into the 5-pin socket on the bot-
tom of the Control Box. Then insert the Transformer’s pin
into the Power Jack of the Control Box (see Figure 1B, page 6).
ATTACH CONTROL BOX TO TABLE
Place the Control Box
on the side of the table
about one foot from
the end. If you're
right-handed, place it on the left side
of the table. If you're left-handed,
place it on the right side. (See Figure
15, page 12 for more detail.) Plug the Transformer into any
suitable electric power source. Transformer specifications
are printed on top of the Transformer.
7
6
GET READY TO PLAY!
Turn Oscillator Speed on and when the head
aligns with the centerline of the table, turn
Oscillator Speed off. Pick up your paddle,
turn the Ball Speed knob to 2–3 and the Ball
Frequency knob to 4–5. Turn the Power
switch to “on” and get ready to return the ball. It takes
about 30 seconds for the balls to load up before the first
one is delivered. When you’re ready for random delivery,
turn the Oscillator Speed on and the balls will be randomly
delivered across the entire table. To become more familiar
with the controls and adjustments for your machine, read
the O
PeraTiOn
section of this manual starting on page 6.
8
QUICK SET-UP FOR ROBO-PONG 2040+
VERIFY ALL PARTS
Unpack all the parts and check that all are
present. If unable to identify a part, look for
a small silver label with the part name. If a
part is missing, please contact Newgy. You
may want to keep your box and styrofoam pieces in case
you need to ship your robot. If you purchased Pong-Master,
check the photo below to verify all of its parts. In your
Owner’s Packet is a separate
O
wner
’
s
M
anual
for Pong-
Master. That manual will tell you
how to set up and operate Pong-
Master. To help you separate
robot parts from Pong-Master
parts, the silver labels have “RP”
before the part names for the
robot and a “PM” before the part
names for Pong-Master.
1
SPREAD SUPPORT LEGS APART
Spread out the sup-
port legs to their
fully open position.
JOIN NET SUPPORT TUBES
Turn the robot around
1 8 0 ° s o t h e N e t
Support Tubes are now
facing you. Grasp the
second tube from the right and pull
up, removing it from its storage hole.
Place the bottom of this tube into the
top of the first tube on the right as
shown. Repeat on the left side.
2
3
4
Support Legs
Joining Net Support Tubes
➨
➨
➨
Pong Pal
(U.S. Only)
Summary of Contents for Robo-Pong 1040+
Page 27: ...TRAINING LOG 27 DATE TIME NOTES...
Page 28: ...28 DATE TIME NOTES...


