background image


VGA Signal Input Specifications 

VGA (Video Graphics Array) is a computer display standard for analog signals. The VGA 

port is a dedicated VGA standard computer data output port. The table below lists the 

specifications of VGA signal input. 


No. 

Standard 

Resolution 

Refresh rate (Hz) 

VGA 

720 x 400


70Hz


VGA 

800 x 600


60Hz (VESA)


VGA 

800 x 600   

72Hz (VESA)


VGA 

1280 x 1024 

75Hz (VESA)


VGA 

1280 x 1024   

60Hz


VGA 

1920 x 1080   

60.00 Hz 

(recommended)


VGA 

1360 x 768   

60.02 Hz


Summary of Contents for Collaboration HO Series

Page 1: ...aboration Touch Screen User Manual HO Series V1 0 Please keep this Manual properly for future reference This manual is a general manual the pictures are for reference only Please refer to the real pro...

Page 2: ...2 1 Safety Precautions 17 2 2 Installation Precautions 18 2 3 Ventilation 19 2 4 OPS Computer Installation 20 3 Power On Off 22 3 1 Power On 22 3 2 Power Off 22 4 Operating the Touch Screen 25 4 1 Hom...

Page 3: ...ystem 57 4 10 Save session 57 4 11 Automatically End Session 60 5 Add Shortcut 61 5 1 Add Shortcuts to Dock 61 5 2 Delete shortcuts to Dock 62 5 3 Newline Assistant 63 5 3 1 Introduction 63 5 3 2 Inst...

Page 4: ...screen The symbol of the crossed out wheeled bin indicates this product should not be placed in municipal waste Instead dispose of waste equipment by handing it over to a designated collection point f...

Page 5: ...as follows Indicates a hazard with risk that if not avoided could result in death or injury Indicates a potentially hazardous situation that if not avoided could result in equipment damage data loss...

Page 6: ...close to the product Place the product on a stable surface An unstable surface includes but is not limited to an inclined surface a shaky stand desk or platform which might cause turnover and damage D...

Page 7: ...lighting storm to avoid electric shocks Product components with power supply greater than the safe voltage should be install ed or placed out of reach of children Do not touch the power cable with we...

Page 8: ...power cable is damaged please contact the local distributor to repair or replace it The power cable in the accessory box is for this product only Do not use it on other products Correct battery usage...

Page 9: ...ading is complete Otherwise the data or product may be damaged Special Notes Under the premise of ensuring the display quality the energy consumption can be reduced by reducing the brightness of the d...

Page 10: ...ent control it allows writing editing and deleting on the screen using fingers Smooth pen or opaque objects It is an ideal product for modern conferences Features Advanced infrared array scanning sens...

Page 11: ...tion To avoid damage to the plastic parts please pay attention to the following Do not squeeze knock at or disassemble the plastic parts Do not place heavy objects on plastic parts When transporting t...

Page 12: ...ouch screen 9 Power socket 2 Light sensor 10 Power switch 3 Power button 11 Speaker 4 IR receiver 12 Rear port 1 5 Bottom plastic part 13 Rear port 2 6 Microphone 14 OPS Computer slot 7 Camera 15 Soun...

Page 13: ...y the power indicator will turn to green Turn off press it to shut down The power indicator will turn to red Note Press the power button in the power on state the product enter shut down mode by defau...

Page 14: ...r the data reading is complete Otherwise the data or product may be damaged USB2 0 USB3 0 ports output 5V 500mA Max Type C port output 5V 3A For qualified device use only otherwise may cause electrica...

Page 15: ...11 Name Function description MIC Microphone input port...

Page 16: ...of video transmission is 3840 x 2160 60Hz USB 3 0 Connect to USB devices such as mobile hard disk USB flash drive USB keyboard and mouse Note Users can enter Setting Input and output USB connection t...

Page 17: ...tional Warning TS Series Soundbar Connector port only use for TS series Soundbar The manufacture cannot be responsible for the possible damage caused by connecting to other devices 1 5 Remote Control...

Page 18: ...14...

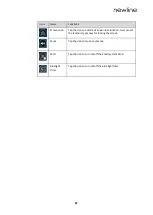
Page 19: ...press once to exit Take a screenshot Freeze the screen Tap to pause the screen interface and the freeze icon appear on the upper right Tap again or touch the screen to exit pause Enter exit Sound Onl...

Page 20: ...16 1 5 2 Range of Remote Control Use the remote control within 5 meters in front of the remote control receiver and at an approximate 30 angle from both sides...

Page 21: ...17 2 Installation Guide 2 1 Safety Precautions Installation Environment Installation Direction...

Page 22: ...rced and have a loading capacity 4 times of the weight of the machine Consult a professional installer for wall mount installation The company does not undertake relevant legal responsibility for any...

Page 23: ...structions Attaching the VESA Mounting Bracket This apparatus is intended to be supported by a GS Listed wall mount bracket 2 3 Ventilation Distance from mounting surface mm Left and right sides Top B...

Page 24: ...e sure that the power has been turned off before plugging unplugging Do not use the OPS Computer before the screws have been tightened or if any screws are missing Step 1 Optional Unscrew the M3 screw...

Page 25: ...upper and lower lugs and tighten them If the screen fuzzes flashes or if no signal is received from the OPS Computer channel after turning on the power it means that the OPS Computer has not been prop...

Page 26: ...operly connected Step 2 Turn on the rocker switch on the rear side of the machine next to the power socket after a power source has been connected The power indicator should be red Step 3 Press the bu...

Page 27: ...re powering off the touch screen Otherwise the product will delete your session documentations after the session is complete Press the power button on the front panel or the power button on the remote...

Page 28: ...product enters sleep mode or shutdown the system will first detect whether the OPS Computer is turned off If not it first turns off the computer before it enters sleep mode or shutdown Please shut do...

Page 29: ...1 Logo Shortcut to Settings 2 Clock Shortcut to Clock 3 Date and Week Shortcut to Calendar 4 Side Toolbar 5 Status Bar and Settings 6 Main Icon Dock 7 Search Bar Notes On the homepage interface swipe...

Page 30: ...reen sharing function Switch to the VGA source Tap File viewer to open the File Manager to explore internal and external files on the display Tap Office viewer to open the Office Suite application Swi...

Page 31: ...rces Return Gadget and Task manager icons are displayed by default in the sidebar on both sides of the screen Users can enter Settings Toolbar to customize the sidebar icon You may hide sidebar in the...

Page 32: ...page Enter annotation mode and Tap again to exit annotation mode and take a screenshot Access whiteboard mode Tap to view the external signal sources including OPS HDMI 1 2 VGA Type C Newline Cast and...

Page 33: ...ion If USB drive is connected to the USB port this icon will appear If the product is connected to Ethernet the icon will appear If the product is connected to a wireless network the icon will appear...

Page 34: ...he signal sources including HDMI 1 HDMI 2 VGA Type C OPS File Viewer and Newline Cast The icon without signal source connected is gray and the icon with signal source connected is white After you choo...

Page 35: ...igned to present conference writing to attendees in a quick and easy manner Users can write draw and take screenshots on the whiteboard page Tap the icon in the home page or toolbar to enter the white...

Page 36: ...t the eraser size Insert Auto shape Tap the icon to enter the auto shape selection interface Users can insert the shapes and set the shapes color Select Tap the icon to select and edit the whiteboard...

Page 37: ...hat page for more operations as shown in the following figure Only 8 pages are displayed at once and you can slide left by one finger to see more Page Operation On the Navigation page you can select o...

Page 38: ...he settings bar users can set the object recognition action hint and default settings Object recognition Users can drag the slider to enable the object detection function users can only write with fin...

Page 39: ...ider to enable the action hint Default settings Tap to enter default setting page users can set whiteboard page background change the color and thickness of Smooth Pen and Highlighter 4 5 Annotation I...

Page 40: ...set the highlighter size or color Select Tap the icon to select and edit the whiteboard content When the object is selected users can move zoom in out copy cut rotate lock change layer or delete objec...

Page 41: ...r the tutorial interface users can swipe left and right with fingers to switch the tutorial page There are 10 pages in the tutorial page which respectively show the quick use of the product On the tut...

Page 42: ...38 Standard Favorite Add and delete icons...

Page 43: ...s Icons with on the upper right corner will display in the floating bar Add and delete favorite icons In the floating bar interface tap the icon to show tap icon to show the following interface users...

Page 44: ...g two methods On the homepage interface swipe left to switch to the gadget interface In the toolbar interface tap the icon Icons Name Functions AquaMail Tap this icon to enter the email application an...

Page 45: ...les including excel word power point and PDF files Settings Tap this icon to enter settings interface Whiteboard Tap this icon to enter whiteboard application Newline Cast Tap this icon to enter the N...

Page 46: ...es such as USB storage device removable hard disk etc are connected the file content of the mobile device will be displayed at the same time Enter the Files application you can tap the submenu at the...

Page 47: ...cation you can preview all files in the internal storage and storage devices connected via USB ports and select copy paste delete and search for files File Filtering You can tap the menu at the left s...

Page 48: ...lter files by View mode Sort by show only File Search Enter the Files application and tap in the dialog box that is displayed enter keywords in the search box according to requirements The system will...

Page 49: ...quirements select files and set rename move copy cut delete open as share zip For details on other operation tap in the right side for more operation 4 9 System Settings Enter the system setting page...

Page 50: ...RJ45 port is properly connected to the network cable tap the corresponding button to enable the Ethernet function User can View the MAC address IP address gateway subnet mask and DNS information The...

Page 51: ...language and keyboard The default input method of the system is Kika Keyboard F and Hardware must be enabled Setting a Language Tap Language at the left side In the Change language dialog box that is...

Page 52: ...u to set the date and time Before setting the date and time users should tap Select time zone to select local time zone Setting a Date You can automatically obtain the system date or customize a date...

Page 53: ...49 To customize a date and date format set them in Set date Setting Time You can automatically obtain the system time or customize time To automatically obtain time select Automatic date time...

Page 54: ...n Set time and Use 24 hour format Time format will be 24 hours mode only when the Use 24 hour format is selected othersize time format will be 12 hours mode 4 9 4 Storage Enter the Storage submenu to...

Page 55: ...o view downloaded applications by type running applications and all applications 4 9 6 Display Theme Enter the Display Theme submenu to set the theme wallpaper logo and font size Theme Standard abstra...

Page 56: ...wallpaper and logo or customize the wallpaper and logo from file viewer Font size drag the slider to change the font size 4 9 7 Tool bar Enter the Tool bar submenu to enable tool bar and quick settin...

Page 57: ...to Power On is enabled When the HDMI port of the machine is connected to a CEC device such as a DVD and both the CEC device and the machine are turned off if the CEC device is turned on the machine au...

Page 58: ...reen is left un operated Power option Set the system enter power off or sleep mode when users press power button or end session Sleep and touch to wake up Tap the button to enable the function users c...

Page 59: ...d set a duration after which the screen enters the lock mode if the screen is left un operated After the screen is locked if the user does not operate the screen within 120s the screen enters the powe...

Page 60: ...ted icons will be displayed as locked and the user needs to enter the password to enter the setting interface When you drag the slider to enable the USB lock the USB ports mouse and keyboard will be u...

Page 61: ...version information import export and factory setting 4 10 Save session Save session button will appear at the bottom of the screen when there is whiteboard data new screenshot data Tap Save session...

Page 62: ...ill be saved in it Share to mail Tap the icon to share the files Tap AquaMail to share current session files by email Back to session Tap the icon to back to session The session will be continued sess...

Page 63: ...switch pictures Prefix name rule WB discussion mode page AN annotation page screenshot and SS remote control screenshot Do not eject USB flash memory before completing the saving process If the USB f...

Page 64: ...OFF Setting After the display is locked if it is operated again within 120 seconds the display is unlocked Otherwise the display enters the shut down mode and automatically deletes all session content...

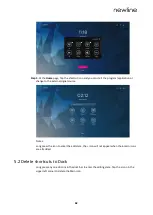
Page 65: ...to Dock Step 1 Long press any one of icons in the dock bar to enter the editing state As shown in the following figure Step 2 Tap the icon to enter the add Main Icon interface users can add up to 6 ic...

Page 66: ...o the external signal source Notes Long press the icon to enter the edit state the icon will not appear when the 6 main icons are all added 5 2 Delete shortcuts to Dock Long press any one of icons in...

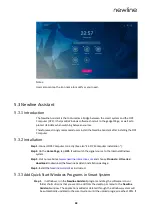
Page 67: ...puter Installation Step 2 On the Home Page tap OPS It will switch the signal source to the Internal Windows system Step 3 Visit our website at www newline interactive com and choose Products HO series...

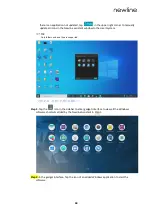
Page 68: ...istant window to the smart system Only folders and exe file are supported Step 2 Tap the icon in the sidebar to enter gadget interface to view all the Windows software shortcuts added by the Newline A...

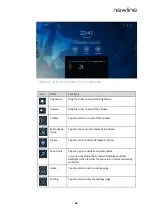
Page 69: ...f the screen the Quick Settings menu will appear tap wherever outside of the menu to hide the quick setting menu As shown in the following figure In the quick settings menu interface swipe left or rig...

Page 70: ...r Microphone mute Tap the icon to mute unmute Microphone Freeze Tap the icon to enter exit freeze function Sound only Tap the icon to enable sound only mode In sound only mode the screen LCD displays...

Page 71: ...enter exit screen lock function User can set the temporary passkey for locking the screen Mute Tap the icon to mute or unmute Wi Fi Tap the icon to turn on off the Smart system Wi Fi Bluelight Fliter...

Page 72: ...power off function is configured for the touch screen users can enter Settings Power Energy Saving to set the duration Press on the remote controller to enter the D mode ECO Standard Auto Custom Hold...

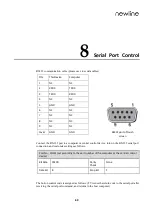
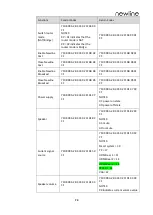
Page 73: ...r central control device turn on the RS 232 serial port connection and customize settings as follows Port No COM1 set according to the port number of the computes or the central control device Bit Rat...

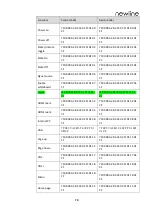
Page 74: ...B3 C4 02 FF 01 51 CF 7F 09 99 A2 B3 C4 02 FF 01 51 01 CF HDMI rear 1 7F 08 99 A2 B3 C4 02 FF 01 52 CF 7F 09 99 A2 B3 C4 02 FF 01 52 01 CF HDMI rear 2 7F 08 99 A2 B3 C4 02 FF 01 53 CF 7F 09 99 A2 B3 C...

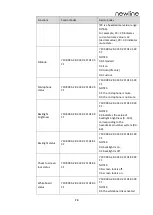
Page 75: ...2 B3 C4 02 FF 01 3D CF 7F 09 99 A2 B3 C4 02 FF 01 3D 01 CF Set display mode 7F 08 99 A2 B3 C4 02 FF 06 XX CF NOTES XX indicates the mode 00 Standard 01 Eco 02 Auto 03 Custom 7F 09 99 A2 B3 C4 02 FF 06...

Page 76: ...2 B3 C4 02 FF 09 XX 01 CF Switch backlight 7F 08 99 A2 B3 C4 02 FF 01 15 CF 7F 09 99 A2 B3 C4 02 FF 01 15 XX CF NOTES XX 01 indicates the backlight is on XX 00 indicates the backlight is off Switch Ba...

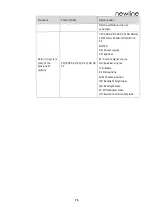
Page 77: ...04 CF 7F 09 99 A2 B3 C4 02 FF 0B 04 01 CF Close Newline Broadcast 7F 08 99 A2 B3 C4 02 FF 0B 05 CF 7F 09 99 A2 B3 C4 02 FF 0B 05 01 CF Power supply 7F 08 99 A2 B3 C4 02 FF 01 37 CF 7F 09 99 A2 B3 C4 0...

Page 78: ...microphone is not mute Backlight brightness 7F 08 99 A2 B3 C4 02 FF 01 49 CF 7F 09 99 A2 B3 C4 02 FF 01 49 XX CF NOTES XX indicates the value of backlight brightness 0 100 corresponding to the hexade...

Page 79: ...ptions 7F 08 99 A2 B3 C4 02 FF 0A 00 CF 7F 13 99 A2 B3 C4 02 FF 0A 00 AB CD EF GH IJ KL MN OP QR ST UV CF NOTES AB Power supply CD Speaker EF Current signal source GH Speaker volume IJ D Mode Kl Micro...

Page 80: ...cated VGA standard computer data output port The table below lists the specifications of VGA signal input No Standard Resolution Refresh rate Hz 1 VGA 720 x 400 70Hz 2 VGA 800 x 600 60Hz VESA 3 VGA 80...

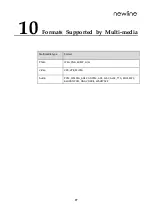
Page 81: ...77 10 Formats Supported by Multi media Multimedia type Format Photo JPEG PNG BUMP GIG Video VP9 VP8 MJPEG Audio PCM FFMPEG_ADEC ADPCM APE FLAC ALAC TTA MIDI MP3 BLURAYLPCM OGG VORBIS WAVEPACK...

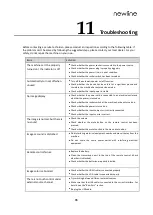
Page 82: ...urned on Check whether the rocker switch of the machine has been turned on Check whether the power is turned on Check whether the input computer is correctly connected Check whether the input source i...

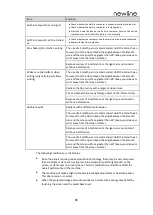
Page 83: ...lusion area Check whether there is any foreign object on the infrared strip Remove sources of interference or change to an environment without interference Unable to write Replace with a different col...

Page 84: ...ne is not optical bonding type the inside of the screen glass may fog in the case of high temperature difference and high humidity this phenomenon can be removed by running the machine continuously fo...

Page 85: ...urn off the power and unplug the power cord Do not set the brightness and contrast to the maximum value for extended periods of time as this affects the service life of the screen Do not write on the...

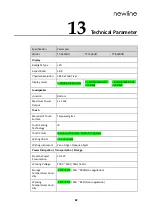
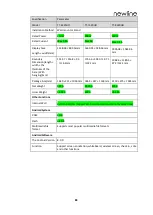
Page 86: ...r Location Bottom Maximum Power Output 2 x 15W Touch Material of Touch Surface Tempered glass Touch Sensing Technology IR Touch Points Windows 20 points Android 10 points Writing Points Fine pen 3mm W...

Page 87: ...6 8 96 114 2mm 1736 6 1040 7 97 1 132 1mm 1982 6 1180 5 97 2 132 1mm Package Size mm 1640 221 1036mm 1859 247 1160mm 2119 275 1281mm Net Weight 36KG 48 5KG 60KG Gross Weight 46 5KG 62KG 75 5KG Other F...

Page 88: ...wline interactive com apac technical support The company is committed to machine updates and technical improvements The technical parameters and specifications are subject to change without prior noti...

Reviews: