Page 3 of 5
Accessory Pack
x1
6mm Frameless shower only:
Chrome covers
x4
Clear washers
Handle
x1
Frameless water seal x1
J
Top brace
x2
#6 x 12mm CSK screws (J)
x8
#6 snap caps
x5
4mm Framed shower only:
I
Vinyl door seal
x1
INSTALLING THE FIXED PANEL
..
STEP 1
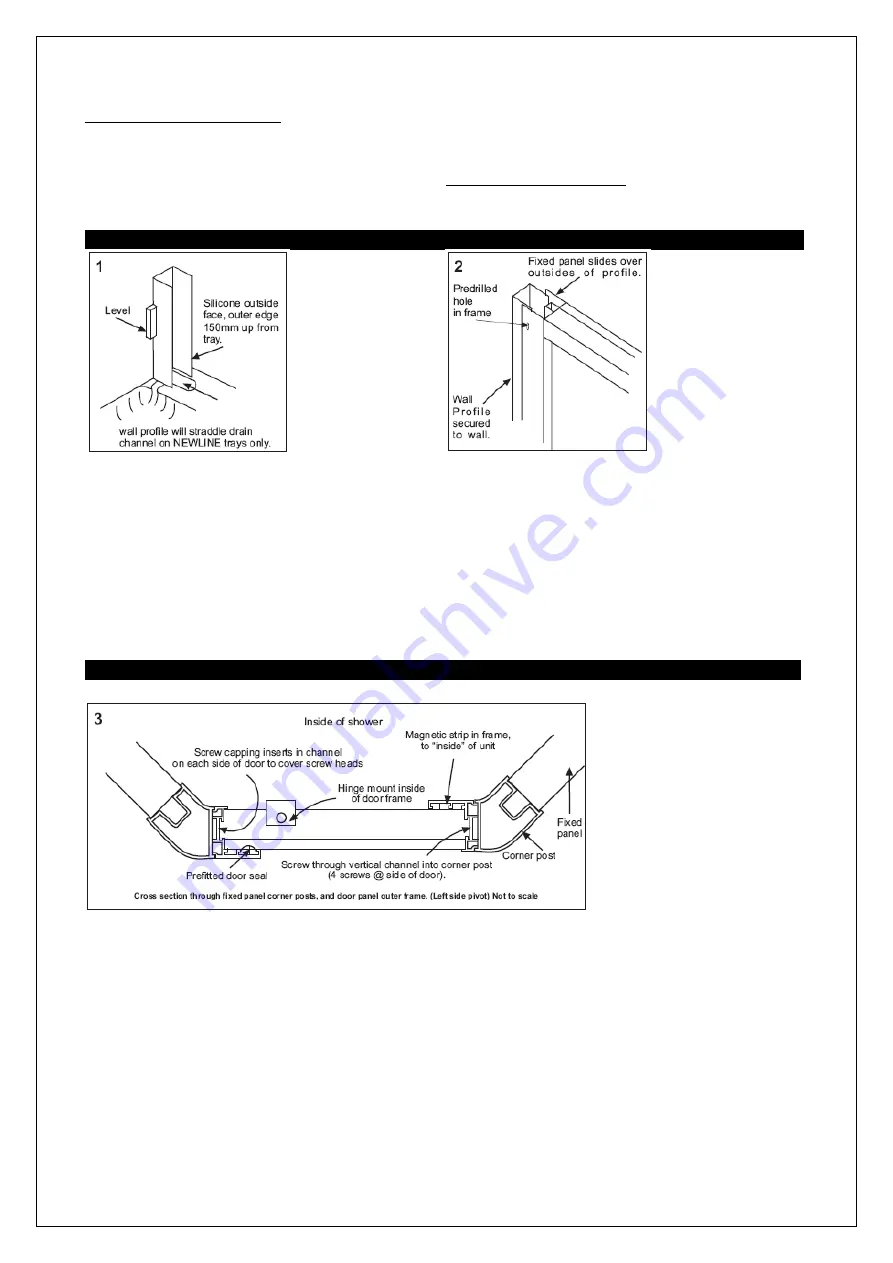
Place wall profiles vertically on wall to
straddle the drain channel on NEWLINE trays only.
Silicone the rear face of the wall profile. Secure to
wall with #8 x 25mm square drive screws. Apply
silicone to the bottom 150mm, on outside face of
profile on outer edge. Solid fixing is preferred.
Rawl plugs are supplied in case solid fixing cannot
be located.
STEP 2
Place fixed panel on tray and slide over the
outside of wall profile. Push panel back firmly to
wall but do not secure. NOTE: The predrilled holes
in the fixed panel (refer Diagram 2 above) face the
inside of the shower.
INSTALLING THE DOOR AND FRAME
.
STEP 3
It is necessary to remove the door from its outer frame to complete the installation. Determine
which side you would like the door to hinge from. Remember that the hinge blocks on the frame should
be on the ‘inside’ of the door and the door operates by swinging outwards into the bathroom. Cut the
tape holding the spacer at the top and bottom of the door. Carefully remove the spacer. Remove the top
pivot mounting block from the outer frame and retain the top pivot block and screws. Separate the door
and the frame by lifting the door panel off the bottom pivot, or by carefully moving the frame over the
door. Put the door to one side.
Place the outer frame on the shower tray between the fixed panels. Check again that:
a.)
The pivot block on the frame is on the inside of the unit and
b.)
That it is on the correct side of the opening.
Ensure that the panels and door frame are in line at top and bottom. Silicone the vertical joint between


