background image


79 


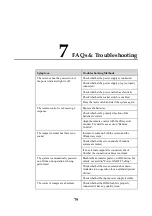
FAQs & Troubleshooting 

Symptom 

Troubleshooting Methods 

The screen cannot be powered on or 
the power indicator light is off.   

Check whether the power supply is connected.   

Check whether the power supply plug is properly 
connected.   

Check whether the power outlet has electricity. 

Check whether the rocker switch is enabled.   

Press the reset switch and start the system again.   

The remote control is not causing a 
response.   

Replace the batteries. 

Check whether the polarity direction of the 
batteries is correct. 

Align the remote control with the IR receiver 
window. For details, see section "Remote 
Control". 

The image is normal but there is no 
sound.   

Increase volume on both the screen and the 
Windows system.   

Check whether the screen and the Windows 
system are muted.   

If an external computer is connected, check 
whether the connection cables are normal.   

The system is automatically powered 
on/off when no operation is being 
performed.   

Disable the automatic power-on/off function. For 
details, see section "Power ON/OFF Setting". 

Check whether the screen entered shut down 
mode due to no operation for an extended period 
of time.   

Check whether the input power supply is stable.   

The colors of images are abnormal. 

Check whether the HDMI cable is properly 
connected or has any quality issue.   

Summary of Contents for RS+ Series

Page 1: ...User Manual V2 0...

Page 2: ...Internal PC Optional 21 2 5 Installing Newline Assistant 23 3 Getting Started 24 3 1 Power On 24 3 2 Power Off 25 3 3 Calibration 25 4 Operating the Touch Screen 28 4 1 Start Screen 28 4 2 Home 29 4 3...

Page 3: ...Management 61 4 8 1 File Viewer Page 61 4 8 2 File Preview 62 4 8 3 File Search 62 4 8 4 File Filtering 63 4 8 5 New Folder 64 4 8 6 File Operation 64 4 8 7 File Name 64 4 9 Gadget 65 4 10 Add Shortcu...

Page 4: ...ence to radio communications However there is no guarantee that interference will not occur in a particular installation If this equipment does cause harmful interference to radio or television recept...

Page 5: ...3 seconds or a remote command can be sent via RS232 The panel will also go into sleep mode without user action after 3 hours of inactivity TT 6519RS and TT 7519RS can exit sleep mode by the user pres...

Page 6: ...ntion The symbols are defined as follows Provides additional information to supplement operation in the main text Provides tips for operation Indicates a potentially hazardous situation that if not av...

Page 7: ...ed plane a shaky stand desk or platform that might cause the product to turnover and be damaged Do not open the panel or change the product on your own High voltage components are installed in the pro...

Page 8: ...ge to cause personal injury out of the reach of children Do not touch the power cable with wet hands Do not install the product in high temperature environments Do not install the product near a heat...

Page 9: ...of the used battery based on your local regulations Do not damage the power cable Do not damage change twist bend or forcibly drag the power cable Do not put weights such as the product itself on the...

Page 10: ...the software you prefer take notes on local files wirelessly cast to the screen from smaller devices run your favorite apps and view multimedia files all while making your experience better than befor...

Page 11: ...10 Rear View 65 inch 75 inch 86 inch...

Page 12: ...1 Remote Control Receiver 7 Speakers 2 Power On Off 8 Power Supply Plug 3 Light Sensor 9 Power Switch 4 Front Plate Cover 10 Internal PC Port OPS 5 Front Ports 11 Rear Ports 6 Front Buttons...

Page 13: ...a from an external product connecting to the port please switch the signal source after the data reading is complete Otherwise the data or product may be damaged For USB consumption USB 2 0 provides u...

Page 14: ...2A maximum Purchase the power code AC adapter according to customer needs The port can be used for the Newline X10D Android box Please do not connect any products with different power requirement Oth...

Page 15: ...14...

Page 16: ...o the home page Return Short press Return to the last menu Exit Menu Short press Open the Settings menu Long Press for More than 2 Seconds Lock the screen Vol Short press Decrease the sound volume Lon...

Page 17: ...place the remote control directly under sunlight or near a heat source Buttons Operations Power On Off Mute Unmute Audio 0 9 Enter number Go to the Home Page Return to Previous Exit Up Down Left Righ...

Page 18: ...o HDMI Front HDMI 1 Switch Source to HDMI 1 HDMI 2 Switch Source to HDMI 2 VGA Switch Source to VGA Autocorrection Screen Display For VGA Signal Source Open the Browser Application Toggle Display Back...

Page 19: ...18 2 Installation Guide 2 1 Safety Precautions Installation Environment Installation Direction...

Page 20: ...t a professional installer for wall mount installation The company does not undertake relevant legal responsibility for any problems caused by improper operation if the third party mobile stand or wal...

Page 21: ...e dimensions of the four bracket mounting holes on the back panel are VESA MIS F compliant 86 inch or 75 inch 800 x 400 mm 31 50 x 15 75 in 65 inch 600 x 400 mm 23 62 x 15 75 in Use metric M8 screws w...

Page 22: ...ch 2 4 Installing the Internal PC Optional The internal PC does not support hot plugging Therefore you must insert or remove the internal PC when the display is powered off Otherwise the display or in...

Page 23: ...Step 1 Unscrew the M3 screws by hand to remove the internal PC shielding cover Step 2 Push the internal PC into the port at the rear of the screen from right to left Step 3 Secure the internal PC to...

Page 24: ...een sources Therefore we strongly recommend users install the Newline Assistant after installing the internal PC Installation Step 1 Install the Internal PC correctly Step 2 On the Home Page click Win...

Page 25: ...ctor into the side of the product Ensure the power supply is in the range of 100V to 240V with frequency at 50 Hz 60 Hz 5 The power current must be grounded The power outlet should be installed near t...

Page 26: ...rnal PC is on 3 3 Calibration If the cursor position has a big deviation from the actual touch point calibration is used to eliminate the deviation Calibration is required in the following scenarios T...

Page 27: ...26 Step 4 Select in the Tablet PC Settings window...

Page 28: ...tep 7 After the calibration is complete the Digitizer Calibration Tool dialog box will be displayed Click Yes to save calibration data To ensure writing accuracy use the pencil or stylus included with...

Page 29: ...28 4 Operating the Touch Screen 4 1 Start Screen When the product is turned on the product will show the Start Screen page as shown in the following figure...

Page 30: ...ge as shown in the following figure Shortcut for Display Theme Settings Click the icon on the Home Page to enter the Display Theme setting page to set the logo image and wallpaper The logo and wallpap...

Page 31: ...n the Home age to start the clock application Using the icons on the top left you may switch from clock mode to alarm mode or to timer and stopwatch mode In the clock mode you may click to add other t...

Page 32: ...tap the to expand or shrink the toolbar Long press the customized icon to unfold level 2 icons The functions of the side toolbar are as follows Icon Functions Enter annotation mode and click again to...

Page 33: ...rnet this icon will appear If the product is connected to a wireless network this icon will appear Access the system setting page Return to the Start Screen page Main Icon Icon Functions Switch to the...

Page 34: ...of an application to run the application Click Add to customize the Home page You can add up to 5 shortcuts to your favorite software gadgets or connections See more detail in Add Shortcuts to Home P...

Page 35: ...he available Wi Fi list Ethernet Click to open ethernet settings Hotspot tethering Click to set up Wi Fi hotspot Wake on LAN turn on off LAN Proxy The settings of the proxy server 4 3 2 Language and I...

Page 36: ...be enabled If you want to switch to another language switch the keyboard input method via Manage keyboards methods in addition to switching the language 00 Setting a Language Click Languages on the L...

Page 37: ...yboards on the Virtual Keyboard interface On the Manage keyboards page select the input methods you would like to use multiple choices can be selected 4 3 3 Storage Enter the Storage submenu to view s...

Page 38: ...l applications 4 3 5 Whiteboard Enter the Whiteboard submenu to set the version of whiteboard 4 3 6 Smart Eye Protection Enter the Smart eye protection submenu to set Eye protection writing mode Eye p...

Page 39: ...ng submenu to set the date and time Before setting the date and time users should click Select time zone to set everything to the local time zone Date Settings You can automatically obtain the date To...

Page 40: ...ime Settings You can automatically obtain the time To automatically obtain the current time select Automatic date time To customize time and time format set them in Set time and select Use 24 hour for...

Page 41: ...ergy saving mode To set the automatic power on time select Auto power on and the time you want the display to turn on in Power on time as shown in the following figure To set the automatic power off t...

Page 42: ...tomize this duration and the range is 3 minutes to 480 minutes NEVER indicates that the automatic shut down mode function is not enabled 4 3 9 Tool Bar Settings Enter the Tool bar submenu to set wheth...

Page 43: ...a CEC device such as a DVD and both the CEC device and the machine are turned off if the CEC device is turned on the machine automatically turns on after receiving command from the CEC CEC auto power...

Page 44: ...ryption credentials USB lock functions Passkey lock Click to set whether you need enter the password or modified password when going from the Start page to the Home page The password must be at least...

Page 45: ...a reset network settings reset app preferences reset view firmware information embedded operating system version information or the display s serial number 4 4 Windows On the Home Page click Windows t...

Page 46: ...al casting modes Airplay Google Cast To cast click Screen Sharing on the Home Page to enter Newline Cast On screen directions will appear for you to follow in order to wirelessly cast to the display a...

Page 47: ...navigation Preview or delete pages Whiteboard Mode Click Discussion in the main toolbar or click on either side toolbar to enter the embedded whiteboard mode as shown in the following figure Click on...

Page 48: ...to use the pen function and the icon turns into blue Click and hold the icon for two seconds to set the size and color 6 Highlighter Click to use the highlighter function and the icon will turn blue C...

Page 49: ...age 14 Next Page Click to go to the next page 15 Navigation Click to show the page thumbnails 16 Hide Smart Bar Click to hide or show the smart bar 17 Mode Switch Click the icon to enter discussion mo...

Page 50: ...h Click and in the lower left corner of the discussion mode to switch between whiteboard modes Annotation mode The background is transparent and the real time image of the current signal source will b...

Page 51: ...olor as shown in the following figure You can write content on the page as you wanted Import On the Whiteboard Click to import data from file management you can import the pictures whiteboard data PNG...

Page 52: ...insert text and show the keyboard Click and hold the icon for two seconds to set the default text setting Insert Auto Shape On the Whiteboard Click to insert the anto shape Click and hold the icon fo...

Page 53: ...r Pen used to write Highlighter used to highlight Characters covered by comments are still visible Line Size and Color On the Whiteboard click and hold or for two seconds to set the size and color You...

Page 54: ...m in zoom out rotate by two fingers and the icon turns into white Click to expand the toolbar users can copy or delete or cut the data or change the data color such as the following figure Icon Functi...

Page 55: ...this icon to Delete the items Click this icon to cut the items Click this icon to copy the items Eraser Two methods are available to erase written errors or content as follows Fist hand back erasing c...

Page 56: ...nd let user to change the object recognition setting slide to left to open the object recognition function slide to right to turn it off Screenshot In annotation mode click to save the current slide a...

Page 57: ...an be viewed and obtained using the following methods Screenshots are saved on the Navigation page as shown in the following figure Click on the home page and choose Internal storage Pictures Screensh...

Page 58: ...ng page Page Preview Click on the lower right corner in the discussion mode All pages will be displayed Click one page to switch to that page for more operations as shown in the following figure Only...

Page 59: ...ns will turn yellow Click the yellow USB icons and the selected whiteboard file can be saved in the folder of Meeting year month day hour minute second under the root directory of the storage device D...

Page 60: ...sending by email confirm that an email account is successfully set up in Settings 4 6 3 Object Detection This product supports object recognition and produces different effects according to the diame...

Page 61: ...a fine pen stylus or thick pen finger to utilize select functions including pen color and thickness After that the system remembers this information until users change them manually Fist palm keep th...

Page 62: ...The product supports connection to USB flash memory In File Viewer application you can preview all files in the internal storage and storage devices connected via USB ports and select copy paste dele...

Page 63: ...nal storage devices connected via the USB ports cloud stored files FTP uploaded files and local network files as shown in the following figure 4 8 3 File Search Enter the File Viewer application and c...

Page 64: ...document a picture music a video archived or was downloaded The system supports two view modes list and thumbnail You can click on the top right corner to switch or view modes Click to display files b...

Page 65: ...e folders according to requirements select files by long pressing and set wallpaper copy paste delete For details on other operation click in the upper right corner for more operation 4 8 7 File Name...

Page 66: ...ion file Prefix name rule WB discussion mode page AN annotation page screenshot and SS remote control screenshot 4 9 Gadget On the Home page click Gadget On the page that is displayed all applications...

Page 67: ...to enter the Office viewer application In this application you can view office files including excel word power point and PDF files Newline Broadcast Click this icon to enter the Newline Broadcast app...

Page 68: ...re shortcuts and pre installed gadgets Click to view signal sources in Connection Click to view the Windows software shortcuts that the Newline Assistant uploads to the embedded operating system For d...

Page 69: ...r change to the external signal source 4 10 2 Add Quick Start Windows Programs in Smart System Step 1 In Windows run the Newline Assistant program and drag the software icons or folder shortcut icons...

Page 70: ...ge Click the icon and go to the shortcut settings The page for adding application programs will be displayed Step 3 At the shortcut setting page click icon to view all the Windows software shortcuts a...

Page 71: ...ne Assistant application is added on the tab Step 4 Tap the icon and add the shortcut at the Home page Tap again and remove it Step 5 Return to Home page Click the icon of an added Windows application...

Page 72: ...n be displayed in the window for a real time preview the icon color will change from white to blue and the name of the preview window for the signal source will change to match with the signal source...

Page 73: ...72 5 Quick Setting Menu Using two fingers to swipe up from the bottom of the screen the Quick Settings menu will appear as shown in the following figure...

Page 74: ...Smart system Wi Fi Click the icon to mute unmute Click the icon to turn on off the beep sound Click the icon to enable sound only mode In sound only mode the screen LCD displays and LED backlight tur...

Page 75: ...00 01 CF Power off 7F 08 99 A2 B3 C4 02 FF 01 01 CF 7F 09 99 A2 B3 C4 02 FF 01 01 01 CF Mute Unmute 7F 08 99 A2 B3 C4 02 FF 01 02 CF 7F 09 99 A2 B3 C4 02 FF 01 02 01 CF Signal source 7F 08 99 A2 B3 C...

Page 76: ...F 7F 09 99 A2 B3 C4 02 FF 01 1B 01 CF Home page 7F 08 99 A2 B3 C4 02 FF 01 1C CF 7F 09 99 A2 B3 C4 02 FF 01 1C 01 CF Return exit 7F 08 99 A2 B3 C4 02 FF 01 1D CF 7F 09 99 A2 B3 C4 02 FF 01 1D 01 CF OK...

Page 77: ...CF 7F 09 99 A2 B3 C4 02 FF 01 48 01 CF Set the value of backlight brightness 7F 08 99 A2 B3 C4 02 FF 09 XX CF XX indicates the value of backlight brightness 0 100 corresponding to the hexadecimal num...

Page 78: ...signal source 7F 08 99 A2 B3 C4 02 FF 01 50 CF 7F 09 99 A2 B3 C4 02 FF 01 50 XX CF Smart system 30 PC 17 DP 20 HDMI rear 1 1F HDMI Rear 2 1E VGA 00 HDMI Front 19 Speaker volume 7F 08 99 A2 B3 C4 02 F...

Page 79: ...7F 08 99 A2 B3 C4 02 FF 01 84 CF 7F 08 99 A2 B3 C4 02 FF 01 84 XX CF XX 01 indicates screen lock status XX 00 indicates exit screen lock status Whiteboard state 7F 08 99 A2 B3 C4 02 FF 01 83 CF 7F 08...

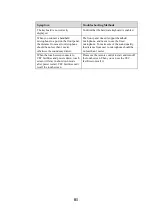
Page 80: ...the IR receiver window For details see section Remote Control The image is normal but there is no sound Increase volume on both the screen and the Windows system Check whether the screen and the Wind...

Page 81: ...on the front panel is ineffective Touch the button using your full fingertip Check whether the finger is wet or has other liquids on it Restart the screen The USB flash drive cannot be identified Che...

Page 82: ...ort The front panel doesn t support handheld microphone and needs to use the fixed microphone To make sure of the sound quality the distance from user to microphone should be no less than 1 meter When...

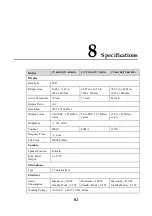
Page 83: ...olution 3840 x 2160 Pixel Display Colors 8 bit FRC 1 07 billion colors 8 bit FRC 1 07 billion colors 10 bit 1 07 billion colors Brightness 370 cd m2 Contrast 4000 1 4000 1 1200 1 Response Time 8 ms Li...

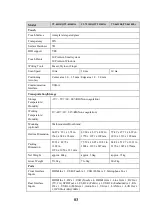
Page 84: ...onal Wall mounted Floor Stand Outline Dimension 60 87 x 37 1 x 3 74 in 1546 x 944 x 96 mm 69 69 x 42 17 x 4 29 in 1770 x 1071 x 109 mm 79 49 x 47 72 x 4 29 in 2019 x 1212 x 109 mm Packing Dimension 67...

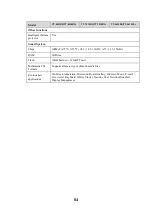
Page 85: ...Mv8 A73 2 A53 2 A53 1 05 1 3GHz A73 1 15 1 5GHz RAM 3GBytes Flash 16GB build in 32GB TF card Multimedia File Formats Supports all major types of multi media les Pre installed applications On Screen An...

Page 86: ...on manual Contact Us for Support Please email us at support newline interactive com Our company is devoted to product innovation and technology enhancement Therefore we may change product specificatio...

Reviews: