background image

Conductivity Mode

1. Rinse electrodes thoroughly by

agitating in distilled or deionized
water.

2. Wipe off conductivity electrode and

allow it to dry.

3. When dry, conductivity should read

“0” in air.

4. Adjust ZERO pot if reading is

incorrect.  If the conductivity
electrode does not zero, it may
indicate dried solids on the sensor.
Clean with a mild detergent solution
(such as Ivory).

5. Immerse electrode in a known

conductivity solution. Choose a
conductivity calibration solution that
is near the range of the samples to
be measured. Adjust SPAN pot to
desired conductivity value.

6. Rinse electrodes and return to

storage compartment.

Operating Procedure

The 9 volt battery should already be
installed

1. Extend electrode pair to either the

90° or 180° measurement position.

2. Remove the electrode covers as

described in “Setting Up the
Electrodes” section.

3. Turn on the instrument by pressing

the ON/OFF switch once.

“–1” and the unit of measure will
momentarily appear and then a second
number with the unit of measure is
displayed.  The display should show
which parameter is being measured (for
example, pH, µS (micro-siemens), or  
µS x 10.  Only the 200K range utilizes the
x10 annunciator on the PHH-80.  20K and
2K are direct readings.  

PHH-60 and PHH-80

pH/Conductivity Meter

7

Summary of Contents for PHH-60

Page 1: ...PHH 60 4 39 ON OFF PH S S pH CONDUCTIVITY METER PHH 60 PHH 80 pH Conductivity Meter Operator s Manual Newport Electronics Inc...

Page 2: ...may be covered by one or more of the following patents United States Patents Des 336 895 5 274 577 France Brevet No 91 12756 Spain 2039150 United Kingdom Patent No 2248954 and other international pate...

Page 3: ...e purchase price of the component upon which liability is based In no event shall NEWPORT be liable for consequential incidental or special damages Every precaution for accuracy has been taken in the...

Page 4: ...te Broughton Astley Leicestershire England LE9 6TU TEL 44 1455 285998 FAX 44 1455 285604 Newport Electronics B V Postbus 8034 1180 LA Amstelveen The Netherlands TEL 31 20 6418405 FAX 31 20 6434643 New...

Page 5: ...n 5 Calibrating the Meter 6 pH Mode 6 Conductivity Mode 7 Section 6 Operating Procedure 7 Section 7 pH Electrode Care 8 Section 8 pH Electrode Replacement 9 Section 9 Conductivity Electrode Care 10 Se...

Page 6: ...he shipping agent The carrier will not honor any claims unless all shipping material is saved for their examination After examining and removing contents save packing material and carton in the event...

Page 7: ...conductivity capability to 199 999 mhos While in use the electrodes fold out and lock into a 90 or 180 position When testing is completed the electrodes fold back into the instrument case Recessed sw...

Page 8: ...ge the battery do the following 1 Insert your thumb in the recessed area of the battery compartment door and pull it away from the display 2 Snap the 9V alkaline battery into the battery clip 3 Place...

Page 9: ...e pH Electrode Fig 3 To remove the soaker bottle 1 Extend the electrode pair to the 90 position 2 Hold part of the electrode shafts and the white cap with one hand 3 With the thumb and forefinger of t...

Page 10: ...pping the electrode in pH7 solution to avoid contamination Cross contamination of calibration standards will cause the appearance of drift in the instrument pH Mode For best results calibrate pH with...

Page 11: ...djust SPAN pot to desired conductivity value 6 Rinse electrodes and return to storage compartment Operating Procedure The 9 volt battery should already be installed 1 Extend electrode pair to either t...

Page 12: ...back fill the bottle with a small amount of pH4 buffer or pH7 buffer 9 Remove the battery when the instrument is to be stored for a long period of time pH Electrode Care pH Electrodes must be kept moi...

Page 13: ...ailable from NEWPORT Engineering part number PHE 8200 To remove the electrode simply unscrew it clockwise from the electrode pivot hinge on the meter You will hear a pop that s OK Refer to Figure 4 Fi...

Page 14: ...both conductance rings One ring is located at the bottom of the electrode and the other is located approximately 1 up from the bottom above the blue collar 4 Twist the brush and scrub up and down for...

Page 15: ...tion and prevents it from drying out The red cap on the conductivity electrode prevents fluid from entering the electrode when only pH is being measured and reduces the need for cleaning Clean both el...

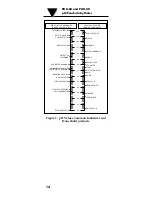
Page 16: ...10 0 9 0 8 0 7 0 6 0 5 0 4 0 3 0 2 0 1 0 0 0 LIME SODA SOFTENING SALT WATER AQUARIUM SWIMMING POOL WATER FRESH WATER AQUARIUM BREWING PROCESS NICKEL PLATING FOOD PROCESSING PICKLE PROCESSING EXTREMEL...

Reviews: