background image


NewRider™ 1700 HPA Airless Ride-on Sprayer  

ALWAYS wear safety goggles or protective eye-wear when operating the unit

!


NewRider™ 1700 HPA Manual / 4026.0916


Page 2 of 3


1.


Check for any damage that may have occurred 
during shipment. Advise factory immediately if you 
see any damage. Remove the unit from the crate 
by removing the top boards, then the boards at the 
ends of the crate. Remove the tie down straps and 
then remove any shipping cartons. 

2.


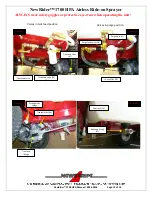
Access the transaxle release lever at the rear of the 
machine. Pull the lever up, push in and then down 
to disengage. (Picture 1) 


3.


Release parking brake if applied. You should be 
able to roll the machine out of the crate by pushing 
on the rear bumper. DO NOT STAND IN FRONT OF 
THE MACHINE WHILE ROLLING OUT OF CRATE.  

4.


Locate the battery access cover in front of the 
purge tank. Remove the 4 bolts with washers and 
access cover.  

5.


Connect the battery ground cable to the negative 
side of the battery. Re-install battery cover.  

6.


Mount the spray head support by aligning the two 
holes in the bumper bracket with the two holes in 
the frame. Insert two ½”x3” bolts in the holes from 
the front. Place one washer and one nylock nut on 
each bolt and tighten.  

7.


Cut the tie that secures the lift lever lock spring to 
the machine. Hook the bottom of the spring into 
the loop in the bottom of the mounting bracket.  

8.


Press on foot release for the spray head (lever on 
the left side of the steering column) to lower the 
spray head support tube. 

9.


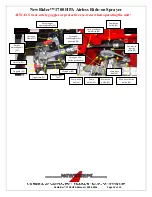
Mount the spray head caster assembly by sliding 
the caster arm onto the spray head support tube 
and tighten bolts. The caster wheel may be 
adjusted to the left or right so that the rear wheels 
will clear the striped line when turning. (Picture 2) 

10.


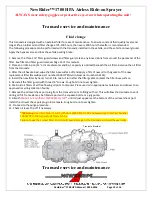
Slide the spray gun mounting bracket over the 
upright on spray head support tube and tighten 
bolt. Adjusting the spray gun mounting bracket up 
or down will adjust the spray width. (Picture 3) 

11.


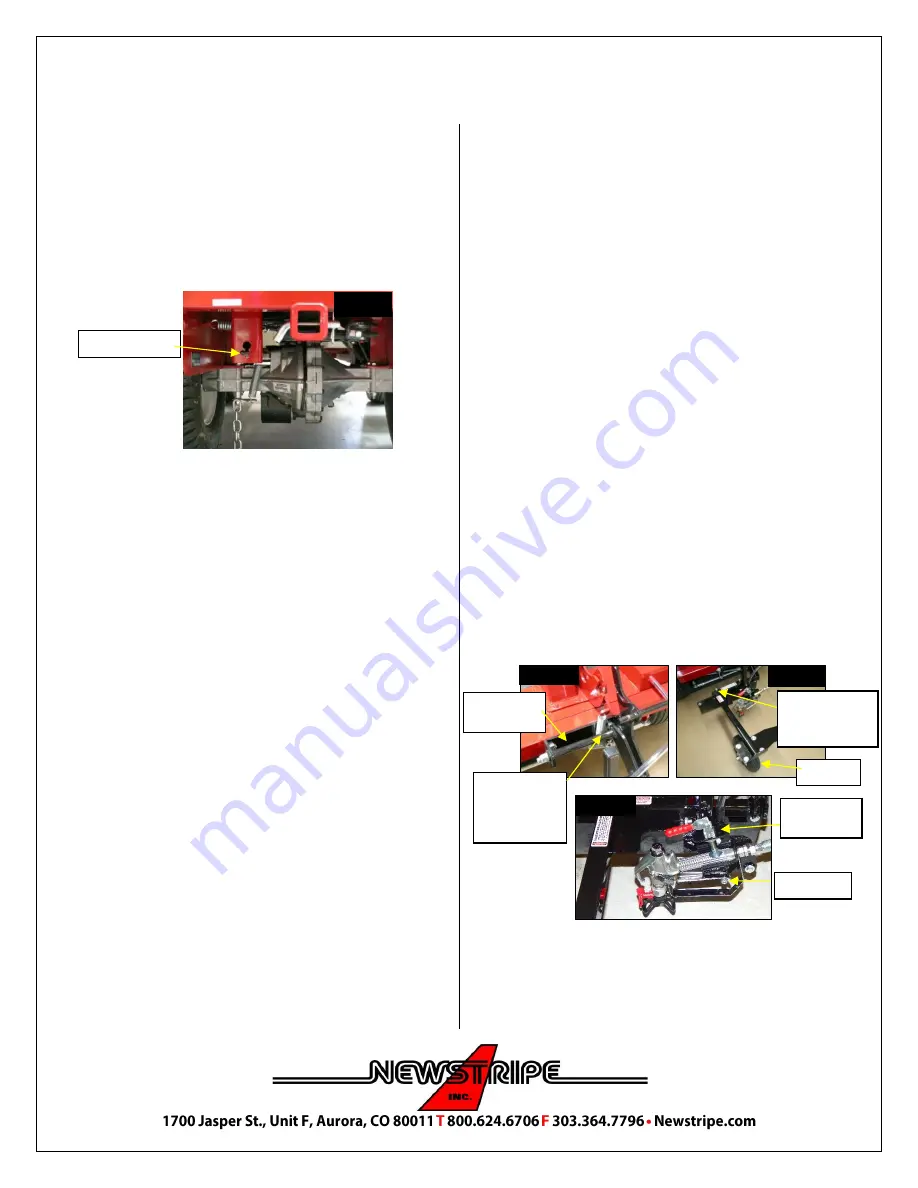
Place the spray gun in the holder without the hose 
attached and secure with the clamp. (Picture 4) 

12.


The spray gun may have to be moved forward or 
backward in the clamp so that there is 
approximately 1/8” of space between the trigger 
and the lifting bar. This should also leave enough 
room to push the trigger lock sideways. (Picture 4) 

13.


If the trigger lock will not push release the gun 
clamp and slide gun forward or backward until you 
can push the trigger lock. Re-clamp gun.  
NOTE: To release trigger lock push the lock in on 
the right side (inside) of the gun.  

14.


Attach one end of the spray hose to the pump 
outlet with a ¾” wrench and the other end to the 
spray gun. To secure the hose on the spray gun you 
will need a 3/4” and a 9/16” wrench as it has a 
swivel fitting.  

15.


Loop the additional hose over the hanger on the 
left side of the spray tank. Make sure hose does 
not contact the tire. Route the hose through the 
snap link and around post at corner of left fender.  

16.


Always check the oil level in the engine before 
starting (SAE 10W30) 

17.


Make sure the static chain is contacting the 
ground.  
NOTE: The NewRider 1700 is Equipped with an 
EPA/Carb approved recovery system and tethered 
fuel cap. DO NOT SERVICE OR REMOVE THE VAPOR 
CANISTER OR TEATHERED FUEL CAP FROM THE 
MACHINE. DO NOT REPLACE ANY FUEL SYSTEM 
PARTS WITH NON APPROVED PARTS. 


Lifting bar 

Raised 

position 

locking lever 

spring 

Spray Head 

Support 

Caster 

Spray Head 

with mounting 

tube  

Trans Release lever 


Picture 1 

Picture 3 

Picture 2 

Spray Gun 

release 

clamp 

Picture 4 

Summary of Contents for NewRider 1700 HPA

Page 1: ...NewRider 1700 HPA Airless Ride on Sprayer NewRider 1700 HPA Manual 4026 0916 ...

Page 2: ......

Page 3: ...nsaxle service and Maintenance Page 15 16 Troubleshooting Guide Page 17 18 California U S EPA and Newstripe Inc evaporative emission control warranty statement Page 19 20 Warranty Page 21 Thank you For your purchase of the Newstripe NewRider 1700 HPA Ride on Airless Sprayer Please read over the instructions and make sure you understand operating procedures before using the unit Please check the se...

Page 4: ......

Page 5: ...Skin Injection Hazard High Pressure spray can inject toxins into blood stream If injection occurs seek emergency medical treatment ALWAYS release pressure in the system before changing or cleaning the spray tip ALWAYS use the nozzle tip guard ALWAYS engage the Trigger Lock on the spray gun before removing the spray gun for hand operation NEVER place your hands or any body parts in front of the spr...

Page 6: ...to the left or right so that the rear wheels will clear the striped line when turning Picture 2 10 Slide the spray gun mounting bracket over the upright on spray head support tube and tighten bolt Adjusting the spray gun mounting bracket up or down will adjust the spray width Picture 3 11 Place the spray gun in the holder without the hose attached and secure with the clamp Picture 4 12 The spray g...

Page 7: ...n 4 Turn the Spray control knob black knob to the Prime Re circulating position Circular arrow symbol in line with Arrow on side of pump housing 5 Make sure trigger lock on spray gun is released The trigger lock button is pushed in on the right side inside of the gun 6 Check that spray tip arrow on spray gun points toward the ground 7 Check that the Tank feed valve located under the left side of t...

Page 8: ...let valve stem to make sure it is free inspect washer to make sure it is seated and in good condition Re attach garden hose fitting making sure that it is tight You may have to snug it with pliers if you continue to get air bubbles Start engine and repeat first steps for operation If the pump will still not prime back out the pressure control knob until loose several turns Then turn the spray cont...

Page 9: ...ontrol knob to prime re circulating position 6 Start engine and move the pump engaging lever to the ON position lift and place in upper notch watch until fluid returning to tank runs clear 7 Turn spray control knob to spray position and trigger gun until spray runs clear 8 Clean spray tip if needed with a nylon bristle brush DO NOT use brushes with metal bristles or any metal object to clean the s...

Page 10: ...Remove as much fuel from the engine gas tank as you can or add fuel stabilizer to fuel 5 Close fuel shut off and run engine until it runs out of gas 6 Trigger spray pedal to remove any pressure in the system 7 Unit may now be stored in freezing temperatures 8 Drain and change engine oil in the spring PRECAUTIONARY WARNING ALWAYS release pressure in the system before changing or cleaning the spray ...

Page 11: ...if tip becomes worn Front axle steering knuckle Lubricate weekly Use high quality bearing grease Wheels Lubricate weekly Check air pressure Use high quality bearing grease for front wheels Pump Engaging lever Lubricate weekly Spray with light machine oil 3 in1 Battery Check monthly Sealed battery Air Filter Check monthly Change if blocked off with dirt Transaxle filter Every 12 months Change trans...

Page 12: ...head 10003746 13 Swivel Caster 10001434 14 Spray trigger operating cable 10000820 15 Paint hose 25 3000 psi with fittings 10000458 16 Spray gun airless 619 tip 10005115 Not shown Spray gun filter 2 pack 10000641 17 Spray Gun Release clamp 10001579 18 Spray gun mounting bracket assembly 10003263 19 Lifting bar spray gun trigger N A 20 Spray Trigger N A 21 Trigger lock N A 22 Spray Tip guard 1000393...

Page 13: ...lock spring 10000692 37 Tank outlet hose 10004041 38 Belt main drive AX39 10001218 39 Pulley Tensioner drive and pump belts 2 10003815 40 Spring Tensioner Main Drive 10002897 41 Belt pump drive 4L360 10004008 42 Pulley Pump drive 10003819 43 Pulley Pump 10003053 44 Spring Pump drive idler Not Shown 10004017 45 Pulley Main drive 10004010 46 Pulley and fan assembly Transaxle 10002999 47 Filter Trans...

Page 14: ...efore each use Every 1000 1500 gallons or if leaking Inlet valve If pump does not prime check washer at same time Every 500 1000 gallons Washer Every 50 250 gallons Outlet valve If pump does not prime Inlet Outlet valve kit 10000694 Every 500 1000 gallons Prime Spray Valve Every 1000 1500 gallons or if it stops working Suction tube Before each use Check for nicks and cuts Bypass Return hose Before...

Page 15: ...lease pin 6 Paint return line 55 Paint tank fill opening Battery access panel Ignition 8 Throttle 7 Empty seat kill switch 5 Parking brake 3 Fuel tank Vapor Capture Canister DO NOT SERVICE Oil dip stick Purge tank 11 Trans Axle release lever 2 Free wheel position Pull up and back to engage Note Trans axle oil filter 47 located behind skid plate Fuel Shut off Air filter Housing 9 Picture 7 Picture ...

Page 16: ...f 13 Spray Head Mounting Gun Mounting Spray head 32 Mounting bolts nuts Qty 2 Raised position Locking lever spring 36 Spray head with mounting tube 12 Spray Gun 16 Caster 13 Paint hose 15 Forward reverse pedal 30 Spray head release lock lever 33 Spray trigger pedal 31 Spray head lifting lever 32 Spray head support 32 Picture 11 Picture 12 Picture 13 Picture 14 ...

Page 17: ...PA Manual 4026 0916 Page 13 of 14 In line Filter 29 Purge Hose 41 Transaxle Filter 47 Tank Drain valve 26 41 Tank feed Valve Valves in purge position Valves in tank feed position Purge feed valve 28 Bulkhead fitting 27 Transaxle fan 46 Transaxle linkage Parking brake linkage Picture 15 Picture 16 Picture 17 Picture 18 Paint tank 25 ...

Page 18: ...rigger operating cable 14 Spray gun mounting bracket assembly 18 Lifting Bar 19 Spray trigger 20 Trigger lock 21 Tip guard 22 Spray Tip 23 Spring tensioner main drive 40 Pump drive belt 41 Pump pulley 43 Main drive pulley 45 Main drive belt 38 Main drive tension pulley 39 Spray gun filter inside gun handle Pump drive tension pulley 39 Picture 19 Picture 20 Spray gun Clamp 17 Pump drive pulley 42 ...

Page 19: ...o the gasket of the new replacement filter Newstripe part number 10003778 Hydro Gear part number 52114 4 Install the new filter by hand turn 3 4 to one full turn after the filter gasket contacts the filter base surface 5 Re install the filter guard with three 1 4 screws Snug but do not over tighten 6 Drain old oil filters of all free flowing oil prior to disposal Place used oil in appropriate cont...

Page 20: ...the oil has been changed The resulting symptoms in hydrostatic systems may be 1 Noisy operation 2 Lack of power or drive after short term operation 3 High operation temperature and excessive expansion of oil Before starting make sure the transaxle is at the proper oil level If it is not fill to the specifications outlined in this manual Purging Procedures The following procedures are best performe...

Page 21: ...t spray control knob is in Prime position Circular arrows aligned with arrow on housing Spray control Knob in prime position still will not prime Check that spray pressure control knob is in the high pressure position knob turned clockwise all the way Knobs are set correct still will not prime Push outlet button 3 times brass button Outlet button pushed still will not prime Turn spray control knob...

Page 22: ... Restart Gun will still not spray paint Call factory for assistance Over spray or too much paint Lower spray pressure Turn spray pressure control knob counter clockwise several turns then increase pressure just until spray pattern is full width Too little paint Increase the spray pressure Paint may need to be thinned Change spray tip to larger size Uneven spray pattern or stringing Increase the sp...

Page 23: ... you are responsible for performance of the required maintenance listed in your owner s manual Newstripe Inc recommends that you retain all receipts covering maintenance on your line painter but Newstripe Inc cannot deny warranty solely for the lack of receipts As the small off road engine line painter owner you should however be aware that Newstripe Inc may deny you warranty coverage if your fuel...

Page 24: ...eriod prior to the first scheduled replacement point for the part 4 Repair or replacement of any warranted part under the warranty provisions of this article must be performed at no charge to the owner at a warranty station 5 Notwithstanding the provisions of subsection 4 above warranty services or repairs must be provided at distribution centers that are franchised to service the subject engines ...

Page 25: ...mplete guidelines for warranty and returns please visit www newstripe com guidlinesforwarrantyandreturn Gasoline engines compressors pumps including airless and Transaxles are furnished with their respective manufacturer s warranties only Such components are not covered by any warranty of Newstripe Inc Where Newstripe elects to extend manufacturers warranties the warranty shall be pro rated as to ...

Page 26: ......

Reviews: