background image

Copyright © 2012 NEXCOM International Co., Ltd. All Rights Reserved.

52

Appendix B: Extended Display Identification Data Timing Support

APPD 1200T/1205T/1500T/1700T/1900T User Manual 

APPD 1700T

Resolution

Vertical Frequencies

60Hz

70Hz

72Hz

75Hz

640x480

720x400

800x600

1024x768

1280x1024

APPD 1900T

Resolution

Vertical Frequencies

60Hz

70Hz

72Hz

75Hz

640x480

720x400

800x600

1024x768

1280x1024

Summary of Contents for 10IA1200T01X0

Page 1: ...NEXCOM International Co Ltd NEXCOM International Co Ltd Published August 2018 www nexcom com IoT Automation Solutions Business Group Applied Panel Display APPD 1200T 1205T 1500T 1700T 1900T User Manual ...

Page 2: ...tures 1 Overview APPD 1500T 2 Key Features 2 Overview APPD 1700T 3 Key Features 3 Overview APPD 1900T 4 Key Features 4 Specifications 5 APPD 1200T 5 Specifications 6 APPD 1205T 6 Specifications 7 APPD 1500T 7 Specifications 8 APPD 1700T 8 Specifications 9 APPD 1900T 9 Knowing Your APPD Series 10 Front Top View of APPD 1200T 1205T 10 Front Top View of APPD 1500T 10 Front Top View of APPD 1700T 10 F...

Page 3: ... Pin Definitions External I O Interfaces 22 USB Port 22 COM Port 22 DVI Port DVI D 23 VGA Port 23 12 24V DC Input 24 Chapter 3 System Setup Panel Mounting 25 Installing the Power Adapter Bracket 28 Chapter 4 Adjusting the Display OSD Menu Functions 33 Chapter 5 Touch Driver Settings 49 Appendix A Power Consumption 50 Appendix B Extended Display Identification Data Timing Support 51 ...

Page 4: ... 1900T is a trademark of NEXCOM International Co Ltd All other product names mentioned herein are registered trademarks of their respective owners Regulatory Compliance Statements This section provides the FCC compliance statement for Class B devices and describes how to keep the system CE compliant Declaration of Conformity FCC This equipment has been tested and verified to comply with the limits...

Page 5: ...000ppm and Polybrominated diphenyl Ethers PBDE 0 1 or 1 000ppm In order to meet the RoHS compliant directives NEXCOM has established an engineering and manufacturing task force to implement the introduction of green products The task force will ensure that we follow the standard NEXCOM development procedure and that all the new RoHS components and new manufacturing processes maintain the highest i...

Page 6: ...manuals cable etc and any components from the card such as CPU and RAM If the components were suspected as part of the problems please note clearly which components are included Otherwise NEXCOM is not responsible for the devices parts Customers are responsible for the safe packaging of defective products making sure it is durable enough to be resistant against further damage and deterioration dur...

Page 7: ...the chassis and power supply are inconsistent with these instructions or the instructions for accessory modules contact the supplier to find out how you can ensure that your computer meets safety and regulatory requirements Cautions Electrostatic discharge ESD can damage system components Do the described procedures only at an ESD workstation If no such station is available you can provide some ES...

Page 8: ...g your fingers can disconnect most of the connections It is recommended that you do not use needle nose pliers to disconnect connections as these can damage the soft metal or plastic parts of the connectors Safety Information Before installing and using the device note the following precautions Read all instructions carefully Do not place the unit on an unstable surface cart or stand Follow all wa...

Page 9: ...eater than the voltage and current rating marked on the product 10 All cautions and warnings on the equipment should be noted 11 If the equipment is not used for a long time disconnect it from the power source to avoid damage by transient overvoltage 12 Never pour any liquid into an opening This may cause fire or electrical shock 13 Never open the equipment For safety reasons the equipment should ...

Page 10: ...ing system version application software etc A complete description of the problem The exact wordings of the error messages Warning 1 Handling the unit carry the unit with both hands and handle it with care 2 Maintenance to keep the unit clean use only approved cleaning products or clean with a dry cloth 3 CompactFlash Turn off the unit s power before inserting or removing a CompactFlash storage ca...

Page 11: ...ffice 13F No 920 Chung Cheng Rd ZhongHe District New Taipei City 23586 Taiwan R O C Tel 886 2 8226 7796 Fax 886 2 8226 7792 Email sales nexcom com tw www nexcom com tw NEXCOM Intelligent Systems Taichung Office 16F No 250 Sec 2 Chongde Rd Beitun Dist Taichung City 406 R O C Tel 886 4 2249 1179 Fax 886 4 2249 1172 Email sales nexcom com tw www nexcom com tw Japan NEXCOM Japan 9F Tamachi Hara Bldg 4...

Page 12: ...nexcom eu www nexcomitalia it NEXCOM Shanghai Room 603 604 Huiyinmingzun Plaza Bldg 1 No 609 Yunlin East Rd Shanghai 200333 China Tel 86 21 5278 5868 Fax 86 21 3251 6358 Email sales nexcom cn www nexcom cn NEXCOM Surveillance Technology Corp Room202 Building B the GuangMing Industrial Zone Zhonghua Rd Minzhi Street Longhua District Shenzhen 518131 China Tel 86 755 8364 7768 Fax 86 755 8364 7738 Em...

Page 13: ...ms listed in the table APPD 1200T 1205T 1500T 1700T Item Description Qty 1 Panel Mount Kit 12 2 Driver CD 1 3 Touch Pen 1 4 VGA Cable 1 8m 1 5 USB Cable 1 8m 1 6 Serial Cable 1 8m 1 7 Terminal blocks 3 pin Phoenix Contact Plug 1 Panel Mount Kit Driver CD Touch Pen Terminal blocks 3 pin Phoenix Contact Plug VGA Cable USB Cable Serial Cable Note Package contents may vary depending on your country re...

Page 14: ... Pen 1 4 VGA Cable 1 8m 1 5 USB Cable 1 8m 1 6 Serial Cable 1 8m 1 7 Terminal blocks 3 pin Phoenix Contact Plug 1 APPD 1900T Panel Mount Kit Driver CD Touch Pen Note Package contents may vary depending on your country region some items may be optional Please contact your local distributor for more information Terminal blocks 3 pin Phoenix Contact Plug VGA Cable USB Cable Serial Cable ...

Page 15: ...t RS 232 and USB touch screen interfaces APPD 1500T C P N 10IA1500T00X0 15 XGA industrial 4 3 LED Backlight flush touch monitor with VGA and DVI D input 12 24VDC input RS 232 and USB touch screen interfaces APPD 1700T P N 10IAD170002X0 17 SXGA industrial 4 3 LCD flush touch monitor with VGA and DVI D input 12 24VDC input RS 232 and USB touch screen interfaces APPD 1900T C P N 10IA1900T02X0 19 SXGA...

Page 16: ... Manual Chapter 1 Product Introduction Key Features IP65 compliant plastic front bezel with flush panel by 5 wire touch screen Dual display input interface analog VGA and DVI D Shares identical appearance with APPC series Dual touch screen interface RS232 and USB Ultra slim in depth OSD Multilanguage function Overview APPD 1200T 1205T ...

Page 17: ...0T 1700T 1900T User Manual Key Features IP65 compliant plastic front bezel with flush panel by 5 wire touch screen Dual display input interface analog VGA and DVI D Shares identical appearance with APPC series Dual touch screen interface RS232 and USB Ultra slim in depth OSD Multilanguage function Overview APPD 1500T ...

Page 18: ...0T 1700T 1900T User Manual Key Features IP65 compliant plastic front bezel with flush panel by 5 wire touch screen Dual display input interface analog VGA and DVI D Shares identical appearance with APPC series Dual touch screen interface RS232 and USB Ultra slim in depth OSD Multilanguage function Overview APPD 1700T ...

Page 19: ...0T 1700T 1900T User Manual Key Features IP65 compliant plastic front bezel with flush panel by 5 wire touch screen Dual display input interface analog VGA and DVI D Shares identical appearance with APPC series Dual touch screen interface RS232 and USB Ultra slim in depth OSD Multilanguage function Overview APPD 1900T ...

Page 20: ... D 1x DVI I connector DC power input connector 3 Pin Phoenix terminal blocks OSD Function OSD keypad Multilanguage OSD Mechanical Environment Color Pantone black and black silver PC box IP protection IP65 front Mounting panel wall stand VESA 100mm x 100mm Power input 12V 24VDC Power adapter optional AC to DC power adapter 12V 60W Vibration IEC 68 2 64 2Grms sine 5 500Hz 1hr axis Operating 2 2Grms ...

Page 21: ... D 1x DVI I connector DC power input connector 3 Pin Phoenix terminal blocks OSD Function OSD keypad Multilanguage OSD Mechanical Environment Color Pantone black and black silver PC box IP protection IP65 front Mounting panel wall stand VESA 100mm x 100mm Power input 12V 24VDC Power adapter optional AC to DC power adapter 12V 60W Vibration IEC 68 2 64 2Grms sine 5 500Hz 1hr axis Operating 2 2Grms ...

Page 22: ... 1x DVI I connector DC power input connector 3 Pin Phoenix terminal blocks OSD Function OSD keypad Multilanguage OSD Mechanical Environment Color Pantone black and black silver PC box IP protection IP65 front Mounting panel wall stand VESA 100mm x 100mm Power input 12V 24VDC Power adapter optional AC to DC power adapter 12V 60W Vibration IEC 68 2 64 2Grms sine 5 500Hz 1hr axis Operating 2 2Grms ra...

Page 23: ... 1x DVI I connector DC power input connector 3 Pin Phoenix terminal blocks OSD Function OSD keypad Multilanguage OSD Mechanical Environment Color Pantone black and black silver PC box IP protection IP65 front Mounting panel wall stand VESA 100mm x 100mm Power input 12V 24VDC Power adapter optional AC to DC power adapter 12V 60W Vibration IEC 68 2 64 2Grms sine 5 500Hz 1hr axis Operating 2 2Grms ra...

Page 24: ...1x DVI I connector DC power input connector 3 Pin Phoenix terminal blocks OSD Function OSD keypad Multilanguage OSD Mechanical Environment Color Pantone black and black silver PC box IP protection IP65 front Mounting panel wall stand VESA 100mm x 100mm Power input 12V 24VDC Power adapter optional AC to DC power adapter 12V 60W Vibration IEC 68 2 64 2Grms sine 5 500Hz 1hr axis Operating 2 2Grms ran...

Page 25: ...uction APPD 1200T 1205T 1500T 1700T 1900T User Manual Knowing Your APPD Series Front Top View of APPD 1700T Front Top View of APPD 1900T Front Top View of APPD 1200T 1205T Front Top View of APPD 1500T Power OSD Menu Buttons Power OSD Menu Buttons Power OSD Menu Buttons Power OSD Menu Buttons ...

Page 26: ... power on or power off the display No OSD menu Press to increase the brightness of the screen Inside OSD menu Press to move the selection down in OSD menu Configuring options Press to increase the value No OSD menu Press to decrease the brightness of the screen Inside OSD menu Press to move the selection up in OSD menu Configuring options Press to decrease the value OSD Menu No OSD Menu Press to l...

Page 27: ...Co Ltd All Rights Reserved 12 Chapter 1 Product Introduction APPD 1200T 1205T 1500T 1700T 1900T User Manual Rear Bottom View of APPD 1200T 1205T Rear Bottom View of APPD 1500T Rear Bottom View of APPD 1700T Rear Bottom View of APPD 1900T ...

Page 28: ...chscreen Connector DB 9 Optional This RS 232 connector must be connected to the RS 232 port of the PC RS 232 USB touchscreen interface does not allow connection into the system at the same time DVI Port DVI D Connected with a standard DVI connector through I O port of this unit Only supports digital signals VGA Port DB 15 This DB 15 connector can be connected to the system 12 24V DC Input Terminal...

Page 29: ...ved 14 Chapter 1 Product Introduction APPD 1200T 1205T 1500T 1700T 1900T User Manual Rear View of APPD 1200T 1205T VESA Mounting Hole VESA Mounting Hole VESA Mounting Hole VESA Mounting Hole VESA Mounting Holes These are mounting holes for VESA mount 100x100mm ...

Page 30: ...served 15 Chapter 1 Product Introduction APPD 1200T 1205T 1500T 1700T 1900T User Manual Rear View of APPD 1500T VESA Mounting Hole VESA Mounting Hole VESA Mounting Hole VESA Mounting Hole VESA Mounting Holes These are mounting holes for VESA mount 100x100mm ...

Page 31: ...served 16 Chapter 1 Product Introduction APPD 1200T 1205T 1500T 1700T 1900T User Manual Rear View of APPD 1700T VESA Mounting Hole VESA Mounting Hole VESA Mounting Hole VESA Mounting Hole VESA Mounting Holes These are mounting holes for VESA mount 100x100mm ...

Page 32: ...served 17 Chapter 1 Product Introduction APPD 1200T 1205T 1500T 1700T 1900T User Manual Rear View of APPD 1900T VESA Mounting Hole VESA Mounting Hole VESA Mounting Hole VESA Mounting Hole VESA Mounting Holes These are mounting holes for VESA mount 100x100mm ...

Page 33: ...ghts Reserved 18 Chapter 1 Product Introduction APPD 1200T 1205T 1500T 1700T 1900T User Manual Mechanical Dimensions 8 80 34 86 100 25 100 25 301 73 317 243 8 50 8 80 7 62 15 83 13 84 37 227 76 53 50 14 69 173 70 100 108 51 56 17 100 APPD 1200T 1205T ...

Page 34: ...tional Co Ltd All Rights Reserved 19 Chapter 1 Product Introduction APPD 1200T 1205T 1500T 1700T 1900T User Manual 8 60 384 37 7 41 366 32 160 160 309 95 7 19 10 40 60 70 35 70 35 292 20 51 44 173 70 142 19 100 82 66 100 APPD 1500T ...

Page 35: ...ational Co Ltd All Rights Reserved 20 Chapter 1 Product Introduction APPD 1200T 1205T 1500T 1700T 1900T User Manual 410 31 340 20 43 70 RS 232 DVI D VGA GND DCIN 12 24V 100 00 100 00 17 80 17 80 33 39 22 02 22 02 17 80 APPD 1700T ...

Page 36: ... All Rights Reserved 21 Chapter 1 Product Introduction APPD 1200T 1205T 1500T 1700T 1900T User Manual 178 82 100 100 119 8 10 24 15 16 05 10 15 52 90 111 52 112 52 361 34 379 24 49 15 6 80 41 49 104 50 431 34 457 64 97 35 104 50 270 APPD 1900T ...

Page 37: ...5T 1500T 1700T 1900T User Manual Chapter 2 Connector Pin Definitions External I O Interfaces USB Port Connector type USB port Pin Definition 1 VCC5 2 DATA_N 3 DATA_P 4 GND COM Port Connector type DB 9 port 1 5 6 9 Pin Definition Pin Definition 1 NC 2 RXD Receive Data 3 TXD Transmit Data 4 NC 5 GND 6 NC 7 NC 8 NC 9 NC ...

Page 38: ...15 11 Pin Definition Pin Definition 1 RED 2 GREEN 3 BLUE 4 ID2 5 GND 6 RGND 7 GGND 8 BGND 9 KEY 10 SGND 11 ID0 12 SDA 13 HSYNC or CSYNC 14 VSYNC 15 SCL Pin Definition Pin Definition 1 TMDS Data 2 2 TMDS Data 2 3 Shield 4 NC 5 NC 6 DDC clock 7 DDC data 8 Reserved 9 TMDS Data 1 10 TMDS Data 1 11 Shield 12 NC 13 NC 14 5V 15 GND 16 Hot plug detect 17 TMDS data 0 18 TMDS data 0 19 Shield 20 NC 21 NC 22...

Page 39: ... NEXCOM International Co Ltd All Rights Reserved 24 Chapter 2 Connector Pin Definitions APPD 1200T 1205T 1500T 1700T 1900T User Manual 12 24V DC Input Connector type 3 pin Terminal Block 1 3 Pin Definition 1 2 3 GND ...

Page 40: ...out a shape on the panel that corresponds to the Industrial Touch Monitor s rear dimensions The thickness of the panel e g steel board plank acrylic board wall etc where you will mount the Industrial Touch Monitor must not exceed 3mm for APPD 1900T and 5mm for APPD 1200T 1205T 1500T 1700T If the distance between the front bezel and panel mount hole is too wide it will not fit the panel mount kit 3...

Page 41: ...rial Touch Monitor through the hole until it is properly fitted against the panel 4 Position the mounting clamps along the rear edges of the Industrial Touch Monitor The first and second clamps must be positioned and secured diagonally prior to mounting the rest of the clamps Tighten the clamp s screw until it touches the panel Clamp Panel 399 00 4mm 329 00 436 00 366 00 3mm APPD 1700T APPD 1900T ...

Page 42: ...Copyright 2012 NEXCOM International Co Ltd All Rights Reserved 27 Chapter 3 System Setup APPD 1200T 1205T 1500T 1700T 1900T User Manual 5 The illustration below shows all clamps properly mounted ...

Page 43: ...em Setup APPD 1200T 1205T 1500T 1700T 1900T User Manual Installing the Power Adapter Bracket Optional accessory for APPD 1900T only 1 Locate the mounting screws for the bracket on the back side of the chassis 2 Remove the mounting screws and store them in a safe place for later use ...

Page 44: ...td All Rights Reserved 29 Chapter 3 System Setup APPD 1200T 1205T 1500T 1700T 1900T User Manual 3 Wire the power adapter cabling into the cable opening on the bracket then place the adapter inside the bracket Cable opening Power adapter cable ...

Page 45: ...30 Chapter 3 System Setup APPD 1200T 1205T 1500T 1700T 1900T User Manual 4 Turn the bracket over to the back side and place the cable tie into the two tie mounts 5 Wrap the power adapter cable then secure the cable firmly by tying the cable tie Tie mount Cable tie ...

Page 46: ...tem Setup APPD 1200T 1205T 1500T 1700T 1900T User Manual 6 With the bracket still facing backwards align the mounting holes on the bracket to the mounting holes on the back of the chassis then tighten screws to secure it 7 Plug the 3 pin terminal block connector into the DC input ...

Page 47: ...cable into the corresponding pins on the DC input then tighten the screws on the terminal blocks to secure the wires 9 Plug the AC power cord into the power adapter CAUTION CAUTION CAUTION Before plugging the DC power cable wires into the DC input use a multimeter or voltmeter to measure which wire is positive negative and GND and ensure that they are connected to the correct pins AC power cord ...

Page 48: ... the back of the display panel to open the OSD menu Refer to the images below for each OSD menu options 1 Colour 1024x768 59 9 Hz OSD EXIT ther Contrast Brightness Colour Temp 9300K 6500K User Colour Adjust Exit Colour Picture Function OSD Menu Misc Exit 50 100 1024x768 59 9 Hz OSD EXIT ther Contrast Brightness Colour Temp 9300K 6500K User Colour Adjust Exit Colour Picture Function OSD Menu Misc E...

Page 49: ...e the brightness 1024x768 59 9 Hz OSD EXIT ther Contrast Brightness Colour Temp 9300K 6500K User Colour Adjust Exit Colour Picture Function OSD Menu Misc Exit 50 100 1024x768 59 9 Hz OSD EXIT ther Contrast Brightness Colour Temp 9300K 6500K User Colour Adjust Exit Colour Picture Function OSD Menu Misc Exit 0 100 Colour Temp colour contrast colour temp to move it towards left colour contrast colour...

Page 50: ...lour Adjust colour red increase the value colour red decrease the value 1024x768 75 4 Hz OSD EXIT ther Red Green Blue Exit Colour Picture Function OSD Menu Misc Exit 100 100 100 1024x768 75 4 Hz OSD EXIT ther Red Green Blue Exit Colour Picture Function OSD Menu Misc Exit 100 100 100 Exit Exits the Colour Adjust sub menu or press the button to exit ...

Page 51: ...ay APPD 1200T 1205T 1500T 1700T 1900T User Manual 1024x768 59 9 Hz OSD EXIT ther Contrast Brightness Colour Temp 9300K 6500K User Colour Adjust Exit Colour Picture Function OSD Menu Misc Exit 50 100 Exit Exits the Colour sub menu and return to main menu or press the button continuously till exit ...

Page 52: ...EXIT ther H Position V Position Clock Sharpness Exit Colour Picture Function OSD Menu Misc Exit 50 50 50 1 2 3 4 5 1024x768 59 9 Hz OSD EXIT ther H Position V Position Clock Sharpness Exit Colour Picture Function OSD Menu Misc Exit 50 50 50 1 2 3 4 5 H Position colour picture H position to move the screen towards right colour picture H position to move the screen towards left ...

Page 53: ...Colour Picture Function OSD Menu Misc Exit 50 50 50 1 2 3 4 5 V Position colour picture V position to move the screen down colour picture V position to move the screen up 1024x768 59 9 Hz OSD EXIT ther H Position V Position Clock Sharpness Exit Colour Picture Function OSD Menu Misc Exit 50 50 50 1 2 3 4 5 Clock colour picture Clock stretch the screen towards right colour picture Clock stretch the ...

Page 54: ...g the Display APPD 1200T 1205T 1500T 1700T 1900T User Manual 1024x768 59 9 Hz OSD EXIT ther H Position V Position Clock Sharpness Exit Colour Picture Function OSD Menu Misc Exit 50 50 50 1 2 3 4 5 Sharpness colour picture sharpness to decrease it colour picture sharpness to decrease it ...

Page 55: ... 1900T User Manual 3 Function 1024x768 59 9 Hz OSD EXIT ther Auto Adjust YES NO Exit Colour Picture Function OSD Menu Misc Exit 1024x768 59 9 Hz OSD EXIT ther Auto Adjust YES NO Exit Colour Picture Function OSD Menu Misc Exit Auto Adjust colour function auto adjust YES to automatically adjust the screen size or NO to abort it ...

Page 56: ...4 Adjusting the Display APPD 1200T 1205T 1500T 1700T 1900T User Manual 1024x768 59 9 Hz OSD EXIT ther Auto Adjust YES NO Auto Colour YES NO Exit Colour Picture Function OSD Menu Misc Exit Exit Exits the Function Adjust sub menu or press the button to exit colour function exit ...

Page 57: ...r Manual 4 OSD Menu 1024x768 59 9 Hz OSD EXIT ther Language OSD H Pos OSD V Pos OSD Timer ON OFF Exit Colour Picture Function OSD Menu Misc Exit 0 50 1024x768 59 9 Hz OSD EXIT ther Language OSD H Pos OSD V Pos OSD Timer ON OFF Exit Colour Picture Function OSD Menu Misc Exit 50 50 Language Press the button to enter the Language sub menu ...

Page 58: ...utton to apply the language 1024x768 59 9 Hz OSD EXIT ther English Deutsch 한국의 繁體中文 日本语 Francais Español Italiano 简体中文 Português Colour Picture Function OSD Menu Misc Exit 1024x768 59 9 Hz OSD EXIT ther Language OSD H Pos OSD V Pos OSD Timer ON OFF Exit Colour Picture Function OSD Menu Misc Exit 50 50 OSD H Pos colour osd menu osd H pos move it towards left colour osd menu osd H pos move it toward...

Page 59: ...Press on the back of the display panel to move the OSD menu up or to move it down colour osd menu osd V pos move it down colour osd menu osd V pos move it up 1024x768 59 9 Hz OSD EXIT ther Language OSD H Pos OSD V Pos OSD Timer ON OFF Exit Colour Picture Function OSD Menu Misc Exit 50 50 OSD Timer Select ON to specify the timeout period of the OSD menu or OFF to disable it Press on the back of the...

Page 60: ...hapter 4 Adjusting the Display APPD 1200T 1205T 1500T 1700T 1900T User Manual 1024x768 59 9 Hz OSD EXIT ther Language OSD H Pos OSD V Pos OSD Timer ON OFF Exit Colour Picture Function OSD Menu Misc Exit 50 50 Exit Exits the OSD Menu sub menu or press the button to exit ...

Page 61: ...00T User Manual 5 Misc 1024x768 59 9 Hz OSD EXIT ther Reset YES NO Volume Input VGA DVI Exit Colour Picture Function OSD Menu Misc Exit 1024x768 59 9 Hz OSD EXIT ther Reset YES NO Volume Input VGA DVI Exit Colour Picture Function OSD Menu Misc Exit Reset colour Misc reset YES to restore factory default settings or NOT to abort it ...

Page 62: ...l 1024x768 59 9 Hz OSD EXIT ther Reset YES NO Volume Input VGA DVI Exit Colour Picture Function OSD Menu Misc Exit Input colour Misc Input Select VGA or DVI as the video input 1024x768 59 9 Hz OSD EXIT ther Reset YES NO Volume Input VGA DVI Exit Colour Picture Function OSD Menu Misc Exit Exit Exits the Misc sub menu or press the button to exit ...

Page 63: ...erved 48 Chapter 4 Adjusting the Display APPD 1200T 1205T 1500T 1700T 1900T User Manual 1024x768 59 9 Hz OSD EXIT ther Reset YES NO Volume Input VGA DVI Exit Colour Picture Function OSD Menu Misc Exit 6 Exit Exits the OSD main menu or press the button to exit ...

Page 64: ...located under the following folder PenMount Windows Universal Driver V2 2 0 283 Win7_32_64bit_WHQL Driver 1 Open the Install ini file 2 Confirm if the Install ini file has the following settings if not please change it Install USB 1 Must set this to 1 COM 1 Must set this to 1 MMonitor 1 ENUM 1 Option TouchReport 2 USB COM EdgeOffset 5 Smoothing 1 ENUM Total 4 COM1 1 Set 1 to the COM port you inten...

Page 65: ...2 Measure the power consumption and record it 3 Enter the standby mode Turn off display 4 Measure the power consumption and record it APPD 1200T 12V 24V Full Loading Mode 0 73A 0 39A Total 8 76W 9 36W Standby Mode 0 05A 0 06A Total 0 6W 1 44W APPD 1205T 12V 24V Full Loading Mode 0 75A 0 39A Total 9W 9 36W Standby Mode 0 05A 0 05A Total 0 6W 1 2W APPD 1500T 12V 24V Full Loading Mode 0 97A 0 5A Tota...

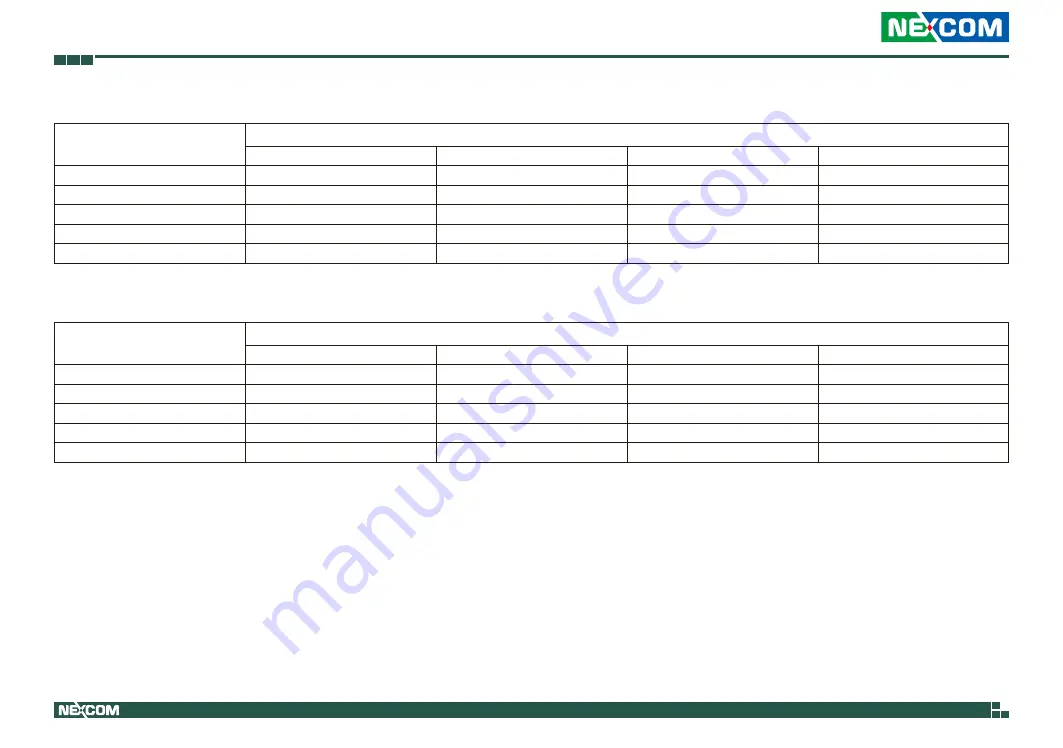
Page 66: ...1900T User Manual Appendix B Extended Display Identification Data Timing Support APPD 1200T Resolution Vertical Frequencies 60Hz 70Hz 72Hz 75Hz 640x480 720x400 800x600 APPD 1205T Resolution Vertical Frequencies 60Hz 70Hz 72Hz 75Hz 640x480 720x400 800x600 1024x768 APPD 1500T Resolution Vertical Frequencies 60Hz 70Hz 72Hz 75Hz 640x480 720x400 800x600 1024x768 ...

Page 67: ... Identification Data Timing Support APPD 1200T 1205T 1500T 1700T 1900T User Manual APPD 1700T Resolution Vertical Frequencies 60Hz 70Hz 72Hz 75Hz 640x480 720x400 800x600 1024x768 1280x1024 APPD 1900T Resolution Vertical Frequencies 60Hz 70Hz 72Hz 75Hz 640x480 720x400 800x600 1024x768 1280x1024 ...

Reviews: