5
20cm
20c
m
2
0
cm
Assembly instructions
Step 1. Temporarily fit the brackets
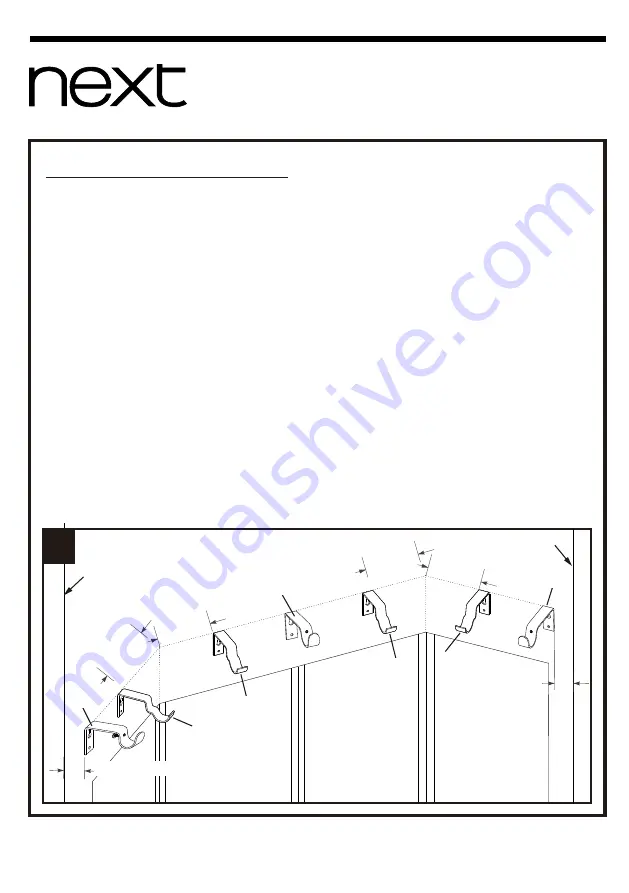
1.Find the four corner brackets from bay window kit. These are the brackets which
supplied with kit, Shown (A) in below figure.
2.Place one of the corner brackets (A) against the wall at the required height and
20cm from the corner of the recess. Make a mark on the wall at the top of the
keyhole slot in the bracket. With the help of a spirit level, mark the wall for the
remaining three corner brackets. Each bracket should be 20cm from the corner of
the recess. At this stage, only mark the hole positions for the keyhole slots.
(See Figure 1).
*IMPORTANT – Curtain rings will not run over brackets supplied with curtain
poles. Please ensure that these are positioned correctly as shown below and
where curtain will not need to be drawn.
3.Find the 3 brackets from the straight curtain pole kit. These are the brackets which
supplied with curtain pole. Shown ‘B’ in below figure.
4.In the same way, mark the desired hole positions for the keyhole slots of the 2
brackets at both end of window. It should be at least 8cm from the wall edge.
5.The remaining bracket should be positioned at the meeting point of the curtain on
the front face of the window, usually the centre. This will also be the point at which
the two parts of the extendable pole meet.
6.Drill 6mm holes in the wall at the seven bracket positions and insert plastic plugs.
7.Without the brackets being in position, screw in the screws in the plastic plugs.
Occasionally try hanging a bracket from them until the brackets are starting to be
held firmly.
8.Hang all the brackets on their screws.
Assembly Instructions
1
20c
m
At least 8cm
Wall edge
Wall edge
A
A
A
A
B
B
B
At least 8cm
Produced in China for Next Retail Ltd.
Bay
Window
Kit
666612
&
662382
Bay
Window
Kit
-
2015 INS-9.1


