background image

 4. SETUP MENU

     There is also a Setup menu for the general settings, press the MENU button twice on the rear of the 
     device to access the menu. The options and settings available are described below.

      4.1 Format
         

   Format the inserted memory card, this will delete all content. 

            A good practice monthly to ensure your SD card performs to it’s full potential.


4.2 Language

            Set the language as required.
            Default Setting: English 

      4.3 Date / Time

            Adjust the date / time as required using the OK button to toggle through fields, use the     and 
            buttons to set variables.
            Note: In event of the battery becoming fully dis-charged, the date will reset to 01/01/2013. 

      
      4.4 Time Zone / DST

            The Time and Date is automatically set from the satellite signal, but can be adjusted dependant 
            upon your Time Zone (country) or whether Daylight Savings Time (DST) is operational. 
            Adjust the Time Zone / DST amount using the (UP) and (DOWN) buttons and OK to set.
            Default Setting: GMT

      
      4.5 Frequency

            Set the Frequency as required.
            Default Setting: 50Hz


4.6 LED Light

            Turn on the white LED light for use as a torch, if required.
            Default Setting: Off


4.7 Beep Sound

            Turn Off / On the beep sound, note if Beep is turned off the audible low-battery warning will 
            also be disabled.
            Default Setting: On


4.8 Screen Saver

            Turn on the Screen Saver function, shut down the screen after a period of inactivity, with options 
            of 10 Seconds, 30 Seconds and 2 Minutes. Press any button to re-activate the display.
            Default Setting: Off   


4.9 TV Mode

            Set the TV Mode as required.
            Default Setting: PAL


4.10 Speed Stamp

            Turn On / Off the Speed Stamp shown on recorded files.
            Default Setting: On


   4.11 Version

            Display the version number of your device’s software.         


4.12 Default Setting

            Reset the device to the default settings.


4.13 Auto Power Off

            Adjust the timing of the Auto Power Off function, this can be used to continue recording in 
            event of loss of power within in the vehicle, with options of 10 Seconds. 2 Minutes and 5 Minutes.
            Default Setting: 10 Seconds 

18

MENUS AND SETTINGS (CONTD.)

Summary of Contents for 402G

Page 1: ...Instruction Manual inc Driving Recorder Player Software Installation Guide...

Page 2: ......

Page 3: ...E PC CAMERA MAC CONNECTION MASS STORAGE VIDEO AUDIO OUTPUT HIGH DEFINITION OUTPUT STANDARD DEFINITION OUTPUT DRIVING RECORDER PLAYER FOR WINDOWS MINIMUM SYSTEM REQUIREMENTS INSTALLATION USING THE DRIV...

Page 4: ...ncounter any operational problem 04 PRECAUTIONS 1 Ensure that the windscreen is free of dirt or grease before placing mount upon it 2 Do not obscure the view of the road ahead or impede the deployment...

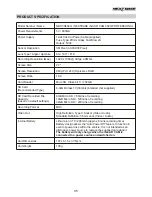
Page 5: ...x 1080 30fps 2 0Mb s 2 7 960 W X 240 H pixels x RGB 16 9 MicroSD Class 6 10 32GB 8 32GB Class 10 30mb s branded not supplied 8GB Micro SD 60mins of recording 16GB Micro SD 120mins of recording 32GB M...

Page 6: ...es directly from your device using the supplied High Definition cable to an external screen Windows is a registered trademark of Microsoft Corporation in the United States and other countries Mac is a...

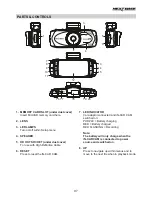
Page 7: ...dust cover For use with High Definition Cable 6 RESET Press to reset the iN CAR CAM HD OUT 7 LED INDICATOR Car adaptor connected and iN CAR CAM switched on PURPLE Battery charging RED Battery charged...

Page 8: ...REEN 13 MENU Press to open the Menu within current mode Press twice to open the Setup menu 14 EXPOSURE EV Press to toggle through exposure settings HD OUT 15 MODE Press to select Video Photo Playback...

Page 9: ...le holding the suction cup onto the glass push the locking lever upwards to secure the mount to the windscreen Please ensure that once mounted the iN CAR CAM is located within the area of the vehicles...

Page 10: ...the power cable under trim Make sure that the iN CAR CAM power cable does not interfere with the drivers operating controls such as the steering wheel pedals or gear levers Do NOT mount the iN CAR CAM...

Page 11: ...isplay Icon Shown on screen when function has been turned on 13 Driver Fatigue Icon Shown on screen when function has been turned on 14 Time Displays current time as set within the Setup menu 15 Date...

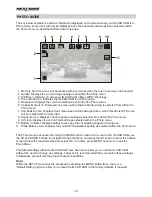
Page 12: ...re setting as selected from within the Photo menu 9 ISO Icon Displays the current ISO setting as selected within the Photo menu 10 Battery Indicator Displays battery level keep the car adaptor plugged...

Page 13: ...the MODE button to continue scrolling through the saved files 2 Video Playback Icon Indicates the iN CAR CAM is displaying a video in the Playback mode 3 Protected File Icon Displayed when a video fil...

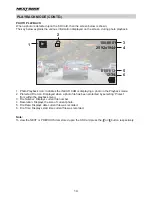
Page 14: ...yback mode 2 Protected File Icon Displayed when a photo file has been protected by selecting Protect from within the playback menu 3 File Number Displays current file number 4 Resolution Displays the...

Page 15: ...beginning overwriting the oldest files unless protected Default Setting 3 Minutes Note Do NOT set this is to Off or recording will simply stop when the SD card is full Set to a timed loop to enable t...

Page 16: ...t Default Setting Off 1 13 Password Settings Set a password that will need to be entered to access menus and settings only basic functions of power on off and start stop remain available 1 14 Speed Un...

Page 17: ...lower the ISO required Default setting Auto 2 7 Exposure Select exposure used to adjust the amount of light received by the sensor Default setting 0 2 8 Date Stamp Turn Off the date stamp shown on re...

Page 18: ...OK to set Default Setting GMT 4 5 Frequency Set the Frequency as required Default Setting 50Hz 4 6 LED Light Turn on the white LED light for use as a torch if required Default Setting Off 4 7 Beep Sou...

Page 19: ...r PC Start the normal application upon your PC that uses a webcam e g Skype and select the iN CAR CAM which is entitled USB Video Device This feature is useful if you do not have a Webcam built in to...

Page 20: ...n the iN CAR CAM screen will blank as all output is now visible upon your television All elements of the Video Photo and Playback are available via the AV output so you can monitor your recordings upo...

Page 21: ...Display 1280 x 1024 Windows Driving Recorder Player Insert the supplied Driving Recorder Player disk in to the CD drive navigate and display the contents upon the disk NBDVR402G Instruction Manual Mul...

Page 22: ...not already be installed a window will open prompting you to confirm the automatic installation from Microsoft as shown below This is normal and enables the Driving Recorder Player software to run Ple...

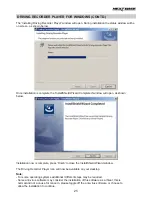
Page 23: ...nt installed then the Welcome to the InstallShield window will open as shown below Press Next to continue the License Agreement window will open as shown below Check the Accept button and press Next t...

Page 24: ...ion folder should you not want files saved to the default folder within the Program Files directory Press Next to proceed the Ready to Install the Program window will open as shown below Click Install...

Page 25: ...s Finish to close the InstallShield Wizard window The Driving Recorder Player icon will now be available on your desktop Note For some operating systems additional different steps may be required Some...

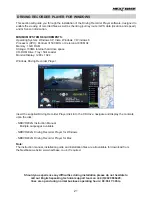
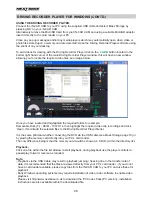
Page 26: ...o clip recordings and click Open this will add the selected files to the Driving Recorder Player file list It is the same principal whether connecting the DVR via the USB cable see Mass Storage page 1...

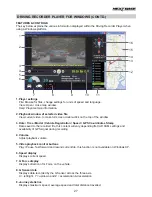
Page 27: ...corded file this content will vary depending iN CAR CAM settings and availability of GPS signal during recording 4 Volume Adjust playback volume 5 Video playback control buttons Play Pause fast forwar...

Page 28: ...current GPS co ordinates only available when the video files are recorded when a satellite connection was present 15 Map Displays route travelled on map only available when the video was recorded whe...

Page 29: ...isk in to the CD drive navigate and display the contents upon the disk NBDVR402G Instruction Manual Multiple Languages available NBDVR402G Driving Recorder Player for Windows NBDVR402G Driving Recorde...

Page 30: ...n the Downloads folder on your Mac The software is saved in a compressed zip folder free de compression applications are readily available for example The Unarchiver available from the Mac Appstore On...

Page 31: ...lick select Eject Driving Recorder Player and right click once more see image below The Driving Recorder Player can also be found within the Applications List see below At this point may also want to...

Page 32: ...files see image below Once you have located and highlighted the required folder for example VOLUME1 DCIM 10130102 then highlight the required video clip recordings and click Open this will add the se...

Page 33: ...odel Vehicle Registration Speed GPS Co ordinates Stamp Data saved to the recorded file this content will vary depending iN CAR CAM settings and GPS signal 3 Volume Adjust playback volume 4 Video playb...

Page 34: ...co ordinates Displays current GPS co ordinates only available when the video files were recorded when satellite connection was present 13 Map Displays route travelled on map only available when the vi...

Page 35: ...at to remove non contiguous files For best recording use a branded class 10 type 30MB s SD card of 8 to 32GB recommended size Recommended video playback software is the supplied Driver Recorder Player...

Page 36: ...s not compatible Simply use the MENU SETUP option to re format the SD card from within the iN CAR CAM For Windows operating systems the player requires an internet connection to open if this is not av...

Page 37: ...ly Switch back on the and within the setting menu and turn off the Motion Detection This is normal during recording Stop the recording before pressing the MENU button If recording re starts before you...

Page 38: ...NOTES 38...

Page 39: ......

Page 40: ...NBDVR402G IM ENG R06 www nextbase co uk...

Reviews: