background image

14

English

NORMAL RECORDING

When the vehicle engine starts up, the camera automatically turns on and starts recording. Recording will 

automatically stop when the engine is switched off. Or, long press the   button to stop recording manually.

Taking Snapshots

During video recording, long press the   button to take snapshot of the current scene.

Single/Dual Camera Display

• 

Single channel: 
Press the   button to turn on/off the screen.

• 

Dual Channel:
Press the   button to toggle screen view:

 Front + Cabin/Rear View camera overlaid

00:00:13

30/04/2020

13:30:25

1440P+1080P

Front camera

Cabin/Rear View 

camera

 Front camera only

 Cabin/Rear View camera only

 Screen off

EMERGENCY RECORDING (FILE PROTECTED)

Emergency recording will be activated under the following two situations.
1.

 G-Sensor event recording

: During video recording, if the dash camera detects an impact, it will automatically 

activate the emergency recording mode.

• 

If the G-Sensor sensitivity is set to “High Sensitivity”, even minor shocks will be detected.

• 

If the G-Sensor sensitivity is set to “Low Sensitivity”, it will only detect the significant shocks.

• 

G-Sensor sensitivity can be adjusted in the OSD menu. See page 18.

2. 

Manual emergency recording

:

• 

During video recording, press the   button to activate the emergency recording(File Protected) function 

manually.

• 

During non-video recording (i.e. in the Playback mode or the OSD menu), press the   button to activate 

the emergency recording function manually.

NOTE:

An 


icon will appear on the screen to indicate the 

Emergency Recording

 is in progress.

AUTO REPAIR

If the microSD card is unexpectedly removed or power outage, the last recorded video may not be saving correctly 

and cannot be played on the computer. When re-insert microSD card back to the camera and it is turn on, the system 

will automatically repair the abnormal video file, so that it can be played normally.

Summary of Contents for A16 Series

Page 1: ...Instruction Manual English Professional A16X Series High Definition Car DVR...

Page 2: ...erviced by a qualified service technician if The Unit has been exposed to rain or water The unit does not seem to operate normally The unit exhibits a marked changes in performance LCD A Liquid Crysta...

Page 3: ...fps 1080P 1080P 1920 x 1080P 30fps 1080P 720P 1280 x 720P 120fps 720P 1080P 1280 x 720P 60fps 720P 720P 1280 x 720P 30fps A163 Single Channel Dual Channel 3840 x 2160P 30fps 1440P 1080P 2560 x 1440P 6...

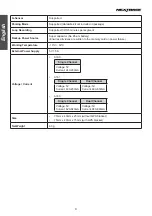
Page 4: ...e memory card on power failure Working Temperature 10 C 60 C External Power Supply 5V 1 5A Voltage Current A160 Single Channel Voltage 5V Current 240 280mA A161 Single Channel Dual Channel Voltage 5V...

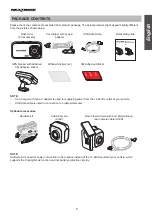
Page 5: ...3M adhesive sticker Window Stickers x2 3M Adhesive Sticker NOTE Car charger with Type C adapter is used for supplying power from the 12 24Vdc outlet of your vehicle USB data cable is used for connecti...

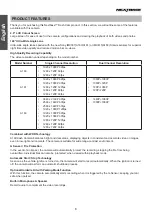
Page 6: ...440P 60fps 2560 x 1440P 30fps 1920 x 1080P 120fps 1920 x 1080P 60fps 1920 x 1080P 30fps 1280 x 720P 120fps 1280 x 720P 60fps 1280 x 720P 30fps 1440P 1080P 1080P 1080P Combined with WDR Technology A16X...

Page 7: ...ecording Mode Take a snapshot Playback Mode Move to the previous file Video Playback Mode Fast forward playback In the Menus Navigate down within menus 9 OK Video Mode Short press to switch the screen...

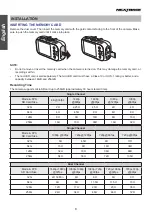
Page 8: ...256GB Recording Time The camera supports microSD card up to 256GB approximately 30 hours record time Single Channel Mode FPS SD Card Size 4K 30fps 1440p 60fps 1440p 30fps 1080p 120fps 1080p 60fps 32G...

Page 9: ...Peel off the adhesive cover layer from the GPS bracket Then place and press down the bracket firmly onto the attached window sticker NOTE If you plan to install the Cabin camera make sure the distanc...

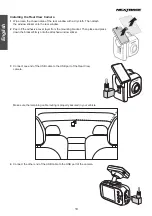
Page 10: ...2 Peel off the adhesive cover layer from the mounting bracket Then place and press down the bracket firmly onto the attached window sticker 3 Connect one end of the USB cable to the USB port of the Re...

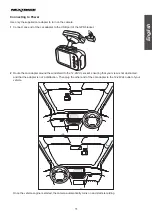
Page 11: ...e GPS bracket 2 Route the car adapter around the windshield to the 12 24Vdc socket ensuring that your view is not obstructed and that the adapter is not a distraction Then plug the other end of the ca...

Page 12: ...of the road ahead Recommended position is no more than 40mm within the wiper swept area Do NOT mount the camera directly in front of the driver Do not place the Dash Cam in such a way that it may int...

Page 13: ...Recording Time Display the length of current recording 5 Resolution Display the current video resolution 6 Time Lapse Recording ON Can be switched OFF in the OSD menu 7 GPS Reception Status Only for A...

Page 14: ...a detects an impact it will automatically activate the emergency recording mode If the G Sensor sensitivity is set to High Sensitivity even minor shocks will be detected If the G Sensor sensitivity is...

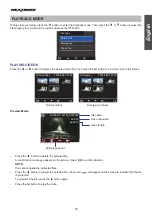
Page 15: ...Video 2020 04 30 07 55 5 5 Emergency 2020 04 30 07 55 Normal Videos Emergency Videos Preview Mode 20200417144755_000029A 4K P30 00 00 16 1X 1X File name Buttons guideline Video resolution Video length...

Page 16: ...yback VIEWING PHOTOS Press the or button to browse the desired photo file Then press the button to view the photo in full screen 5 5 Photo File 2020 04 30 07 55 Preview Mode 20200417143828_000028A 384...

Page 17: ...ght conditions WDR Wide Dynamic Range Dynamic range is the ratio of the brightest portion of the image to the darkest portion of the image When enabled the system records more details in the shadows w...

Page 18: ...time settings Time Zone Select the time zone of your country Language Select your preferred language Beep Sound Turn on off the beep that sounds when a button is pressed Frequency Set the frequency se...

Page 19: ...two folders Movie Normal loop recording video files For the locked video files you can find them in the RO subfolder Photo Video snapshot files REVIEWING GPS LOG Software Installation and Registration...

Page 20: ...d and Distance info G Sensor data Current location Driving direction on the map Auto play of the next video Volume adjustment Video playback controls Take snapshot Video scaling ratio Recording Data D...

Page 21: ...amera and remove the SD card Then turn on the camera again and set the Parking Mode setting is set to Off within the OSD menu See page 17 Video playback is really quick on my PC not consistent with th...

Reviews: