16
Attention
•Please insert the special calibration sheet included with the
scanner. Alternatively you may also use any plain white sheet of
paper sized in Letter size (8.5” x 11.69”) instead; however, the
calibration effect may not be as good as the special calibration
sheet.
2. Click Start > All Programs > Your scanner model name > Calibration Wizard.
3. Click Next from the Calibration Wizard that pops up and then click Calibrate
Now....
4. Click on the Start button to begin the calibration process.
5. The scanner pulls the calibration sheet through the scanner, which completes
this scanner calibration. After the calibration is complete, click OK and then
click Finish.
Power Save
To save power consumption, when the scanning process is finished, the
scanner light source will turn itself off and the scanner will enter a lower-power
mode.
Using the Wall Mount
You may save your desk space, and the scanner can be within each reach when
you need it any time.
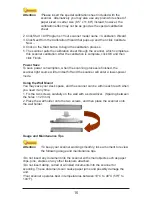
1. Fix the two screws carefully on the wall with a screwdriver. (Spacing between
the holes = 120 mm)
2. Place the wall holder onto the two screws, and then place the scanner onto
the wall holder.
Usage and Maintenance Tips
Attention
•To keep your scanner working smoothly, take a moment to review
the following usage and maintenance tips.
•Do not insert any document into the scanner with small objects such as paper
clips, pins, staples or any other fasteners attached.
•Do not insert damp, curled or wrinkled documents into the scanner for
scanning. These documents can cause paper jams and possibly damage the
unit.
•Your scanner operates best in temperatures between 10°C to 40°C (50°F to
104°F).


