

PANTONE: 445C SIZE: A5
CMOS: TM8706-367, LCD-385, BATTERY 2 x AAA
Model: C8171 WWVB
DISPLAY SYMBOLS
LCD display
INSTALLING OR REPLACING THE BATTERIES
•
Begin by opening the battery compartment cover at
the bottom of the clock.
•
Insert two AAA batteries (not included) into the battery
compartment and make sure the polarity is correct
by following the (+ or -) symbols engraved inside.
• Replace the battery whenever the display becomes
dim or difficult to read.
RADIO CONTROLLED TIME FEATURE
Once the battery is installed the clock will begin to
seek out the radio signal to update the time. This
typically takes between 5-8 minutes in good conditions.
If after eight minutes the signal has not been received,
we recommend that you set the time manually. (See
Setting the Time Manually.) After the first signal is
received, the clock will automatically seek out the
atomic clock signal at 2:00AM, 8:00AM, 2:00PM and
8:00PM, and will continue to do so each day.
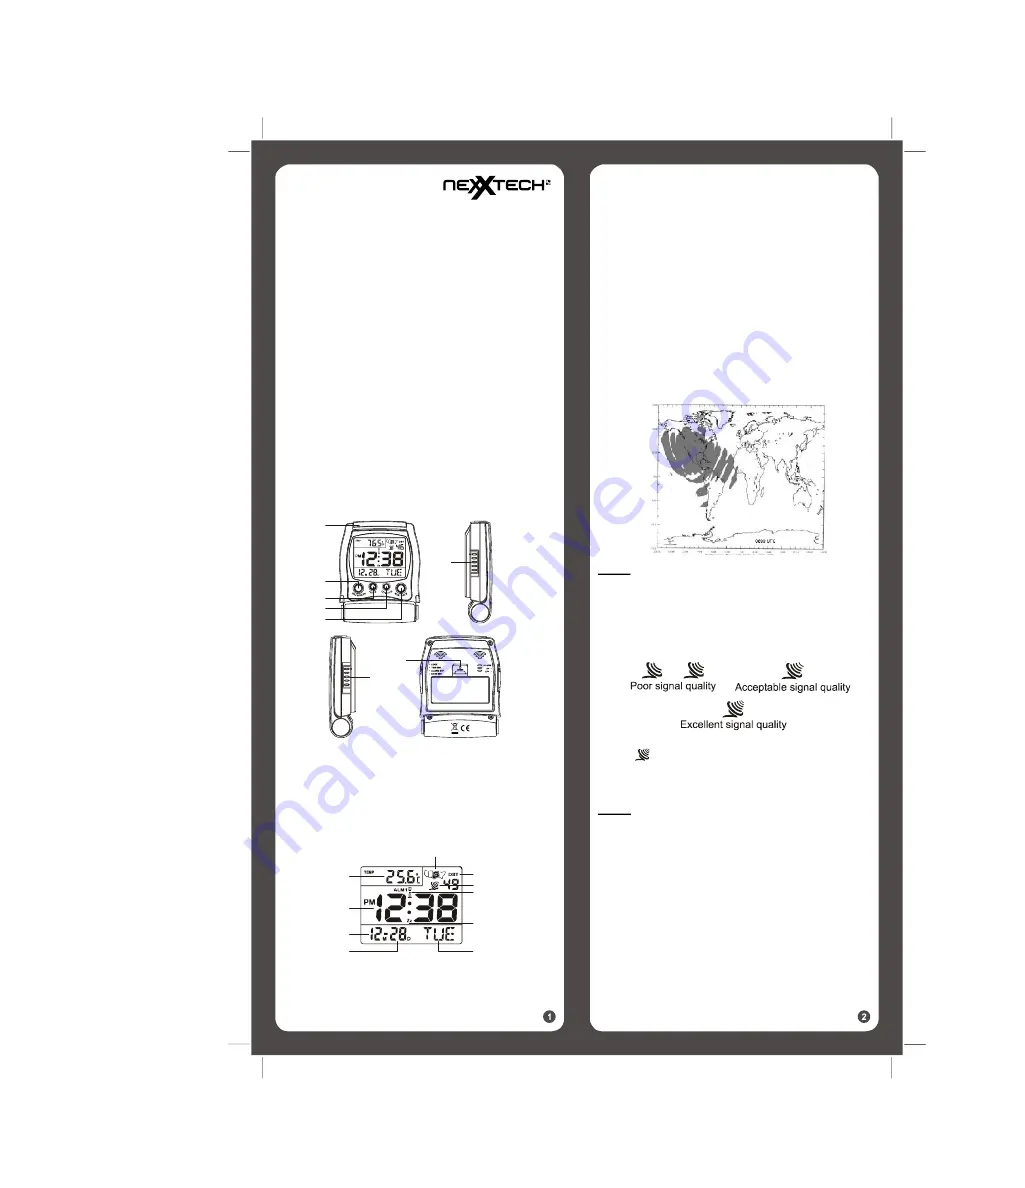
WWVB COVERAGE MAP
Note:
Radio Controlled Clock may not work in some
locations or areas.
SIGNAL STRENGTH INDICATOR
The signal indicator displays signal strength in 3 levels.
Wave segment flashing means time signals are being
received. The signal quality could be classified into three types:
If the RC clock receives signal successfully, a Sync-time
symbol
appears on LCD.
The unit has already received the time signal. Otherwise the
signal strength symbol will disappear from the LCD display.
Note:
SETTING THE TIME ZONE
•
Slide the switch on the right hand side of the clock to
the [TIME SET] position. The time zone and time will
begin to flash.
•
Press the [12/24/YR] button to set the clock to the
correct Time Zone, then the time will adjust itself to
the right time automatically.
1
2
3
4
5
6
7
10
8
9
3
4
1
5
2
6
7
8
6301461
User’s Instructions
RC TRAVEL CLOCK
Thank you for your purchase of this quality clock. The
utmost care has gone into the design and manufacture
of your clock. Please read these instructions carefully
and store them in a safe place for future reference.
FEATURES
•
Radio Controlled Accuracy - Sets Time Automatically
•
Calendar shows Month, Day & Date
• Alarm with Repeat Snooze
• E.L. Backlight for night time viewing
• Daylight savings time function (DST)
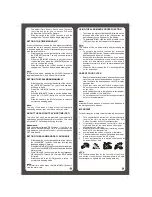
PRODUCT DESCRIPTIONS
1. SNOOZE/LIGHT bar
2. HR/MONTH button
3. ˚C/˚F button
4. 12/24/YR button
5. MIN/DATE button
6. ALARM ON/OFF select switch
7. LOCK•TIME SET•ALARM SET•DATE SET select switch
8. RESET button
1.
Be cautious of using the receiveing mode for an extended
period of time. The receiving mode will shut off
automatically after 6-12 minutes. Receiving mode
consumes more battery power resulting in reduced
battery life.
2.
In an environment with radio frequency interference, the
unit may not maintain communication. The RC function
will return to normal when interference stops.
1. Temperature window
2. Clock window
3. Date
4. Month
5. D ay of the week
6. Snooze On indicator
7. Alarm On indicator
8. Signal strength indicator
9. Daylight savings time indicator
10. Time Zone map


