Alarms
69
TemBreak
PRO
P_SE-UM-001-EN
– V1.2.0
PTA (Pre-Trip Alarm)
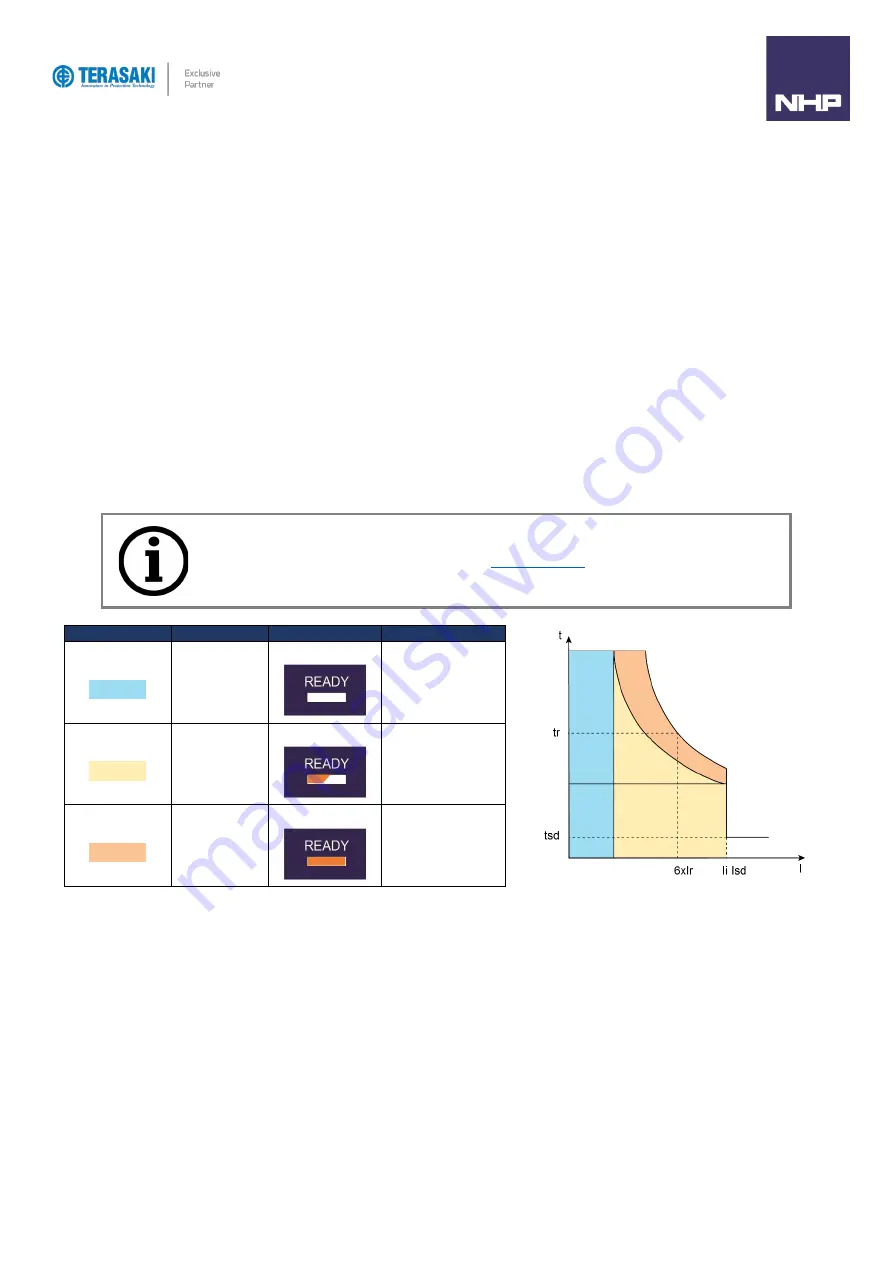
The Pre-Trip Alarm permits monitoring and early warning of overload conditions prior to an actual LTD trip. The PTA setting is defined by two parameters
which define the Pre-trip warning and Pre-trip Alarm zones and thus the behaviour of the PTA contact and status LED:
-
PTA current threshold I
p
: Threshold expressed as a percentage of I
r
and is adjustable from 60
…
95%
-
PTA time delay t
p
: Expressed as a percentage of t
r
and is adjustable from 5
…
80%
The I
p
current threshold defines the lowest current that could be considered to be within the Pre-trip warning and Pre-trip alarm zones. The t
p
time delay
threshold defines the shortest time in which the Pre-trip alarm will activate. The time delay for PTA follows the LTD protection curve and varies with current
as shown in the figure below. Lower currents in the Pre-trip zones will activate the alarm with a longer delay than higher currents.
The behaviour of the various pre-trip zones are illustrated in the figure and table below.
If the load current is less than the I
p
current threshold, then this is considered the normal load zone, and the PTA LED and contact are unaffected and
remain OFF and OPEN, respectively.
As the load current increases to at or above I
p
, the Pre-trip warning zone is entered, and is indicated by the PTA LED illuminating FLASHING orange. Whilst
in the pre-trip warning zone, the load current is monitored and characterised with thermal imaging by the OCR.
If the current remains above I
p
for an extended period of time, the Pre-trip Alarm zone is entered, and is indicated by the PTA LED illuminating SOLID
orange, and the PTA contact activating CLOSED. The time required for the Pre-trip Alarm to activate is dependent on the current value and the t
p
parameter
set, as this follows the LTD protection curve.
Pre-trip zone
Current I vs. I
p
PTA LED status
PTA Contact status
Normal load
I < I
p
OFF
OPEN
Pre-trip Warning
I ≥ I
p
FLASHING
OPEN
Pre-trip Alarm
I ≥ I
p
SOLID
CLOSED
t
p
I
p
Notice
: The use of the PTA contact requires the connection of the OAC/PTA cable to the PTA port located on
the external left-hand side of the P_SE MCCB. Refer to the
section for details on the
OAC/PTA cable.
Summary of Contents for Terasaki TemBreak PRO P SE Series
Page 106: ...106 TemBreak PRO P_SE UM 001 EN V1 2 0 Annex A Dimensions P160 Dimensions...
Page 107: ...Annex A Dimensions 107 TemBreak PRO P_SE UM 001 EN V1 2 0 P250 Dimensions...
Page 108: ...Annex A Dimensions 108 TemBreak PRO P_SE UM 001 EN V1 2 0 P400 Dimensions...
Page 109: ...Annex A Dimensions 109 TemBreak PRO P_SE UM 001 EN V1 2 0 P630 Dimensions...
Page 111: ...111 TemBreak PRO P_SE UM 001 EN V1 2 0 Annex C I2t Let Through Curves P160_SE...
Page 112: ...Annex C I2t Let Through Curves 112 TemBreak PRO P_SE UM 001 EN V1 2 0 P250_SE...
Page 113: ...Annex C I2t Let Through Curves 113 TemBreak PRO P_SE UM 001 EN V1 2 0 P400_SE...
Page 114: ...Annex C I2t Let Through Curves 114 TemBreak PRO P_SE UM 001 EN V1 2 0 P630_SE...
Page 115: ...115 TemBreak PRO P_SE UM 001 EN V1 2 0 Annex D Peak Let Through Curves P160_SE...
Page 116: ...116 TemBreak PRO P_SE UM 001 EN V1 2 0 P250_SE...
Page 117: ...117 TemBreak PRO P_SE UM 001 EN V1 2 0 P400_SE...
Page 118: ...118 TemBreak PRO P_SE UM 001 EN V1 2 0 P630_SE...
Page 121: ...121 TemBreak PRO P_SE UM 001 EN V1 2 0 This page is intentionally left blank...


