background image


 4 

Wall Mounting (optional) 

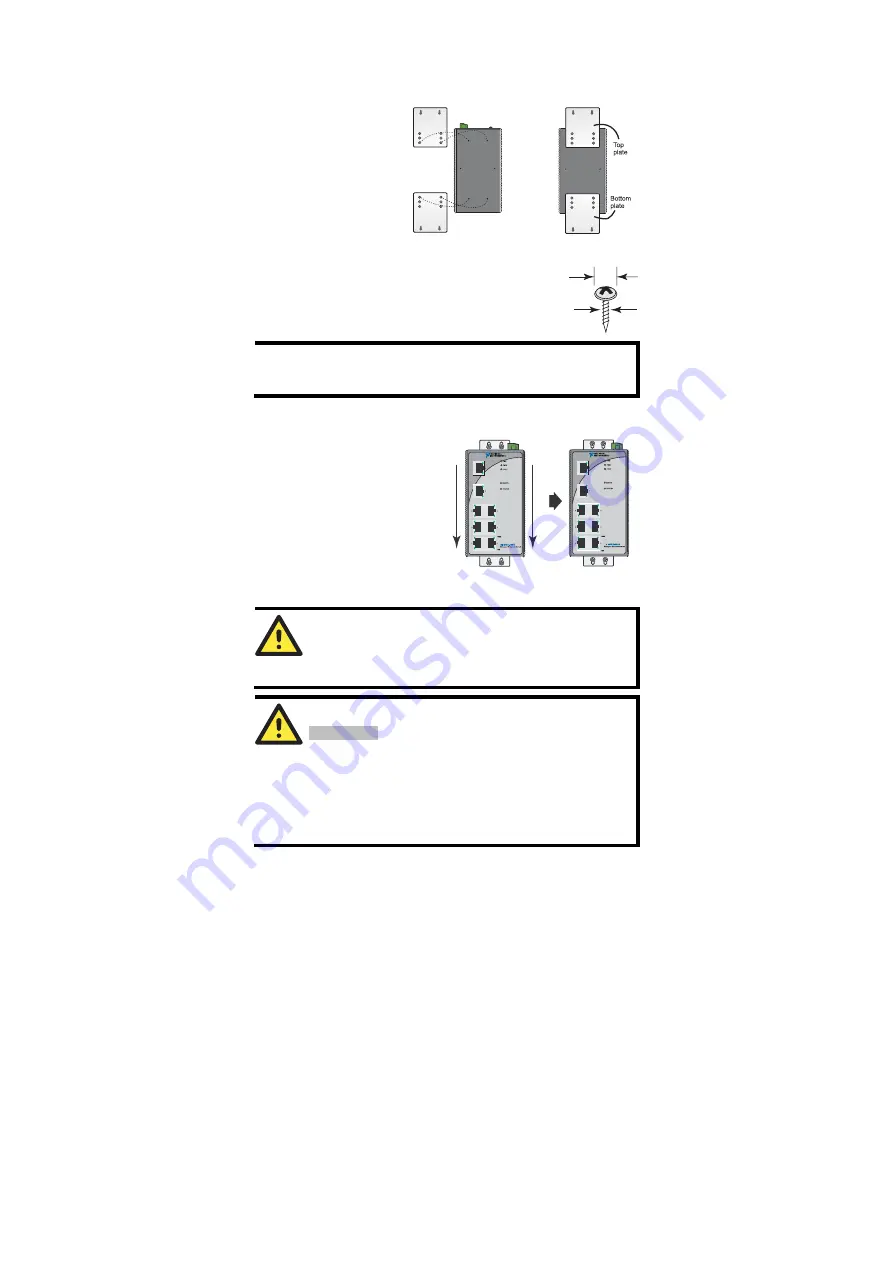
For some applications, you will find it convenient to mount the NI MES-3980 
on the wall, as shown in the following figures. 

STEP 1: 

Remove the 

aluminum DIN-Rail 
attachment plate from the NI 
MES-3980’s rear panel, and 
then attach the wall mount 
plates, as shown in the 
figures at the right.


STEP 2

Mounting the NI MES-3980 on the wall requires 4 screws. 
Use the NI MES-3980, with wall mount plates attached, as a 
guide to mark the correct locations of the 4 screws. The 
heads of the screws should be less than 6.0 mm in diameter, 
and the shafts should be less than 3.5 mm in diameter, as 
shown in the figure at the right.


6.0 mm

3.5 mm

NOTE


Before tightening the screws into the wall, make sure the screw head 
and shank size are suitable by inserting the screw into one of the 
keyhole-shaped apertures of the Wall Mounting Plates. 

Do not screw the screws in completely—leave about 2 mm to allow room for 
sliding the wall mount panel between the wall and the screws.


STEP 3:


Once the screws are fixed in 

the wall, insert the four screw heads 
through the large parts of the 
keyhole-shaped apertures, and then 
slide the NI MES-3980 downwards, 
as indicated. Tighten the four screws 
for added stability.


Wiring Requirements 


WARNING 

The power for this product is intended to be supplied by a Listed 
Power Unit, with output marked LPS, and rated to deliver 12 to 
45 VDC at a maximum of 600 mA.


WARNING 

Safety First!


Be sure to disconnect the power cord before installing and/or 
wiring your NI MES-3980. Calculate the maximum possible 
current in each power wire and common wire. Observe all 
electrical codes dictating the maximum current allowable for each 
wire size. If the current goes above the maximum ratings, the 
wiring could overheat, causing serious damage to your 
equipment.


Summary of Contents for MES-3980

Page 1: ...NI MES 3980 Hardware Installation Guide First Edition Sept 2007 P N 1802508100110...

Page 2: ...TOS DiffServ to increase determinism y Supports 802 3ad LACP for optimum bandwidth utilization y Port Trunking for optimum bandwidth utilization y RMON for efficient network monitoring and proactive c...

Page 3: ...O R T U T L A EN S NI MES 3980 ManagedEthernetSwitch MASTER COUPLE R PWR1 PWR2 FAULT 8 7 6 4 2 5 3 1 1 Grounding screw 2 Terminal block for power input PWR1 PWR2 and relay output 3 Heat dissipation or...

Page 4: ...N Rail attachment plate should already be fixed to the back panel of the NI MES 3980 when you take it out of the box If you need to reattach the DIN Rail attachment plate make sure the stiff metal spr...

Page 5: ...he keyhole shaped apertures of the Wall Mounting Plates Do not screw the screws in completely leave about 2 mm to allow room for sliding the wall mount panel between the wall and the screws STEP 3 Onc...

Page 6: ...ENTION This product is intended to be mounted to a well grounded mounting surface such as a metal panel Wiring the Relay Contact The NI MES 3980 has two sets of relay output relay 1 and relay 2 Each r...

Page 7: ...g the Digital Inputs The NI MES 3980 unit has two sets of digital inputs DI 1 and DI 2 Each DI consists of two contacts of the 6 pin terminal block connector on the NI MES 3980 s top panel The remaini...

Page 8: ...Connector RJ45 Connector Tx Tx Rx Rx Rx Rx Tx Tx Tx Tx Rx Rx Switch Port NIC Port Cable Wiring 3 1 6 2 1 3 2 6 Rx Rx Tx Tx Relay Contact The NI MES 3980 has two relay contacts located on the top pane...

Page 9: ...each DIP Switch is OFF The following table explains the effect of setting the DIP Switches to the ON positions DIP Switch Setting Description Serves no function reserved for future use On Enables the...

Page 10: ...f Power is not being supplied to power input PWR2 On When 1 a relay warning event is triggered 2 the NI MES 3980 is the Master of this Turbo Ring and the Turbo Ring is broken or 3 start up failure FAU...

Page 11: ...ng and Filtering Rate 148810 pps Processing Type Store and Forward Flow Control IEEE802 3x flow control back pressure flow control Interface RJ45 Ports 10 100BaseT X auto negotiation speed F H duplex...

Page 12: ...award winning National Instruments Web site for software drivers and updates a searchable KnowledgeBase product manuals step by step troubleshooting wizards thousands of example programs tutorials ap...

Page 13: ...opac ExpresswayAustin Texas 78759 3504USATel 512 683 0100 Worldwide Offices Australia 1800 300 800 Austria 43 662 457990 0 Belgium 32 0 2 757 0020 Brazil 55 11 3262 3599 Canada 800 433 3488 China 86 2...

Reviews: