27
POOL 11
GB
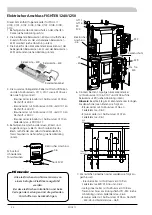
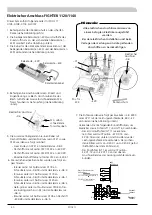
Install the temperature sensor with cable ties with the
heat conducting paste and aluminium tape.
Then insulate with supplied insulation tape.
LEK
LEK
E
Temperature sensor installation
8. Connect Actuator Shuttle valve SV4 as follows:
- Black cable (230v signal) to spring terminal –X6:1
- Brown cable (fixed phase) to spring terminal –X6:2
- Blue cable (zero) to spring terminal –X6:3
9. Connect circulation pump P8 as follows:
- Blue cable (zero) to spring terminal –X6:3
- Yellow/green cable (earth cable) to spring terminal
–X6:4
- Brown cable (phase) to spring terminal –X6:5
Sensor and communication cables must not
be placed near power cables.
Note!
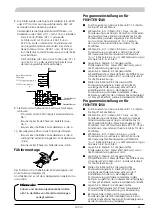
Program settings
FIGHTER 1120/1140
Program version 1.08 and earlier
■
Select service in menu 8.1.1 to gain access to all the
menus.
■
Activate pool control in menu 9.2.10 by selecting
“ON”. This activates the external circulation pump
and shows the pool setting menus. The pool sensor
must be connected to terminal X1:12-13 otherwise
a sensor alarm is displayed for the pool sensor.
■
Select the desired pool temperature in menu 1.11.1,
this temperature determines when pool heating is
stopped.
■
Select the desired connection difference in menu
1.11.2, this is the difference between the value in
menu 1.11.1 and when pool heating starts.
■
Select the desired pool charging time in menu
1.11.3, this is how long pool heating is permitted to
run. The value can be set between 5 and 60 min-
utes. When pool charging has started, it runs for at
least the time selected in this menu even if a heating
requirement arises.
Program version 1.09 and later
■
Select service in menu 8.1.1 to gain access to all the
menus.
■
Activate pool control in menu 9.2.10 by selecting
“ON”. This activates the external circulation pump
and shows the pool setting menus. The pool sensor
must be connected to terminal X1:12-13 otherwise
a sensor alarm is displayed for the pool sensor.
■
Activate pool control in menu 8.4.4 by selecting
“ON”. The allows the heat pump to heat the pool.
Select ”Off” in menu 8.4.4 to prevent pool heating,
e.g. winter time.
■
Select the desired pool temperature in menu 8.4.1,
this temperature determines when pool heating is
stopped.
■
Select the desired connection difference in menu
8.4.2, this is the difference between the value in
menu 8.4.1 and when pool heating starts.
■
Select the desired pool charging time in menu 8.4.3,
this is how long pool heating is permitted to run.
The value is adjustable between 5 and 60 minutes.
When pool charging has started, it runs for at least
the time selected in this menu even if a heating re-
quirement arises.
Summary of Contents for POOL 11
Page 2: ......
Page 16: ...14 POOL 11...
Page 30: ...28 POOL 11...
Page 44: ...42 POOL 11...
Page 45: ...43 POOL 11 Elschema SE DE GB Wiring Diagram Elektrischer Schaltplan...
Page 47: ...45 POOL 11 Elschema Wiring Diagram Elektrischer Schaltplan FIGHTER 1235 1240 1250...
Page 48: ...46 POOL 11 Elschema Wiring Diagram Elektrischer Schaltplan FIGHTER 1235 1240 1250...
Page 49: ...47 POOL 11 Elschema Wiring Diagram Elektrischer Schaltplan FIGHTER 1220 1230...
Page 50: ...48 POOL 11 Elschema Wiring Diagram Elektrischer Schaltplan FIGHTER 1120 1130 1135 1140...
Page 51: ......


