background image

Italiano

30


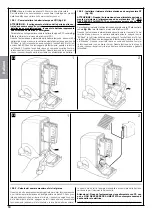
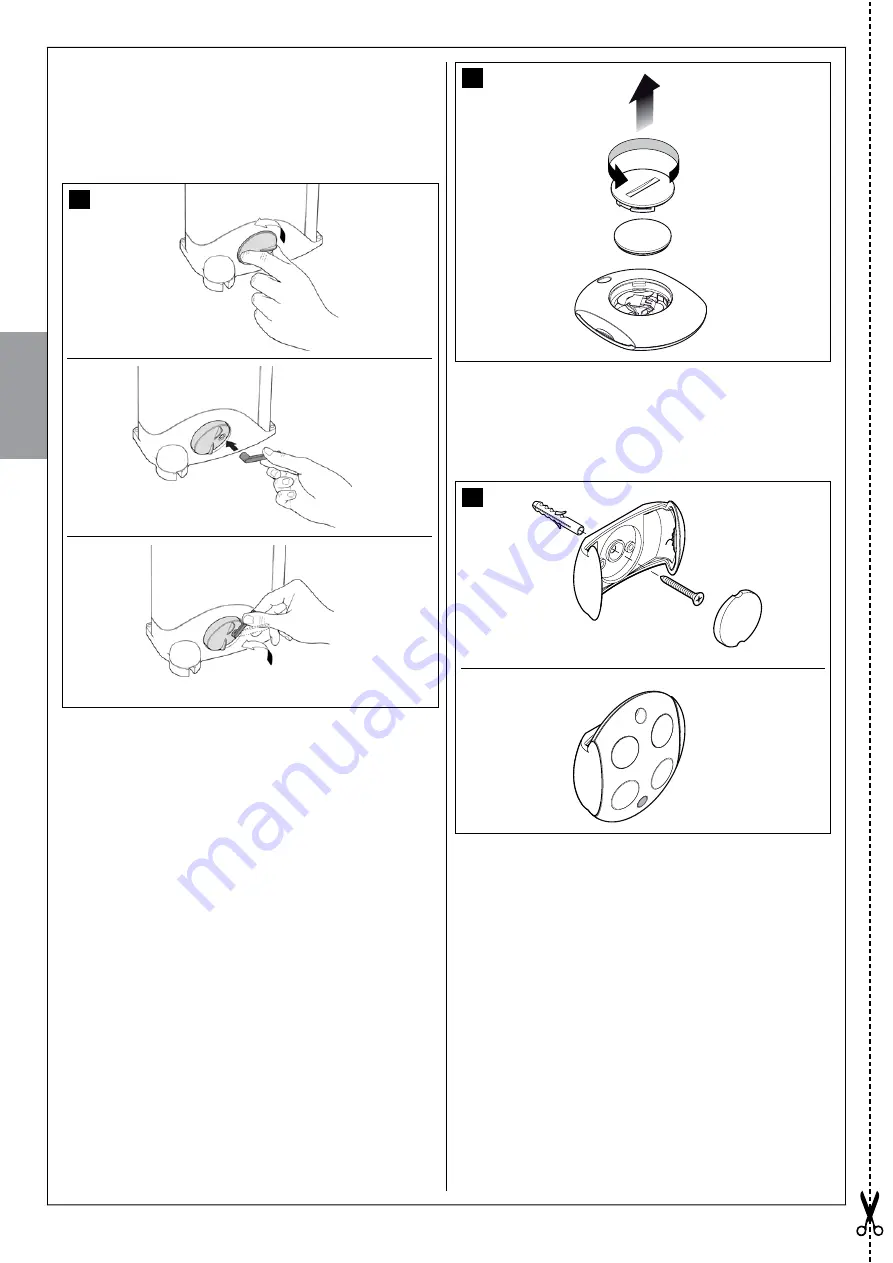
il rilascio del cancello.

04.

 A questo punto è possibile muovere manualmente il cancello.

05.

 Per ripristinare la funzionalità dell’automatismo, ruotare la 

chiave in senso orario e muovere contemporaneamente il 

cancello fino a sentirne l’aggancio.

06.

 Togliere la chiave e richiudere il coperchio coprisblocco ruo

-

tandolo in senso orario.

11.4 – 

Interventi di manutenzione concessi all’utiliz-

zatore

Di seguito sono elencati gli interventi che l’utilizzatore deve ese

-

guire periodicamente.

• Utilizzare un panno leggermente umido (non bagnato) per 

la pulizia superficiale dei dispositivi. Non utilizzare sostanze 

contenenti alcool, benzene, diluenti o altre sostanze infiam

-

mabili. L’uso di tali sostanze potrebbe danneggiare i dispo

-

sitivi e generare incendi o scosse elettriche.
•  Togliere  l’alimentazione  all’automatismo  prima  di  pro

-

cedere  alla  rimozione  di  foglie  e  sassi  per  impedire  che 

qualcuno possa azionare il portone.

11.5 – 

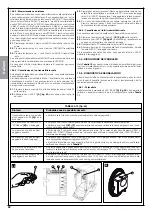
Sostituzione pila del telecomando (fig. 50)

Quando la pila si scarica, il trasmettitore riduce sensibilmente la 

portata. Se quando si preme un tasto, il led L1 si accende e subi

-

to si spegne affievolendosi, significa che la pila è completamente 

scarica e va subito sostituita.
Se invece il led L1 si accende solo per un istante, significa che 

la pila è parzialmente scarica; occorre tener premuto il tasto per 

almeno mezzo secondo perché il trasmettitore possa tentare di 

inviare il comando. Comunque, se la pila è troppo scarica per 

portare a termine il comando (ed eventualmente attendere la 

risposta), il trasmettitore si spegnerà con il led L1 che si affievo

-

lisce. In questi casi, per ripristinare il regolare funzionamento del 

trasmettitore occorre sostituire la pila scarica con una dello stes

-

so tipo, rispettando la polarità indicata. Per la sostituzione della 

pila procedere come mostrato in 

fig. 50

.

Le  pile  contengono  sostanze  inquinanti:  non  gettarle  nei 

rifiuti comuni ma utilizzare i metodi previsti dai regolamenti 

locali.

11.6 – 

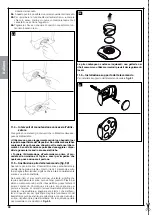
Installazione supporto del telecomando

Per installare il supporto del telecomando vedere 

fig. 51

.

49

51

50

Summary of Contents for MhouseKit SL10S

Page 1: ...tallation et l utilisation EN Instructions and warnings for installation and use IT Istruzioni ed avvertenze per l installazione e l uso PL Instrukcje i ostrze enia do instalacji i u ytkowania Ouvre p...

Page 2: ......

Page 3: ...DE COMMANDE 10 PROGRAMMATION PHASE 7 14 7 1 BRANCHEMENT AU SECTEUR 14 7 2 V RIFICATIONS INITIALES 14 7 3 RECONNAISSANCE DES DISPOSITIFS CONNECT S 14 7 4 V RIFICATION DU MOUVEMENT DU VANTAIL DU PORTAI...

Page 4: ...vues par la Directive 2006 42 CE Directive Machines et en particulier par les normes EN 12445 EN 12453 EN 12635 e EN 13241 1 qui permettent de d clarer la conformit pr sum e de l automatisme De ce fa...

Page 5: ...effectuer dans sa vie 115 000 cycles environ syst me ECSbus De plus la logique de commande peut tre alimen t e par le secteur lectrique 230 V ou en alternative par le syst me pho tovolta que PF de la...

Page 6: ...ans l installation tablir la position approximative o installer chaque dispositif pr vu dans l installation en s inspirant des fig 3 et 4 La fig 3 montre une installation r alis e avec le pr sent prod...

Page 7: ...Fran ais 7 2 300 163 295 84 4 E D A F D B D C D 3 i d e g h a d b b c f l 1 A C D E F B G...

Page 8: ...e 16 Fixer les pattes de fin de course a porter manuellement le vantail en position d ouverture en s arr tant au moins 2 3 cm de la but e m canique b faire coulisser la patte de fin de course sur la c...

Page 9: ...Fran ais 9 5 7 8 9 10 0 50 moteur fix gauche moteur fix droite 6 36 50 0 50 50...

Page 10: ...Fran ais 10 11 12 14 13 170 170 1 200 200...

Page 11: ...Fran ais 60 11 16 18 19 17 10 0 50 0 50 10 moteur fix gauche moteur fix droite 15 A...

Page 12: ...rtie des c bles fixation verticale A ou fixation horizontale B 04 Percer le mur avec une perceuse percussion et un foret de 6 mm et introduire dans le trou des chevilles de 6 mm 05 Fixer le fond avec...

Page 13: ...Fran ais 21 A B 6 mm x4 A B A B A B B B B 1 2 3 4 1 2 3 4 20 B C A 13 5 D E F 6...

Page 14: ...Fran ais 14 22 23 21 A B A B A B A B A B A B 5 6 7 8 9 11 12 10 A B A B 6 mm x4 A A A A 4...

Page 15: ...Fran ais 15 24 25 TX RX 26 FL100 PH100 KS100 A 28 27 A B...

Page 16: ...les bornes ECSBus et STOP 01 Sur la logique de commande maintenir la touche P2 A fig 31 enfonc e pendant au moins 3 secondes puis rel cher la touche 02 Attendre quelques secondes que la logique de com...

Page 17: ...Fran ais 17 31 B A C 34 32 A A B 35 A B 30 A B 33 T1 T2 T3 T4...

Page 18: ...ersonnes s ils taient jet s dans la nature Comme l indique le symbole ci contre il est interdit de jeter ce produit avec les ordures m nag res Par cons quent utiliser la m thode de la collecte s lecti...

Page 19: ...n cessaire p riodiquement 10 1 2 V rification des r glages avec un metteur radio Avec un metteur radio m moris en mode 1 il est possible de v rifier tout moment les valeurs s lectionn es pour chaque...

Page 20: ...atisme est aliment par la batterie tampon 60 secondes apr s la fin d une man uvre la logique de commande automatiquement teint la sortie ECSbus et tous les dispositifs qui y sont connect s la sortie F...

Page 21: ...ui sert de magasin d nergie et du fait que l accumulateur permet l autonomie de l automatisme m me pendant de longues p riodes de mauvais temps quand le panneau photovolta que produit tr s peu d nergi...

Page 22: ...tions de s curit seuls les dispositifs avec sor tie r sistance constante 8 2 k garantissent la cat gorie 3 de s curit aux pannes Comme pour le ECSBus la logique de commande reconna t le type de dispos...

Page 23: ...effectuant la proc dure d crite dans le paragraphe 10 4 4 Effacement d un metteur radio 02 Presser la touche P1 B fig 43 sur la logique de commande un nombre de fois quivalant la commande d sir e suiv...

Page 24: ...fin attendre qu elle mette 3 clignotements 03 Rel cher la touche P1 exactement durant le troisi me clignotement 04 Attendre pendant environ 4 s la fin de la phase d effacement durant laquelle la LED P...

Page 25: ...nde 8 clignotements 9 clignotements pause de 1 seconde 9 clignotements tat Erreur sur l ECSbus Intervention d une photocellule Intervention du limiteur de la force moteur Intervention de l entr e de S...

Page 26: ...risation en cours C est normal durant la m morisation en mode 1 qui dure au maximum 10 s C est normal durant la m morisation en mode 2 qui dure au maximum 10 s Effacement d un metteur radio effectu co...

Page 27: ...kg et avec une longueur de tablier jusqu 5 m Les caract ristiques de sa structure permettent de l utiliser sur des portails jusqu 550 kg et avec une longueur de tablier jusqu 7 m 230 V 10 15 50 60Hz...

Page 28: ...t aux bornes FLASH et ANTENNE des logiques de commande pour automatisme de la gamme Mhouse 20 50 C Non Horizontal sur le plat ou vertical au mur IP55 120 x 60 h 170 mm 285 g 28 D tecteur de pr sence p...

Page 29: ...omatiques Modulation cod e AM OOK radio 433 92 MHz Code variable rolling code avec code 64 Bits 18 milliards de milliards de combinaisons 4 chaque touche peut tre utilis e pour les diff rentes command...

Page 30: ...MENT EUROP EN ET DU CONSEIL du 15 d cembre 2004 concernant le rapproche ment des l gislations des tats membres relatives la compatibilit lectromagn tique et qui abroge la directive 89 336 CEE selon le...

Page 31: ...ourner dans le sens antihoraire le couvercle de couverture du d brayage jusqu faire co ncider le trou avec l axe de d brayage 02 Introduire la cl dans l axe de d brayage 03 Tourner la cl dans le sens...

Page 32: ...porte puisse tre actionn e par quelqu un d autre 11 5 Remplacement de la pile de l metteur fig 50 Quand la pile s puise la port e de l metteur est sensiblement r duite Si quand on appuie sur une touch...

Page 33: ...ences essentielles des directives suivantes 2006 42 CE Directive Machines 2004 108 CEE Directive sur la compatibilit lectromagn tique 2004 95 CEE Directive Basse Tension 1999 5 CE Directive R TTE et c...

Page 34: ......

Page 35: ...LIGHT 10 6 4 ELECTRICAL CONNECTION TO CONTROL UNIT 10 PROGRAMMING STEP 7 14 7 1 POWER SUPPLY CONNECTION 14 7 2 INITIAL CHECKS 14 7 3 LEARNING CONNECTED DEVICES 14 7 4 CHECKING GATE LEAF MOVEMENT 14 7...

Page 36: ...ting commissioning and maintenance operations must be performed exclusively by a qualified and skilled technician All preliminary set up installation and programming operations may be performed by per...

Page 37: ...a leaf length of 3 5 m with weight of 250 kg for example in a location near the sea Table 1 states the severity index values for this type of installation 10 Leaf length 20 Leaf weight and 15 Presence...

Page 38: ...e with 2 internal electrical wires Connection of several devices can be in the configuration cascade star or the latter two combined STEP 4 4 1 PRELIMINARY CHECKS FOR INSTALLATION 4 1 1 Establish the...

Page 39: ...English 5 2 300 163 295 84 4 E D A F D B D C D 3 i d e g h a d b b c f l 1 A C D E F B G...

Page 40: ...kets as follows a manually move the leaf to the opening position leaving a distance of at least 2 3 cm from the mechanical end stop b slide the travel limit bracket on the rack in the opening directio...

Page 41: ...English 7 5 7 8 9 10 0 50 motor fixed on left motor fixed on right 6 36 50 0 50 50...

Page 42: ...English 8 11 12 14 13 170 170 1 200 200...

Page 43: ...English 9 18 19 60 17 10 0 50 0 50 10 motor fixed on left motor fixed on right 15 A 16...

Page 44: ...ng the base as a reference and ensuring that the hole on the base is aligned with the cable outlet vertical fixture A or horizontal fixture 04 Use a percussion drill to drill the wall with a 6 mm tip...

Page 45: ...English 11 21 A B 6 mm x4 A B A B A B B B B 1 2 3 4 1 2 3 4 5 20 6 B C A D E F...

Page 46: ...English 12 22 23 21 A B A B A B A B A B A B 5 6 7 8 9 11 12 10 A B A B 6 mm x4 A A A A 4...

Page 47: ...English 13 24 25 TX RX 26 FL100 PH100 KS100 A 28 27 A B...

Page 48: ...ected on the terminals ECSBus and STOP 01 On the control unit press and hold P2 A fig 31 for at least 3 sec onds then release 02 Wait a few seconds for the control unit to complete the device learn in...

Page 49: ...English 15 31 B A C 34 32 A A B 35 A B 30 A B 33 T1 T2 T3 T4...

Page 50: ...thods envisaged by current legislation in your area or return the product to the retailer when purchasing a new version Caution Local legislation may envisage serious fines in the event of abusive dis...

Page 51: ...seconds complete the action as specified in Table 6 according to the parameter to be modified Example to set the pause time at 40 s 01 Press and hold the keys T1 and T2 simultaneously for at least 5 s...

Page 52: ...ttery 60 seconds after a manoeuvre is completed the control unit automatically switches off the output ECSbus and all connected devices output Flash and all leds with the exception of the ECSbus led w...

Page 53: ...same for all days of the week Considering the presence of the battery which acts as an energy storage depot and the fact that the battery enables automation autonomy also for long periods of bad weat...

Page 54: ...ly the control unit gives a STOP command when it detects a variation with respect to the learned state 10 3 3 Recognition of other devices The learning operation of the devices connected to the ECSBus...

Page 55: ...sure Internal photocell h 100 cm triggered on closure Single photocell that covers the entire automation and is triggered on closure and opening Photocell Jumpers A B C G D Internal photocell h 50 cm...

Page 56: ...en off and then flash 3 times 03 Release key P1 precisely when the LED flashes the third time 04 Wait about 4 s for deletion to be completed during which the LED P1 will emit quick flashes If the proc...

Page 57: ...a command if the condition persists it means there is a serious fault and the electronic board must be replaced Check the type of command that is always present for example it could be a command from...

Page 58: ...n underway This is normal during memorisation mode 1 which lasts maximum 10 s This is normal during memorisation mode 2 which lasts maximum 10 s Deletion of a transmitter successfully completed Comman...

Page 59: ...surface with the specific fixing plate IP44 300 x 163 h 295 mm 7 5 kg 300 x 163 h 295 mm 8 5 kg With GTX4 transmitters the control unit is set to receive one or more of the following commands OPEN Par...

Page 60: ...of address assignment Ambient operating temperature Use in particularly acid saline or potentially explosive atmospheres Assembly Protection rating Dimensions weight Presence detector for automations...

Page 61: ...automations for automatic gates and doors Encoded AM OOK radio modulation 433 92 MHz 64 Bit rolling code 18 billion billion combinations 4 each key can be used for different commands of the same cont...

Page 62: ...MENT AND COUNCIL of 15th December 2004 regarding the approxi mation of member state legislation related to electromagnetic compatibility repealing directive 89 336 EEC according to the following harmo...

Page 63: ...until it is completely open and has come to a standstill Do not allow children to play near the door or with the controls Keep the transmitters away from children Suspend the use of the automation imm...

Page 64: ...d significantly When a key is pressed if led L1 illuminates and then immediately fades and turns off this means that the battery is completely discharged and must be replaced immediately Otherwise if...

Page 65: ...N Year of manufacture Location address Complies with the essential requirements of the following directives 2006 42 CE Machinery Directive 2004 108 CEE Electromagnetic compatibility directive 2006 95...

Page 66: ......

Page 67: ...ENTO ELETTRICO ALLA CENTRALE 10 PROGRAMMAZIONE PASSO 7 14 7 1 ALLACCIAMENTO DELL ALIMENTAZIONE 14 7 2 VERIFICHE INIZIALI 14 7 3 APPRENDIMENTO DEI DISPOSITIVI COLLEGATI 14 7 4 VERIFICARE IL MOVIMENTO D...

Page 68: ...men to del prodotto ATTENZIONE Secondo la pi recente legislazione europea la realizzazione di una porta o di un cancello automatico deve rispettare le norme previste dalla Direttiva 2006 42 CE Diretti...

Page 69: ...pro gettuali e dei risultati di prove effettuate su prototipi Infatti essendo una stima non rappresenta alcuna garanzia sull effettiva durata del prodotto Esempio del calcolo di durabilit automatizzaz...

Page 70: ...gurazione a cascata a stella o una mista tra le prime due dine Questi indici devono essere sommati fra loro per ricavare l indice di gravosit complessivo che in questo caso 45 Con il valore trovato 45...

Page 71: ...Italiano 5 2 300 163 295 84 4 E D A F D B D C D 3 i d e g h a d b b c f l 1 A C D E F B G...

Page 72: ...e l anta in posizione di apertura lasciando almeno una distanza di 2 3 cm dall arresto meccanico b far scorrere la staffa di finecorsa sulla cremagliera nel senso dell apertura fino a quando intervien...

Page 73: ...Italiano 7 5 7 8 9 10 0 50 motore fissato a sinistra motore fissato a destra 6 36 50 0 50 50...

Page 74: ...Italiano 8 11 12 14 13 170 170 1 200 200...

Page 75: ...Italiano 9 18 19 60 17 10 0 50 0 50 10 motore fissato a sinistra motore fissato a destra 15 A 16...

Page 76: ...n modo che il foro sul fondo corrisponda all uscita cavi fis saggio verticale A oppure fissaggio orizzontale B 04 Forare il muro con un trapano a percussione con una punta da 6 mm ed inserirvi i tasse...

Page 77: ...Italiano 11 21 A B 6 mm x4 A B A B A B B B B 1 2 3 4 1 2 3 4 20 B C A 5 D E F 6...

Page 78: ...Italiano 12 22 23 21 A B A B A B A B A B A B 5 6 7 8 9 11 12 10 A B A B 6 mm x4 A A A A 4...

Page 79: ...Italiano 13 24 25 TX RX 26 FL100 PH100 KS100 A 28 27 A B...

Page 80: ...lta terminate le verifiche iniziali necessario far riconoscere alla centrale i dispositivi ad essa collegati sui morsetti ECSBus e STOP 01 Sulla centrale mantenere premuto il tasto P2 A fig 31 per min...

Page 81: ...Italiano 15 31 B A C 34 32 A A B 35 A B 30 A B 33 T1 T2 T3 T4...

Page 82: ...r lo smaltimento secondo i metodi previsti dai regolamenti vigenti sul vostro territorio oppure riconsegna re il prodotto al venditore nel momento dell acquisto di un nuovo prodotto equivalente Attenz...

Page 83: ...rasmettitore radio per almeno 5 s 02 Rilasciare i due tasti 03 Entro tre secondi eseguire l azione prevista dalla Tabella 6 in base al parametro da modificare Esempio per regolare il tempo pausa a 40...

Page 84: ...PR1 vedere fig 38 e fare riferimento al manuale istruzioni di PR1 Quando l automazione alimentata dalla batteria tampone trascorsi 60 s dal termine di una manovra la centrale automaticamente spegne l...

Page 85: ...o la presenza dell accumulatore che agisce da magazzino di energia e considerando che l accumulatore consente l autonomia dell automazione anche per lunghi periodi di maltempo quando il pannello fotov...

Page 86: ...o collegato all ingresso STOP durante la fase di apprendimento successivamente viene provocato uno STOP quando si verifica una qualsiasi variazione rispetto allo stato appreso 10 3 3 Apprendimento alt...

Page 87: ...asto T2 Comando Solo Chiude Automazione N 1 Tasto T3 Comando OPEN Automazione N 2 Tasto T4 Comando OPEN Automazione N 3 43 B A TABELLA B 1 volta Comando Open 2 volte Comando Apertura pedonale 3 volte...

Page 88: ...enda poi aspettare che si spenga quindi aspettare che emetta 3 lampeggi 03 Rilasciare il tasto P1 esattamente durante il terzo lampeggio 04 Attendere per circa 4s il termine della fase di cancellazion...

Page 89: ...iprovare a dare un comando se lo stato rimane potrebbe esserci un guasto grave ed occorre sostituire la scheda elettronica Verificare la natura del comando sempre presente ad esem pio potrebbe essere...

Page 90: ...apprendimento dei dispositivi collegati Indica che in corso la fase di ricerca dei dispositivi collegati che dura al massimo qualche secondo LED STOP B Spento Acceso Stato Intervento dell ingresso di...

Page 91: ...fino a 400 kg e lunghezza dell anta fino a 5 m Le caratteristiche strutturali lo rendono adatto all uso su cancelli con peso fino a 550 kg e lunghezza dell anta fino a 7 m 230 V 10 15 50 60Hz 120 V 10...

Page 92: ...vi Possibilit di indirizzamento Temperatura ambientale di funzionamento Utilizzo in atmosfera acida sali na o potenzialmente esplosiva Montaggio Grado di protezione Dimensioni peso 26 Rilevatore di pr...

Page 93: ...cancelli e portoni automatici Modulazione codificata AM OOK radio 433 92 MHz Rolling code con codice a 64 Bit 18 miliardi di miliardi di combinazioni 4 ogni tasto pu essere utilizzato per i diversi co...

Page 94: ...DEL CONSIGLIO del 15 dicembre 2004 concernente il ravvici namento delle legislazioni degli Stati membri relative alla compatibilit elettromagnetica e che abroga la direttiva 89 336 CEE secondo le segu...

Page 95: ...one non sia completamente aperto e fermo Non lasciare che i bambini giochino in prossimit del por tone o con i comandi dello stesso Tenere i trasmettitori lontano dai bambini Sospendere immediatamente...

Page 96: ...5 Sostituzione pila del telecomando fig 50 Quando la pila si scarica il trasmettitore riduce sensibilmente la portata Se quando si preme un tasto il led L1 si accende e subi to si spegne affievolendos...

Page 97: ...fabbricazione Ubicazione indirizzo Soddisfa i requisiti essenziali delle seguenti direttive 2006 42 CE Direttiva Macchine 2004 108 CEE Direttiva sulla compatibilit elettromagnetica 2006 95 CEE Diretti...

Page 98: ......

Page 99: ...YCZNE DO CENTRALI 10 PROGRAMOWANIE KROK 7 14 7 1 POD CZENIE ZASILANIA 14 7 2 KONTROLE WST PNE 14 7 3 ROZPOZNAWANIE DO CZONYCH URZ DZE 14 7 4 KONTROLA RUCH W SKRZYD A BRAMY 14 7 5 KONTROLA NADAJNIK W R...

Page 100: ...ne instrukcje niniejszy podr cznik nale y zacho wa na wypadek ewentualnej konserwacji lub utylizacji produktu UWAGA Zgodnie z najnowszymi przepisami unijnymi reali zacja drzwi lub bram automatycznych...

Page 101: ...szacowywana jest na podstawie oblicze projektowych i wynik w test w wykonanych na prototypach B d c zatem tylko warto ci szacunkow nie jest jednoznaczn gwarancj rze czywistej trwa o ci urz dzenia Przy...

Page 102: ...ala od ruchomych cz ci automatyki na minimalnej wysoko ci 1 5 m od ziemi w miejscu niedost pnym dla os b postronnych 4 kaskadowe w gwiazd mieszane 50 000 100 000 150 000 200 000 250 000 300 000 WYKRES...

Page 103: ...5 2 300 163 295 84 4 E D A F D B D C D 3 i d e g h a d b b c f l 1 A C D E F B G...

Page 104: ...aniczniki kra cowe a przesun r cznie skrzyd o bramy do pozycji otwarcia pozosta wiaj c przynajmniej 5 cm wolnej przestrzeni od odbojnika mecha nicznego b przesun ogranicznik po z batce w kierunku otwa...

Page 105: ...7 5 7 8 9 10 0 50 si ownik przymocowany z lewej strony si ownik przymocowany z prawej strony 6 36 50 0 50 50 Polski...

Page 106: ...8 11 12 14 13 170 170 1 200 200 Polski...

Page 107: ...9 16 18 19 60 17 10 0 50 0 50 10 si ownik przymocowany z lewej strony si ownik przymocowany z prawej strony 15 A Polski...

Page 108: ...taw jako punkt odniesienia aby otw r na podstawie pokrywa si z wyj ciem przewod w mocowanie pionowe A lub poziome B 04 Wykona w murze otwory u ywaj c wiertarki udarowej z wiert em o rednicy 6 mm a nas...

Page 109: ...11 21 A B 6 mm x4 A B A B A B B B B 1 2 3 4 1 2 3 4 20 B C A 5 D E F 6 Polski...

Page 110: ...12 22 23 21 A B A B A B A B A B A B 5 6 7 8 9 11 12 10 A B A B 6 mm x4 A A A A 4 Polski...

Page 111: ...13 24 25 TX RX 26 FL100 PH100 KS100 A 28 27 A B Polski...

Page 112: ...ez co najmniej 3 sekundy przycisk P2 A rys 31 na centrali a nast pnie zwolni go 02 Poczeka kilka sekund a centrala uko czy rozpoznawanie urz dze 03 Po zako czeniu rozpoznawania dioda STOP B rys 31 pow...

Page 113: ...15 31 B A C 34 32 A A B 35 A B 30 A B 33 T1 T2 T3 T4 Polski...

Page 114: ...samo rodowisko jak i na zdrowie ludzkie Jak wskazuje symbol obok zabrania si wyrzucania niniej szego produktu razem z odpadami domowymi W celu usuni cia produktu nale y zatem przeprowadzi zgodnie z lo...

Page 115: ...nd 01 Wcisn r wnocze nie na przynajmniej 5 s przyciski T1 i T2 rys 37 na nadajniku 02 Zwolni oba przyciski 03 W ci gu trzech sekund wykona dzia anie opisane w tabeli 6 w zale no ci od modyfikowanego p...

Page 116: ...utomatyka zasilana jest przez akumulator awaryjny po up ywie 60 s od momentu zako czenia manewru centrala automatycznie wy cza wyj cie ECSbus oraz wszystkie pod czone do niego urz dzenia wyj cie Flash...

Page 117: ...dla wszystkich dni tygodnia Ze wzgl du na obecno akumulatora pe ni cego funkcj magazynu energii oraz na fakt e aku mulator ten umo liwia autonomiczne dzia anie automatyki tak e przy d u gich okresach...

Page 118: ...awania Ka da zmiana wzgl dem zapami tanego stanu powoduje wydanie polecenia STOP 10 3 3 Rozpoznawanie innych urz dze Zwykle operacja rozpoznawania urz dze pod czonych do ECSBus i do wej cia STOP jest...

Page 119: ...przycisku mo na przypisa dowolne z czterech polece Krok po kroku Otwarcie cz ciowe Tylko otw rz i Tylko zamknij Tryb 2 wymaga oddzielnego wczytania ka dego przycisku nadajnika 01 Je eli wczytywany na...

Page 120: ...a P1 A rys 43 za wieci si po chwili zga nie a nast pnie wykona 3 kr tkie migni cia 3 Zwolni przycisk P1 dok adnie podczas trzeciego migni cia 4 Zaczeka oko o 4 s na zako czenie procesu kasowania W tym...

Page 121: ...polecenie Je li nic si nie zmienia mo e si okaza e jest to powa na usterka i wymaga wymiany p yty elektronicznej Sprawdzi rodzaj trwaj cego polecenia na przyk ad mo e to by polecenie wydane przez zeg...

Page 122: ...ni od 1 do 4 5 szybkich migni 1 wolne migni cie 3 wolne migni cia 5 wolnych migni Status Wszystko OK Wczytywanie w Trybie 1 Wczytywanie w Trybie 2 Kasowanie OK B dne polecenie Wczytywanie OK Kasowanie...

Page 123: ...ym zasolonym lub potencjalnie wybuchowym Monta Stopie ochrony Wymiary ci ar Mo liwo zdalnego sterowania Ilo mo liwych do wczytania nadajnik w GTX4 SL1SC SL10SC Elektromechaniczny si ownik do automatyz...

Page 124: ...cych warunk w atmosferycznych Urz dzenie mo na po czy tylko do sieci ECSBus z kt rej pobiera ono zasilanie elektryczne i do kt rej wysy a sygna y wyj ciowe 1 jednostka ECSBus Do 20 m nale y przestrzeg...

Page 125: ...ch Modulacja radiowa fali no nej AM OOK 433 92 MHz System Rolling code kod zmienny 64 Bit 18 trylion w kombinacji 4 ka dy przycisk mo e zosta przypisany do r nych polece tej samej centrali lub sterowa...

Page 126: ...108 WE z dnia 15 grudnia 2004 roku w sprawie ujednolicenia prawodawstwa pa stw cz onkowskich w zakresie kompatybilno ci elektromagnetycznej znosz ca dyrektyw 89 336 EWG zgodnie z nast puj cymi normam...

Page 127: ...owy jest ju do u ytku a jego cztery przyciski maj nast puj ce funkcje rys 47 Tabela do wype nienia przez osob kt ra programowa a sys tem KROK 11 Zaleca si przechowywanie instrukcji i udost pnienie jej...

Page 128: ...ia pr dem elektrycznym Przed przyst pieniem do usuwania li ci i kamieni od czy zasilanie aby uniemo liwi przypadkowe uruchomie nie bramy Nale y wykonywa okresowe przegl dy instalacji a w szczeg lno ci...

Page 129: ...006 42 WE Dyrektywa Maszynowa 2004 108 EWG Dyrektywa o kompatybilno ci elektromagnetycznej 2006 95 EWG Dyrektywa niskonapi ciowa 1999 5 WE Dyrektywa w sprawie urz dze radiowych i ko cowych urz dze tel...

Page 130: ......

Page 131: ......

Page 132: ...toirement notre Service Apr s Vente par t l phone au ou par email nice services nicefrance fr Merci de ne pas retourner le produit en magasin Dzia Obs ugi Klienta Polsce tel 48 22 759 40 00 mhouse mho...

Reviews: