EN
4
– English
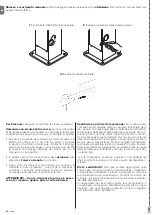
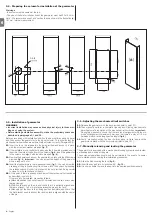
3.4 - Preparing the column for installation of the gearmotor
Warnings
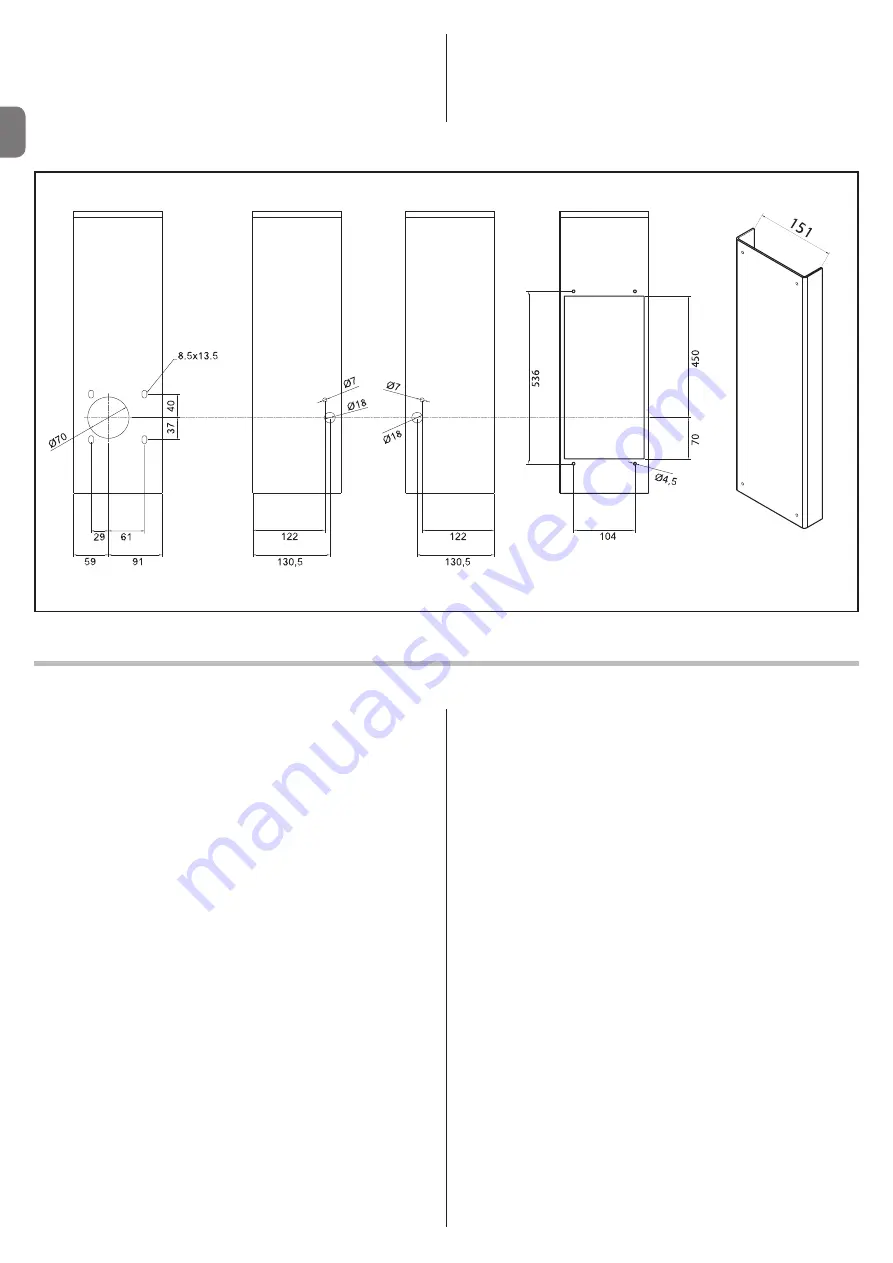
- the column must be sealed at the top.
- The size of the hole for introduction of the gearmotor must be 520 x134 mm
Note – We recommend use of a lid such as the one shown in the illustration (
a
):
151 mm, internal measurement.
(
a
)
3.5 - Installation of gearmotor
WARNINGS
• Incorrect installation may cause serious physical injury to those wor-
king on or using the system.
• Before starting automation assembly, make the preliminary checks as
described in paragraphs 3.1 and 3.2
.
Before proceeding with installation, position the door halfway along its travel
and then anchor the gearmotor to the base (column). This ensures that the
mechanical limit switches are automatically adjusted correctly (Paragraph 3.6).
01.
Insert the lid on the release into the hole provided and anchor it in place
with the screw and washer provided (
fig. 3
)
02.
If the installation is not sufficiently easy, use the 2 dowels provided and fit
them into the slots at the bottom of the column (
fig. 4
); insert the gearmotor
in the column and align it with the slots provided (
fig. 5
);
03.
Remove the dowels and anchor the gearmotor in place with the M8 screws
provided (
fig. 6
).
Important
– You can adjust the height of the gearmotor
within a range of 5 mm;
04.
Insert the triangular pin in the release shaft seat (
fig. 7
). You can adjust the
overhang of the pin by adapting it to column width. Then check by inserting
the release wrench. Anchor it in place with the nut provided, being careful
to close it on the flat surface of the pin.
05.
At this point, if there is already a rack, adjust the mechanical limit switches
as described in point 3.6.
If the rack is to be installed, proceed as follows:
a)
Manually position the door at least 50 cm away from the limit switch stop
(during closing);
b)
Position the rack on the pin and check that it is perfectly aligned and
there are at least 1 to 2 mm of play between the pin and the rack;
c)
Manually put the door in the closing position (complete) and check that
the first bracket used to anchor the rack in place is aligned with the center
of the pin.
3.6 - Adjusting the mechanical limit switches
01.
Release the gearmotor with the key provided (refer to point 3.7);
02.
Then manually perform a complete Opening and Closing manoeuvre to
permit automatic regulation of the mechanical limit switches.
Important
–
During this maneouvre, check that the rack runs in alignment with the pin,
with a misalignment of maximum 5 mm, and that there is a play of 1÷2 mm
between pin and rack along its entire length (
fig. 8
);
03.
Lastly, manually position the door halfway along its travel and lock the
gearmotor in place with the key provided (refer to point 3.7).
3.7 - Manually releasing and locking the gearmotor
The gearmotor is equipped with a mechanical blocking system to enable man-
ual opening and closing of the gate.
These manual operations should only be performed in the event of a power
failure, malfunctions or during the installation procedures.
01.
Slide the disk covering the lock (
fig. 9
);
02.
Insert the key and turn it clockwise (90° -
fig. 10
);
03.
It is now possible to move the door into the desired position manually.
Slots
Summary of Contents for Naked Sliding NKSL400
Page 2: ......
Page 43: ...I 405 mm 131 mm 135 mm 1 3 4 5 b d c c h l b f m g i n e a E C F D C F A B 2...
Page 44: ...II b a b a c 5 mm 6 7 10 11 8 9...
Page 46: ...IV 14 15...
Page 48: ...VI 19 20 a b c d e...
Page 49: ...VII 21 22...
Page 50: ......
Page 51: ......

