EN
6
– English
03.
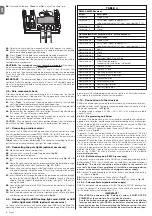
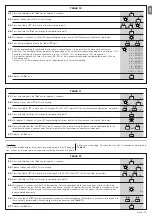
Press and hold down “
Close
” and “
Set
” keys at the same time.
04.
Release the keys when the manoeuvre starts (after approx. 3 seconds);
05.
Wait a few seconds for the control unit to complete the position learning
phase: pole closing, opening and closing.
06.
Press “
Open
” for the pole to run a complete Opening manoeuvre.
07.
Press “
Close
” for the pole to run a complete Closing manoeuvre.
During these manoeuvres, the control unit memorises the force required to
complete these manoeuvres.
CAUTION!
– The learning phases must never be interrupted.
If this occurs,
the entire learning procedure must be repeated.
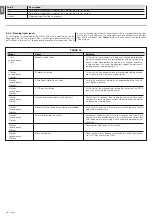
At the end of the learning phase, if leds “L3” and “L4” flash, this means that
there is an error. The phase for learning the mechanical stops can be repeated
at any time, also after installation (for example, if the position of a mechanical
stop is moved).
IMPORTANT
– The deceleration points are calculated automatically by the
control unit; after the position search phase, at least 2 or 3 complete manoeu-
vres must be performed before that control unit can correctly calculate the
points of deceleration.
4.6 - Pole movement check
After learning the devices and completing the 2-3 manoeuvres to calculate
deceleration, a number of Opening and Closing manoeuvres should be per-
formed to ensure correct pole movement.
01.
Press “
Open
” to activate an Opening manoeuvre; ensure that the pole
starts to decelerate before reaching the opening position;
02.
Press “
Close
” to activate a Closing manoeuvre; ensure that the pole starts
to decelerate before reaching the closing position;
03.
Make sure that the (optional) LED flashing light flashes at regular intervals
(0.5 sec on, 0.5 sec off) during a manoeuvre.
04.
Run a number of Opening and Closing manoeuvres to ensure that there
are no points of increased friction or malfunctions.
CAUTION
– If the manoeuvre starts from a position different from that of one of
the mechanical stops (opening or closing), it is performed at low speed.
4.7 - Connecting a radio receiver
The control unit is fitted with a SM type connector for connection of a radio
receiver (optional accessory) model SMXI, SMXIS, OXI or OXIT and similar.
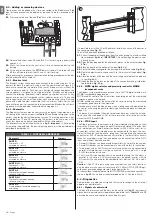
To insert the radio receiver, disconnect the control unit from the power mains
and insert the receiver as shown in
fig. 28
.
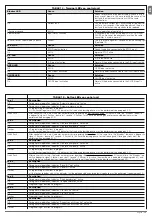
Table 4
shows the actions performed by the control unit according to the out-
puts activated or the commands sent from the radio receiver.
4.8 - Connecting the pole lights (optional accessory)
01.
Move the pole to the vertical position;
02.
Unscrew the 4 screws that hold the pole cover (
fig. 29
);
03.
Remove the pole temporarily;
04.
Insert the grommet in the pre-drilled hole for cable routing (
fig. 30 - A,
B
);
05.
Route the lights cable through the impact protection rubber profile, using a
guide to facilitate attachment if necessary (
fig. 31 - A, B
);
06.
If necessary, shorten the length of the lights cable: cuts may only be made
at the points bearing the relative mark. After cutting, the plug at the cut end
must be moved to seal off the new end;
07.
Insert the cable first through the hole on the pole support and then through
the hole on the cabinet (
fig. 32 - A, B, C
);
Caution
– Leave a little extra
cable in the pole support, to enable pole rotation through 90° without ten-
sioning the cable;
08.
Connect the lights cable to the FLASH terminal on the control unit: see dia-
gram in
fig. 27
;
09.
Position and secure the connector in the slot on the pole (
fig. 32 - D
);
10.
Insert the pole and secure with its cover, tightening the 4 screws fully down
and taking care not to pinch the wiring cable (
fig. 33
).
4.9 - Connecting the LED flashing light mod. XBA7 or LED
traffic light mod. XBA8 (optional accessories)
On the cover of the barrier a LED flashing light mod. XBA8 may be fitted. The
operating mode of this flashing light may be modified through the Oview pro-
grammer or with suitable programmes of the control unit. For further informa-
tion, refer to the instruction manual for the product.
4.10 - Connection of other devices
SBAR also enables power supply to external devices (a radio receiver or key-
operated selector switch lighting) by receiving power from the control unit: for
the type of connection, see
Fig. 34
.
The power supply voltage is 24 Vdc, -30%/+50%, with maximum available
current 100 mA.
4.10.1 - Programming unit Oview
The use of the programming unit Oview enables complete and rapid man-
agement of installation, maintenance and troubleshooting of any malfunctions
of the whole automation system. Oview can be connected to SBAR by
means of the BusT4 connector on the control unit.
To access the BusT4 connector, open the cover of SBAR and insert the con-
nector in its seat (
fig. 35
).
In general, Oview can be positioned at a maximum distance of 100 m of
cable from the control unit; it can be connected to multiple control units
simultaneously (max. 16) and can also remain connected during normal
operation of the automation; to exceed these limits, observe the warnings in
the Oview instruction manual and the Oview System Book system manual. If
a OXI type radio receiver is present in the control unit, Oview enables
access to the parameters of the transmitters memorised in this receiver. For
detailed information, refer to the instruction manual of the Oview program-
mer or the “SBAR” function datasheet also available on the website
www.niceforyou.com
.
4.10.2 - Buffer battery mod. PS124 (accessory)
In the event of a mains power failure, SBAR can also be powered by a buffer
battery model PS124. To install and connect the battery, proceed as follows:
Caution!
– The electric connection of the battery to the control unit
must only be made after completing all installation and programming
phases, as the battery constitutes an emergency power supply.
01.
Connect the relative cable of the buffer battery and position the battery
as shown in
fig. 36
;
03.
Remove the membrane on the control unit (
fig. 37
);
04.
Disconnect the mains power and fit the connector as shown in
fig. 38
.
4.10.3 - Solemyo System (photovoltaic supply)
SBAR is designed to be powered with the "Solemyo SYKCE" photovoltaic
system. To connect IT to the control unit, use the socket that is normally used
for the buffer battery (see paragraph 4.10.2).
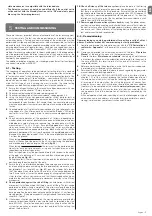
IMPORTANT!
- When SBAR is powered by the “Solemyo” system, it MUST NOT BE
POWERED at the same time from the electrical mains.
- Due to the limited solar power available, depending on the installation
location and time of year, SBAR can perform a maximum number of
manoeuvres per day. Before installing the Solemyo system, check in
the relative instruction manual whether the maximum number of pos-
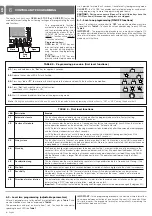
Open
Stop
Se
t
Close
Fuse 1AT
L1
L2
L3
L4
L5
L6
L7
L8
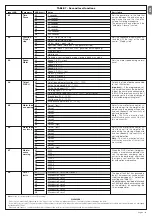
TABLE 4
SMXI, SMXIS Receiver
output
description
Output no. 1
Step by step
Output no. 2
Partial Open (opens to approx. 45%;
value programmable with Oview, see paragraph 4.10.1)
Output no. 3
Open
Output no. 4
Close
OXI receiver, OXIT
programmed in “Extended Mode II”
Command
description
Command no. 1
Step by step
Command no. 2
Partial Open (opens to approx. 45%;
value programmable with Oview, see paragraph 4.10.1)
Command no. 3
Open
Command no. 4
Close
Command no. 5
Stop
Command no. 6
Apartment block Step by Step
Command no. 7
Step-Step High priority
(controls also if automation is blocked)
Command no. 8
U Open
Command no. 9
U Close
Command no. 10
Open and block automation
Command no. 11
Close and block automation
Command no. 12
Block automation
Command no. 13
Release automation
Command no. 14
Courtesy light timer on
Command no. 15
Courtesy light on-off
Summary of Contents for S-BAR
Page 78: ...I 2 1 A B C B 179 5 mm 330 mm 1146 mm 826 mm 4000 mm 3 b a d e f g h c ...
Page 79: ...II 5 A B C 1 2 4 ...
Page 80: ...III 9 10 90 6 A C B 7 8 B A ...
Page 81: ...IV 14 15 A B A B 11 A B 12 13 A B ...
Page 82: ...V 16 A B 17 18 ...
Page 83: ...VI 20 180 21 C C A B 1cm 1cm 19 A C B ...
Page 84: ...VII 22 23 26 L N 24 1 2 25 ...
Page 86: ...IX 30 A A B STOP 31 A B ...
Page 87: ...X 32 A B C D STOP 33 A B 34 ...
Page 88: ...XI 35 36 L8 37 A B 2 1 L7 L8 L8 A B C Op L5 L6 L7 L8 Stop Set Close F u s e 1 A T 38 ...
Page 89: ...XII 300 200 700 500 39 300 200 700 500 150 40 41 ...
Page 90: ...a c d e b XIII F2 F1 42 43 ...
Page 91: ...XIV 44 O pe n L1 L2 L3 L4 L5 L6 L7 L8 St op Se t Cl os e Fuse 1AT 45 f g ...
Page 93: ...IST SBARR01 4865_20 10 2011 www niceforyou com Nice SpA Oderzo TV Italia info niceforyou com ...


