background image

4

Perform periodical inspection to check that the aforementioned storage procedures have been taken properly, and that the storing methods 

are correct.

(1) Return the product to normal conditions from those taken for storage (such as for the amount of special oil).
(2) Since bearings may partially run out of grease resulting from the grease hardening during long-term storage, be sure to turn the motor 

shaft by hand from the fan side before operation, and check that there are no problems.

(3) Since exposed parts of rubber and/or resin parts in the oil seal, O-ring, and oil gauge, etc., may become deteriorated due to environmental 

influences,  such  as  temperature,  humidity,  and/or  ultraviolet  rays,  check  those  parts  before  resuming  operation.  If  any  deterioration  is 
found, replace with new ones.

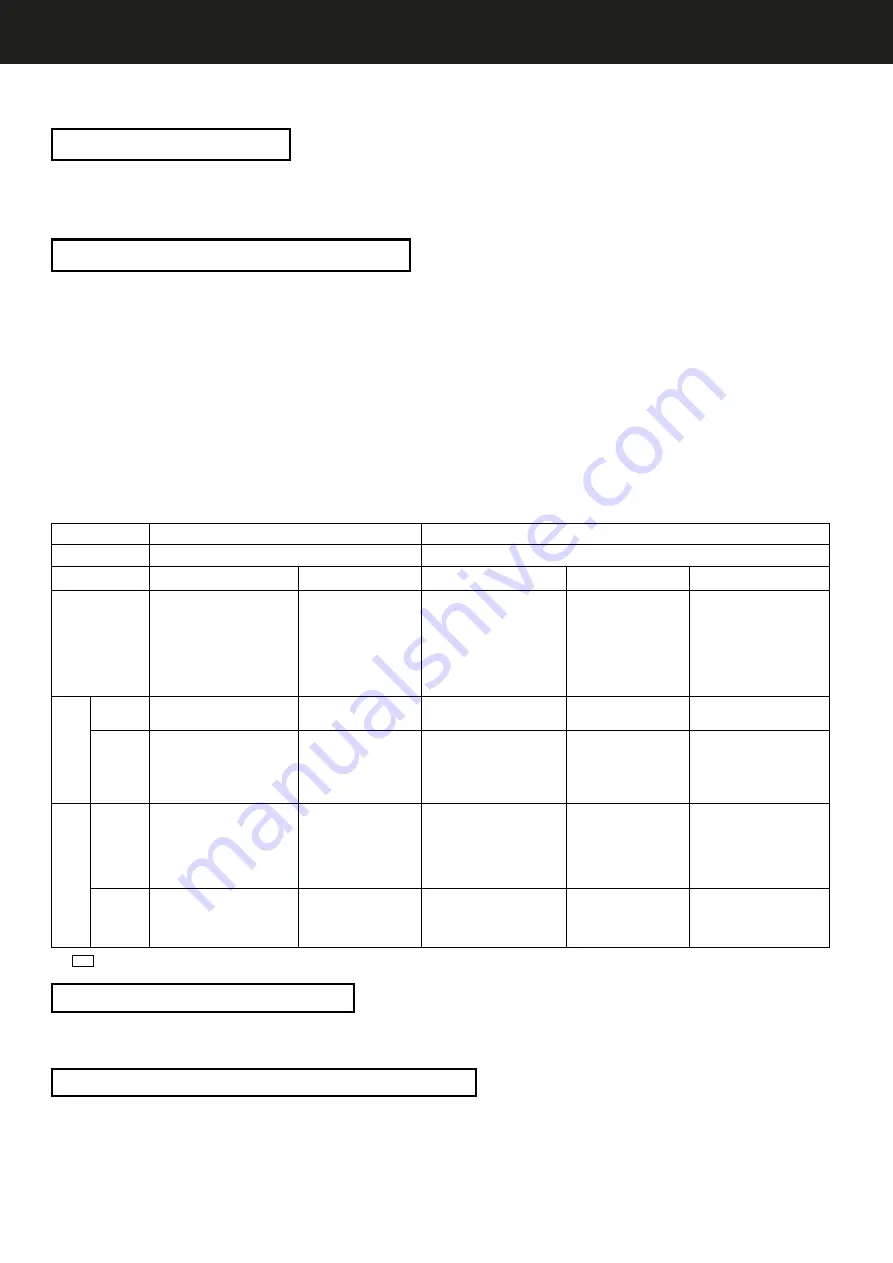
Rust-proofing interval

Within one year (our shipping standard)

 Over one year to less than three years (our recommendation)

Instructions at ordering

No particular instructions are necessary

“Special rust-proofing specifications” need to be instructed

Rust-proofing area

Rust-proofing procedures at factory 

shipping

Rust-proofing oil agent

Rust-proofing procedures at 

factory shipping

Rust-proofing oil agent

Procedures after shipping

Exposed parts of the 

product, input/output 

shafts, and flange 

section

Input/output shafts

After rinsing, wrap plastic tape 
around.

Flange section

After rinsing, apply the rust-
proofing oil agent to it, and pack 
the whole part with a plastic bag.

J

IS K2246 NP-2

Idemitsu Daphne Evercoat PL, 

or equivalent

Input/output shafts

After rinsing, apply the rust-
proofing oil agent to them, and 
wrap plastic tape around.

Flange section

After rinsing, apply the rust-
proofing oil agent to it, and pack 
the whole part with a plastic bag.

Equivalent to JIS K2246 NP-19

Taiyu Sabiden SAP D-15K, or 

equivalent

Check the condition of the rust-

proofing one year after shipping, 
and re-apply the rust-proofing 
oil, if necessary.
After that, carry out the same 
procedure every year.

Inside 
of the 

product

Grease

Special grease supplied at shipping

-

Special grease supplied at shipping

-

No special procedures are 

necessary

Oil

Special oil supplied at shipping

(The air breather has been sealed)

-

 Add special oil thoroughly 

 inside the housing.
 (The air breather has been sealed)

-

Take the same procedures as in 

the left, two years after shipping. 
When starting operation, replace 
with new oil, and fill to the 
specified level.

Supplied 

oil 

cooler 

pump 

unit

Water-cooled 

system

 Operate with special oil, and drain 
oil at shipping.
(The air breather has been sealed)

 Eliminate water from pipes 

completely, dry, and seal the cooling 
water openings.

-

 Add special oil thoroughly inside 

the unit.
 (The air breather has been sealed)

 Eliminate water from pipes 

completely, dry, and seal the 
cooling water openings.

-

Take the same procedures as in 

the left, two years after shipping. 
When starting operation, replace 
with new oil.

Air-cooled 

system

Operate with special oil, and drain 
oil at shipping.
 (The air breather has been sealed)

-

 Add special oil thoroughly inside 

the unit.
 (The air breather has been sealed)

-

Take the same procedures as in 

the left, two years after shipping. 
When starting operation, replace 
with new oil.

Storing Precautions

If you do not plan to use the product immediately after purchase, store it under the following precautions.

To store temporarily

To store for a long period of time

Inspection during storage

Inspection before resuming operation

(1) Store the product in a clean and dry place.
(2) If you store the product outdoors or in a humid place, put it in a box, seal the box, and cover with plastic sheets.
(3) When storing, attach a red rubber stopper into the air release plug, or set a plug stopper to prevent humidity from entering the product.

1) When storing the product in outdoor areas subject to a lot of rain and/or humidity after installing on the site

(1) Cover the whole product with a water-proof sheet, and fix the sheet securely to prevent it from coming off due to strong wind, as well as 

to avoid entering rain and/or dust from clearance gap.

(2) If moisture is expected to evaporate from the ground, put the water-proof sheet underneath to prevent exposure to humidity from the 

evaporation, filling inside the sheet.

(3) When storing, attach a red rubber plug into the air release plug, or set a plug stopper to prevent humidity from entering the product.
(4) Set the cover on the motor terminal box, and seal the lead wire openings to avoid humidity from entering through the terminal box to the 

inside of the motor.

2) When storing the product indoors

When there is less humidity, cover the product with a plastic bag, etc., and follow the procedures described in (3) and (4) above.

3) When storing the product for a long period of time, over a year, special rust-proofing specifications are required in addition to the above 

procedures.

4) Rust-proofing intervals and procedures

Note : Only when the export rust-proofing specifications or instructions are given, rust-proofing oil is applied to the input/output shafts even in less than one year.

Summary of Contents for RINDCODE NRX Series

Page 1: ...ecautions Operating Precautions Storing Precautions Installation Operation Special Lubricating Oil Periodical Inspection Troubleshooting Disassembly Reassembly 1 2 4 5 6 8 11 11 12 NRX Series Instruct...

Page 2: ...carefully read these safety precautions and follow them for proper use WARNING Indicates a potentially hazardous situation that may result in serious injury if you incorrectly handle this product CAU...

Page 3: ...ate position Note that the output speed might change if a load changes greatly Output Speed When using product continuously use it in the middle and high speed areas which secures high efficiency If a...

Page 4: ...ck to ensure that there is no oil leakage Periodical inspection every three months Check to ensure that pulleys sprockets and speed drive mounting bolts are not loose Check to ensure that there are no...

Page 5: ...lied oil cooler pump unit Water cooled system Operate with special oil and drain oil at shipping The air breather has been sealed Eliminate water from pipes completely dry and seal the cooling water o...

Page 6: ...set the maximum torque to be within the rated torque of the speed drive 1 NRXMK Base type 30cm Maintain an ambient temperature between 0 C and 40 C Make it easy to add and drain oil Install horizonta...

Page 7: ...et Oil outlet Vertical type Rubber hose Rubber hose Air cooled system Horizontal type Oil filter Air cooled oil cooler OUT Oil outlet Pump unit IN Oil inlet Oil inlet Oil inlet Oil outlet Oil outlet V...

Page 8: ...r pump unit 1 Never turn the speed change handle when operation stops when the motor is not running 2 Be careful not to overload 3 The surface temperature of the speed drive housing under normal opera...

Page 9: ...he type of lubricating oil differs between the speed change and speed reduction sections In the event that different types of oil are used sufficient performance may not be attained or extension of th...

Page 10: ...ug position in the center of the speed reduction section indicates the proper oil level Remove the upper lubrication plug and level plug and fill with oil until oil flows out of the level plug SC O N...

Page 11: ...5 0 15 15 18 18K C11 21 H 5 0 4 6 15 7 C29 43 L 5 0 15 15 18 NRX Inscribed planetary reducer L N C 200B to 7500 200B to 7500 Model 11K 15K 18K Model 11K 15K 18K Oil filling port in the speed reduction...

Page 12: ...rease load to the specified level Pressure contact of the driving surface may be defective Adjust the pressure contact condition The driving surface may have been worn Replace the ring and cone with n...

Page 13: ...within the range of values in the table below If backlash is too large or small remove the bearing cover and adjust to the normal value by increasing or decreasing the shim 0 1 mm to 0 2 mm thick 3 R...

Page 14: ...ing to 1 to 3 add a shim 0 2 mm thick Model Clearance of the cam disc 3700 to 18K Adjust clearance to 0 to 0 1 mm and add a shim 0 1 mm to 0 15 mm thick 0 05 mm to 0 1 mm thick when applying pressure...

Page 15: ...t force ER flange Cover NRX 200B to 2200 N Adjust by cam retainer backlash NRX 3700 to 7500 N Adjust by clearance between the cam disc and input cam Model Cam retainer backlash 200B 400B 750 1500 1 to...

Page 16: ...204 51305 1500 6206ZZ 6206 51206 51405 2200 6207ZZ 6207 51207 51407 6008 3700 6208ZZ 6307 51307 51408 6010 5500 7500 6210ZZ 6308 51308 51410 6011 6210LLU 6011LLU Oil seal name number list Output shaft...

Page 17: ...XK For the speed change section refer to page 15 Bearing name number list Oil seal name number list D Thrust bearing E F G Ball bearing ZZ metal seal type LLU contact rubber seal type Input disc D Inp...

Page 18: ...E F G H Ball bearing ZZ metal seal type LLU contact rubber seal type B D Thrust bearing Output shaft A Output shaft B Output shaft C Input disc D Input disc H Motor shaft E Motor shaft F 11K 15K 6312...

Page 19: ...203 3 6206ZZ 3700 4T 30210 6012 4T 30206 6002 4 6204 3 6207ZZ 5500 7500 4T 30211 6013 4T 30207 6002 4 6305 3 6208ZZ Oil seal name number list Output shaft 2R Input shaft 2S 200B 400B D25408 S20358 Oil...

Page 20: ...low speed side Bearing housing on the low speed side Primary pinion Primary gear Secondary pinion Secondary gear Output shaft Key for the primary pinion Key for the primary gear Key for the secondary...

Page 21: ...brackets The number of pieces without bracket indication is one Bearing name number list Cone retainer Cone Output cam Cam retainer Cam disc Packing on the output shaft side Base Output shaft Output s...

Page 22: ...ove the bolt from the carrier pin and release the output shaft 6 Remove the wheel bush and eccentric roller bearing on the output shaft side 7 Remove the spacer 8 Remove the wheel bush and eccentric r...

Page 23: ...speed section Cover Gland Snap ring shaft for bearing 7 Low speed shaft with Note 3 Worn or damaged oil seals collars and or packing etc could result in oil leakage Be sure to replace them with new o...

Page 24: ...e f e r t o p a g e 1 5 O u t p u t s h a f t s e c t i o n S p e e d c h a n g e s e c t i o n I n p u t s h a f t s e c t i o n F o r d e t a i l s o n t h e o u t p u t s h a f t s e c t i o n r e...

Page 25: ......

Page 26: ......

Page 27: ......

Page 28: ...Address 1 Terada Kohtari Nagaokakyo city Kyoto 617 0833 Japan Phone 81 75 958 1298...

Reviews: