22
OPERATING PROCEDURE: Measurement Method
3.2
Measurement Method
1
Turn on (
) the power switch.
Wait until the screen switches to the measurement screen.
When the device is turned on, the measuring unit makes small forward-backward, side-to-side move-
ments for initialization of auto tracking.
2
The measurement screen is displayed.
3
Perform checks before use.
Perform the following checks before use.
•
No error message appears.
•
The measuring window is clean.
•
The main unit moves smoothly using the joystick.
•
The chinrest moves up and down by pressing the chinrest up/down button.
•
Printer paper is sufficient.
If any abnormality is found, stop using the device, then refer to
“4.1 Troubleshooting” (page 71)
.
4
Set the measurement conditions.
●
Measurement mode
Press the R/K
button for selection.
When power is turned on, the measurement mode is set to the mode last used when power was
turned off.
• When the “61. WINDOW CHECK” parameter is set to “YES” or “DAY”, the check screen is displayed
before the measurement screen is displayed.
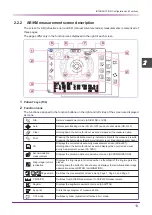
ᵏ
㹐㸸㸮ࠉ㸦ࠉ㸧ࠉ㹉㸸㸮
㹐㸸㸮ࠉ㸦ࠉ㸧ࠉ㹉㸸㸮
㹑㸩ࠉ㸮㸬㸮㸮ࠉ㹐㸯ࠉࠉ㸮㸬㸮㸮ࠉࠉࠉ㸮
㸮㸮ࠉ㹐㸯ࠉࠉ㸮㸬㸮㸮ࠉࠉࠉ㸮
㹁㸫ࠉ㸮
ࠉ㸮㸬㸮㸮ࠉ㹐㸰ࠉࠉ㸮㸬㸮㸮ࠉࠉࠉ㸮
㸮㸮ࠉ㹐㸰ࠉࠉ㸮㸬㸮㸮ࠉࠉࠉ㸮
㸿ࠉࠉࠉࠉࠉ㸮
㸿ࠉࠉࠉࠉࠉ㸮
Measurement mode
Details of setting
AR/KM measurement
mode
KM (corneal curvature radius) and AR (refractive error) measurements are
successively taken.
AR measurement mode
Only AR (refractive error) measurement is taken.
KM measurement mode
Only KM (corneal curvature radius) measurement is taken.
Summary of Contents for ARK-1S
Page 1: ...AUTO REF KERATOMETER AUTO REF KERATOMETER ARK 1s ARK 1s OPERATOR S MANUAL OPERATOR S MANUAL ...
Page 6: ...IV ...
Page 76: ...70 OPERATING PROCEDURE Operation when Peripheral Devices are Connected ...
Page 112: ...106 SPECIFICATIONS AND TECHNICAL INFORMATION EMC Electromagnetic Compatibility ...


