LLE14BRDA001A/E
7 - 55
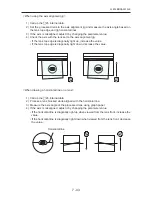
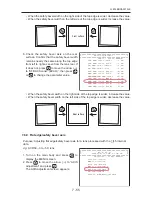
• When the safety bevel width on the right side of the top edge is wider, decrease the value.
• When the safety bevel width on the left side of the top edge is wider, increase the value.
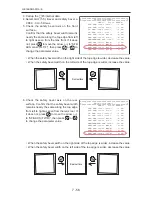
6. Check the safety bevel axis on the rear
surface. Confirm that the safety bevel width
remains nearly the same along the top edge
from left to right as seen from the lens rear. If
it does not, press
to move the arrow (
→
)
to “SFB AXS const. (BVL/R)”, then press
or
to change the parameter value.
• When the safety bevel width on the right side of the top edge is wider, increase the value.
• When the safety bevel width on the left side of the top edge is wider, decrease the value.
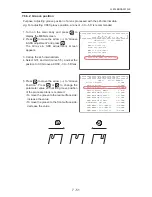
7.6.9 Flat edge/safety bevel axis
Purpose: Adjusting flat edge/safety bevel axis for a lens processed with the 45 internal
data
Jig: A CR39, -3 to -5 D lens
1. Turn on the main body and press
to
display the MENU screen.
2. Press
to move the arrow (
→
) to “AXIS
adjustment” and press
.
The AXIS adjustment screen appears.
Front surface
Rear surface
㧖㧖㧖㧖㧖㧖㧖㧖㧖㧖㧖㧖㧖㧖㧖㧖㧖㧖㧖㧖㧖㧖㧖㧖㧖㧖㧖㧖㧖㧖㧖㧖㧖㧖㧖㧖㧖㧖
㧖ޓޓޓޓޓޓޓޓޓޓ㧭㨄㧵㧿ޓ㨍㨐㨖㨡㨟㨠㨙㨑㨚㨠ޓޓޓޓޓޓޓޓޓޓޓ㧖
㧖㧖㧖㧖㧖㧖㧖㧖㧖㧖㧖㧖㧖㧖㧖㧖㧖㧖㧖㧖㧖㧖㧖㧖㧖㧖㧖㧖㧖㧖㧖㧖㧖㧖㧖㧖㧖㧖
ޓޓޓޓޓޓޓޓޓޓޓޓޓޓ㧖㧱㨄㧵㨀ޓ㧦ޓ㧼㨞㨑㨟㨟ޓ㧱㧺㨀㧱㧾
ޓޓޓޓޓޓޓޓޓޓޓޓޓޓޓޓޓޓޓޓޓޓޓޓޓޓޓޓޓޓޓޓ
ޓޓޓޓޓ㧼㧸㧭ޓ㧭㨄㧿ޓ㨏㨛㨚㨟㨠㧚
㧔㨎㨑㨢㨑㨘㧕
㧦㧙㧝㧚㧞㧜
ޓޓޓޓޓޓޓޓޓޓޓޓޓޓޓޓޓޓޓޓޓޓޓޓޓޓޓޓޓޓޓޓޓޓޓ
ޓޓޓޓޓޓ㧼㧸㧭ޓ㧭㨄㧿ޓ㨏㨛㨚㨟㨠㧚
㧔㨒㨘㨍㨠㧕
㧦㧙㧝㧚㧞㧜
ޓޓޓޓޓޓޓޓޓޓޓޓޓޓޓޓޓޓޓޓޓޓޓޓޓޓޓޓޓޓޓޓޓޓ
ޓޓޓޓޓޓ㧼㧯ޓ㧭㨄㧿ޓ㨏㨛㨚㨟㨠㧚
㧔㨎㨑㨢㨑㨘㧕
㧦㧙㧝㧚㧞㧜
ޓޓޓޓޓޓޓޓޓޓޓޓޓޓޓޓޓޓޓޓޓޓޓޓޓޓޓޓޓޓޓޓޓޓޓ
ޓޓޓޓޓޓ㧼㧯ޓ㧭㨄㧿ޓ㨏㨛㨚㨟㨠㧚
㧔㨒㨘㨍㨠㧕
㧦㧙㧝㧚㧞㧜
ޓޓޓޓޓޓޓޓޓޓޓޓޓޓޓޓޓޓޓޓޓޓޓޓޓޓޓޓޓޓޓޓޓޓޓޓ
ޓޓޓޓޓޓ㧳㧸㧿ޓ㧭㨄㧿ޓ㨏㨛㨚㨟㨠㧚
㧔㨎㨑㨢㨑㨘㧕
㧦㧙㧡㧚㧜㧜
ޓޓޓޓޓޓޓޓޓޓޓޓޓޓޓޓޓޓޓޓޓޓޓޓޓޓޓޓޓޓޓޓޓޓޓ
ޓޓޓޓޓޓ㧳㧸㧿ޓ㧭㨄㧿ޓ㨏㨛㨚㨟㨠㧚
㧔㨒㨘㨍㨠㧕
㧦㧙㧡㧚㧜㧜
ޓޓޓޓޓޓޓޓޓޓޓޓޓޓޓޓޓޓޓޓޓޓޓޓޓޓޓޓޓޓޓޓޓޓ
ޓޓޓޓޓޓ㧳㧾㧻㧻㨂㧱㧒㧿㧲㧮ޓ㧭㨄㧿ޓ㨏㨛㨚㨟㨠
㧦㧗㧜㧚㧟㧟
ޓޓޓޓޓޓޓޓޓޓޓޓޓޓޓޓޓޓޓޓޓޓޓޓޓޓޓޓޓޓޓޓޓޓ
ޓޓޓޓ㧿㧲㧮ޓ㧭㨄㧿ޓ㨏㨛㨚㨟㨠㧚
㧔㧮㨂㧸㧲㧕
㧦ޓ㧜㧚㧜㧜
ޓޓޓޓޓޓޓޓޓޓޓޓޓޓޓޓޓޓޓޓޓޓޓޓޓޓޓޓޓޓޓޓޓޓ
ޓޓޓޓψޓ㧿㧲㧮ޓ㧭㨄㧿ޓ㨏㨛㨚㨟㨠㧚
㧔㧮㨂㧸㧾㧕
㧦ޓ㧜㧚㧜㧜
ޓޓޓޓޓޓޓޓޓޓޓޓޓޓޓޓޓޓޓޓޓޓޓޓޓޓޓޓޓޓޓޓޓޓ
ޓޓޓޓޓޓ㧿㧲㧮ޓ㧭㨄㧿ޓ㨏㨛㨚㨟㨠㧚
㧔㧲㧸㨀㧲㧕
㧦ޓ㧜㧚㧜㧜
ޓޓޓޓޓޓޓޓޓޓޓޓޓޓޓޓޓޓޓޓޓޓޓޓޓޓޓޓޓޓޓޓޓޓ
ޓޓޓޓޓޓ㧿㧲㧮ޓ㧭㨄㧿ޓ㨏㨛㨚㨟㨠㧚
㧔㧲㧸㨀㧾㧕
㧦ޓ㧜㧚㧜㧜
ޓޓޓޓޓޓޓޓޓޓޓޓޓޓޓޓޓޓޓޓޓޓޓޓޓޓޓޓޓޓޓޓޓ
㧖㧖㧖㧖㧖㧖㧖㧖㧖㧖㧖㧖㧖㧖㧖㧖㧖㧖㧖㧖㧖㧖㧖㧖㧖㧖㧖㧖㧖㧖㧖㧖㧖㧖㧖㧖㧖㧖
㧖ޓޓޓޓޓޓޓޓޓޓޓޓޓޓޓޓޓޓޓޓޓޓޓޓޓޓޓޓޓޓޓޓޓޓޓޓ㧖
㧖ޓޓޓޓޓޓޓޓޓޓޓޓޓ㧹ޓޓ㧱ޓޓ㧺ޓޓ㨁ޓޓޓޓޓޓޓޓޓޓޓޓޓ㧖
㧖ޓޓޓޓޓޓޓޓ㧸㨑㨚㨓㨠㨔ޓ㧾㧦㧝㧣㧣㧚㧥㧤ޓ㧸㧦㧝㧣㧤㧚㧜㧞ޓޓޓޓ㧖
㧖㧖㧖㧖㧖㧖㧖㧖㧖㧖㧖㧖㧖㧖㧖㧖㧖㧖㧖㧖㧖㧖㧖㧖㧖㧖㧖㧖㧖㧖㧖㧖㧖㧖㧖㧖㧖㧖
ޓޓޓޓޓޓޓޓޓޓޓ㧖㧱㨤㨑㨏㨡㨠㨑ޓ㧦ޓ㧼㨞㨑㨟㨟ޓ㧱㧺㨀㧱㧾ޓޓޓޓޓޓ
ޓ
ޓޓޓޓޓ㧼㨞㨛㨏㨑㨟㨟ޓ㨏㨛㨡㨚㨠㨑㨞ޓ
ޓ
ޓޓޓޓޓޓ㨃㨔㨑㨑㨘ޓ㨐㨞㨑㨟㨟㨕㨚㨓ޓ
ޓ
ޓޓޓޓޓ㧿㨕㨦㨑ޓ㨍㨐㨖㨡㨟㨠㨙㨑㨚㨠ޓ
ޓ
ޓޓޓޓޓޓ㧮㨑㨢㨑㨘ޓ㨍㨐㨖㨡㨟㨠㨙㨑㨚㨠ޓ
ޓ
ޓޓޓޓψޓ㧭㨄㧵㧿ޓ㨍㨐㨖㨡㨟㨠㨙㨑㨚㨠ޓ
ޓ
ޓޓޓޓޓޓ㧼㧰ޓ㨍㨐㨖㨡㨟㨠㨙㨑㨚㨠ޓ
ޓ
ޓޓޓޓ㧳㨞㨛㨛㨢㨑ޓ㧒ޓ㧿㧲㧮ޓ㨍㨐㨖㨡㨟㨠㨙㨑㨚㨠ޓ
Summary of Contents for Le 1000
Page 1: ...PATTERNLESS EDGER Model SERVICE MANUAL June 2008 Pages in total 152 LLE14BRDA001A E...
Page 8: ...This page is intentionally left blank LLE14BRDA001A E 1 2...
Page 10: ...This page is intentionally left blank LLE14BRDA001A E 2 2...
Page 19: ...LLE14BRDA001A E 3 9 3 3 Model Configuration...
Page 22: ...LLE14BRDA001A E 3 12 5 4 01 000000 9CVGT RTGUUWTG CZ M2C EU area only...
Page 28: ...LLE14BRDA001A 3 18...
Page 34: ...LLE14BRDA001A E This page is intentionally left blank...
Page 91: ...LLE14BRDA001A E 7 27 7 4 2 Parameter list of BL motor 40340 E066 E067 inverter User parameter...
Page 92: ...LLE14BRDA001A E 7 28 User parameter...
Page 93: ...LLE14BRDA001A E 7 29 System parameter...
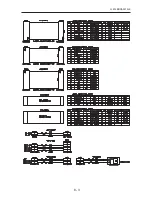
Page 126: ...LLE14BRDA001A E 8 2 8 2 Connector Cable...
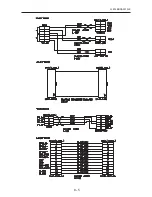
Page 127: ...LLE14BRDA001A E 8 3...
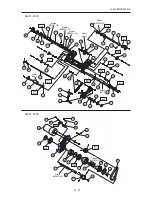
Page 128: ...LLE14BRDA001A E 8 4...
Page 129: ...LLE14BRDA001A E 8 5...
Page 130: ...LLE14BRDA001A E 8 6...
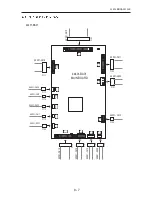
Page 131: ...LLE14BRDA001A E 8 7 44401 BA01 2 2 2 2 2 2 2 2 2 2 2 44401 BA01 MAIN BOARD 2 2 2...
Page 134: ...LLE14BRDA001A E 8 10 8 5 Grease MSDS 8 5 1 NIPPECO LLP...
Page 135: ...LLE14BRDA001A E 8 11...
Page 140: ...LLE14BRDA001A E 8 16 8 5 4 NBU15...
Page 141: ...LLE14BRDA001A E 8 17...
Page 142: ...LLE14BRDA001A E 8 18...
Page 143: ...LLE14BRDA001A E 8 19...
Page 144: ...LLE14BRDA001A E 8 20...
Page 145: ...LLE14BRDA001A E 8 21 8 6 Troubles and Measures...
Page 146: ...LLE14BRDA001A E 8 22...
Page 147: ...LLE14BRDA001A E 8 23...
Page 148: ...LLE14BRDA001A E 8 24...
Page 149: ...LLE14BRDA001A E 8 25...
Page 152: ...LLE14BRDA001A E 8 28 This page is intentionally left blank...


