background image

 Height Rider/SP Series 

Operating & Safety Instructions 

English/USA – 01/18 

Original instructions 

41 


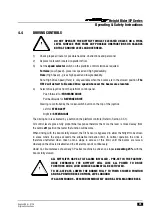
4.7.2


TOWING 

To enable towing of the HR12 

2x4

 in case of an emergency. 

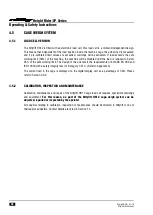
GEARBOX DISENGAGEMENT 

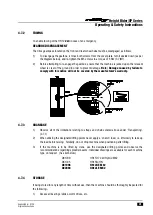
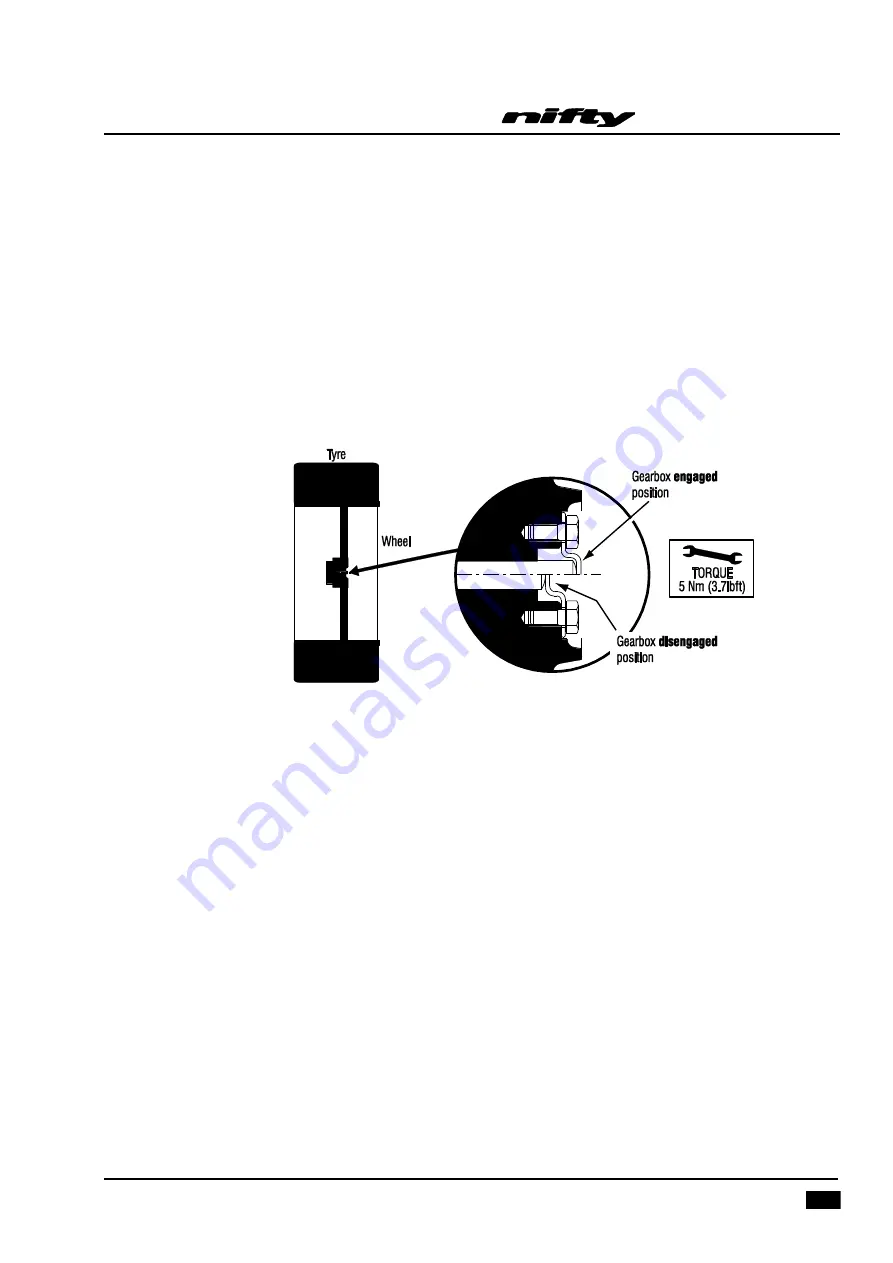
The drive gearboxes located on the front and rear wheel hubs must be disengaged as follows; 
1)


To disengage the gearbox, remove both screws from the cover plate, turn it upside down (as per 

the diagram below), and re-tighten the M5 screws to a torque of 5 Nm (3.7lbft). 

2)


Before attempting to re-engage the gearbox, ensure that the machine is jacked up so the relevant 

wheel is clear of the ground in order to prevent damage.

 Note; Damage caused by failure to 

comply with this notice will not be covered by the manufacturer’s warranty.


4.7.3


CRANEAGE 

1)


Observe  all  of  the  limitations  relating  to  straps  and  chains  stated  above  under  ‘Transporting’. 

(4.7.1)  

2)


When utilising the designated lifting points never apply a ‘snatch’ load, i.e. lift slowly to take up 

the load before raising.  Similarly, do not drop machine when positioning after lifting. 

3)


If  the  machine  is  to  be  lifted  by  crane,  use  the  designated  lifting  points  and  observe  the 

recommendations regarding spreader beams. Individual drawings are available for each machine 

type, on request.  (See list below.) 

D81790 

HR15/17 4x4/Hybrid MK2 

D81795 

HR15N/17N 

D81996 

HR12NE MK2 

D82069 

HR12LE MK2 


4.7.4


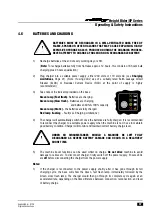
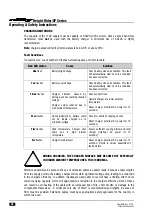
STORAGE 

If being stored for any length of time without use, then the machine should be thoroughly inspected for 
the following:- 
1)


Grease all bearings /slides, worm drives, etc. 

Summary of Contents for HR 12

Page 1: ...Operating Safety Instructions MODEL HR12 SP34 SERIES MK2 www niftylift com e mail info niftylift com Tel 44 0 1908 223456 Fax 44 0 1908 312733 M50512 02 Manufactured by Niftylift Limited Chalkdell Dr...

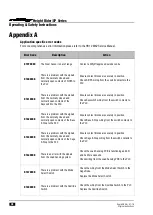
Page 2: ...ixed object and cage overload has disabled the machine move machine slightly using steps 1 2 The overload alarm and visual warning will cease and normal controls are available 4 Use normal controls if...

Page 3: ...PARATION FOR USE 14 3 3 PRE OPERATIONAL SAFETY CHECK SCHEDULES 15 3 4 PLACARD DECALS INSTALLATION UK SPEC 18 3 5 TORQUE REQUIREMENTS 20 4 Operation 21 4 1 CONTROL CIRCUIT COMPONENTS 21 4 2 GROUND CONT...

Page 4: ...e machine are strictly forbidden One of the most important facts to remember is that any equipment is only as safe as those who operate it DANGER WARNING CAUTION IMPORTANT INSTRUCTIONS AND NOTICE Any...

Page 5: ...Drive Shenley Wood Milton Keynes MK5 6GF Great Britain Tel 44 0 1908 223456Fax 44 0 1908 312733 Niftylift Inc 1525 S Buncombe Road Greer SC 29651 USA Tel 01 864 968 8881Fax 01 864 968 8836 Nifty Pty L...

Page 6: ...97m 13ft 1in PLATFORM CAPACITY Europe 200kg 440lbs WHEELBASE 1 90m 6ft 3in TURNING RADIUS OUTSIDE 3 31m 10ft 9in TURRET ROTATION 4050 TURRET TAIL SWING Zero TRAVEL SPEED 0 2 3mph 0 3 7kph PLATFORM SI...

Page 7: ...ons English USA 01 18 Original instructions 5 1 5 IDENTIFICATION UK PLATE This manufacturer s plate is attached to the chassis on each machine at the time of manufacture on every Niftylift Please ensu...

Page 8: ...ns English USA 01 18 Original instructions 6 1 5a IDENTIFICATION USA PLATE This manufacturer s plate is attached to the chassis on each machine at the time of manufacture on every Niftylift Please ens...

Page 9: ...Height Rider SP Series Operating Safety Instructions English USA 01 18 Original instructions 7 1 6 EC DECLARATION OF CONFORMITY Typical...

Page 10: ...the beginning of each shift the Niftylift shall be given a visual inspection and functional test including but not limited to operating and emergency controls safety devices personal protective cloth...

Page 11: ...ntering the platform ensure that the drop down entry bar is closed afterwards 2 1 14 Use of an approved full body harness and short lanyard hard hat and appropriate safety clothing is mandatory Fasten...

Page 12: ...ersonnel 2 1 25 The aerial platform shall not be driven on grades side slopes or ramps exceeding those for which the aerial platform is rated by the manufacturer 2 1 26 It shall be the responsibility...

Page 13: ...ot obstructed e g by tools or equipment and clear access to the Emergency Stop is available at all times 2 1 43 All persons in the cage must take suitable precautions to prevent items falling or being...

Page 14: ...will be necessary All dust dirt salt encrustation excess oil or grease should be removed Deposits of paint or bitumen particularly on legends or labels should be removed All standard Niftylift machin...

Page 15: ...dividual machine is then subjected to static overload tests on flat level ground with 150 of the SWL exceeding the requirements of BS EN280 2013 A1 2015 for power operated MEWPs Self propelled machine...

Page 16: ...arry out the Pre operational Report Refer to Section 6 3 before placing machine in service 3 2 PREPARATION FOR USE Whilst every effort has been made at the Niftylift factory to ensure your machine arr...

Page 17: ...eck that control levers are secure and operate freely 8 Check that operating buttons and emergency stop buttons function correctly 9 Check the operation of the manual hand pump 10 Visually inspect all...

Page 18: ...for wear 5 Check that slew ring bolts are secure torque 205ft lbs 279Nm Toughcage Niftylift toughcage is fully UV stabilised for outdoor use in the most demanding climates However the user and machine...

Page 19: ...N IRAN AUSTRALIA WESTERN SOUTH QUEENSLAND 7 years NORTH AFRICA SAUDI DUBAI AUSTRALIA NORTHERN TERRITORY 6 years Note The date of manufacture of the toughcage floor is located on its underside Niftylif...

Page 20: ...2 2 15 General crush hazard P14782 9 16 Hydraulic levers Base on canopy P28482 1 17 Operating Instructions P14892 1 18 Emergency controls location P21700 1 19 Daily Checks P14908 1 20 IPAF Are you tr...

Page 21: ...y Instructions English USA 01 18 Original instructions 19 41 Do not jet wash P29665 1 42 No dust or water LE P31446 4 44 LED indicator P26934 1 45 Power to cage 110V 230V P26426 P26862 1 1 46 Power to...

Page 22: ...wing assumptions 1 Bolts to ISO 898 1 Mechanical properties of fasteners made of carbon steel and alloy steel 2 For unplated bolts all grades Hex head bolts Black oxide steel bolt with a rolled oiled...

Page 23: ...r the sounder or the beacon if site conditions require the machine to behave differently e g Beacon only when used at night in a residential area It is mandatory that one alert device is functioning a...

Page 24: ...unt the footswitch will be disabled to increase operator safety and reduce the possibility of sustained involuntary operation of the cage controls For further information refer to Section 4 3 6 4 1 3...

Page 25: ...1 Emergency Stop Push to Stop Operation Twist to Enable Operation 2 Green Power Button Push and hold for Power Release to Cease operation 3 Base Platform Selector Clockwise for Platform Centre for Ba...

Page 26: ...ve and around the platform for any obstruction or hazards before operating any function 2 Ensure all red emergency stops are out 3 Turn key switch at ground control station to Ground Single turn clock...

Page 27: ...rate the desired function lever s If normal controls are not available 2 Locate the manual hand pump under the control side canopy 3 Attach supplied handle to the hand pump 4 Move and hold the desired...

Page 28: ...button or footswitch is pressed that function will not be available until the control is returned to its neutral position and a deliberate action is taken to move the function after the green button o...

Page 29: ...ht for Right 12 Operates Telescoping Up for Tele In Down for Tele Out More than one function can be operated at the same time 4 3 2 DISPLAY SCREEN Situated on the Ground and Cage Control Panels this g...

Page 30: ...Safety Critical condition has been detected the safety warning lamp on the Platform Control Panel and Base Control Panel will also illuminate Advisory Main screen Release E Stop Machine will not opera...

Page 31: ...Panel Refer to Page 26 Digital display reverts to these icons once the joystick trigger is activated Ground Controls To enable platform controls selector switch located on ground controls must be turn...

Page 32: ...or Amber General error Red Critical error Press Button 1 for further information 4 3 4 MENU SCREENS DIAGNOSTICS To access this screen press button 1 This displays options to access Error Codes Softwar...

Page 33: ...l appear automatically with this symbol if the machine is on charge to warn any potential operators to disconnect the charger before use MACHINE HOURS To access this screen press button 2 Total Hours...

Page 34: ...nd press the right arrow key or ok to open the screen Press Left arrow key or button 4 to return to previous screen Beacon Sounder This allows the operator to select between the beacon or sounder for...

Page 35: ...ground control station to the fully anti clockwise OFF position remove key and chock wheels ALWAYS ENSURE THE AERIAL PLATFORM IS ON A FIRM LEVEL SURFACE AND THE AREA IS FREE OF ANY OVERHEAD OBSTRUCTI...

Page 36: ...ity of sustained involuntary operation of the cage controls Note The green button will illuminate once the footswitch has been disabled but continues to be available for use at all times This allows t...

Page 37: ...e joystick Left for STEER LEFT Right for STEER RIGHT The driving horn is activated by a button on the platform controls Refer to Section 4 3 1 All control levers give a fully proportional response the...

Page 38: ...of the safe working limit The design of the unit meets the requirements of both BS EN 280 and ISO 13849 with a safety integrity level of Category 3 PL d Refer to Appendix A The current load in the ca...

Page 39: ...ng and between 80 100 capacity Green lamp Static the batteries are fully charged Red lamp flashing Fault see Charging Limitations 4 The charger will automatically switch off once the batteries are ful...

Page 40: ...battery could not be trickle charged up to minimum voltage Check for shorted or damaged cells Reset charger interrupt AC power for 15 seconds Five flashes High temperature Charger shut down due to hi...

Page 41: ...e If the batteries have fallen to such a poor state they will have to be removed from the machine and charged individually with an independent charger until the optimum voltage has been reached This i...

Page 42: ...e in transit and to ensure that creepage during transport does not permit the machine to come into contact with other goods being shipped or the container itself Some movement of the machine structure...

Page 43: ...with this notice will not be covered by the manufacturer s warranty 4 7 3 CRANEAGE 1 Observe all of the limitations relating to straps and chains stated above under Transporting 4 7 1 2 When utilising...

Page 44: ...afety devices and controls operate in accordance with the instructions 8 If necessary perform a load test to establish the machine stability before putting the machine to work 9 On completion of an ex...

Page 45: ...n the fastest method of lowering the platform to the ground Note If the machine is fitted with a cage overload system and the cage comes into contact with a fixed object whilst operating at height thi...

Page 46: ...important step is required so that any relevant Technical Bulletins are able to reach the registered owner of each machine without delay Please note warranties are not transferable 6 2 MANUAL OF RESPO...

Page 47: ...tions Operation of suspension dampers if applicable Pivot pins and swing bolts secure BASE Operation of Emergency Stop button Operation of Base control valve and buttons Operation of all booms over fu...

Page 48: ...manufacturers Operating Manual as supplied All cables and terminals secure All hose connections secure Charger control box secure Battery secure Hydraulic oil level SLEWING Slew gearbox and motor are...

Page 49: ...Height Rider SP Series Operating Safety Instructions English USA 01 18 Original instructions 47 Comments remedial work required etc INSPECTED BY DATE...

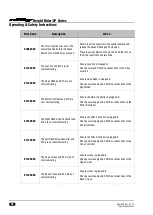
Page 50: ...ch contacts to the PLC 01A20000 There is a problem with the signals from the normally closed and normally open contacts of the Base E Stop to the PLC Ensure contact blocks are securely in position Che...

Page 51: ...neutral position and release the Green Button and Footswitch Press the Green Button or Footswitch and then move the Boom 2 Paddle to operate Links 01B20000 The Boom 3 upper Paddle was out of the neut...

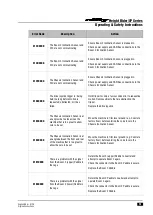
Page 52: ...and CAN Bus connections to the Cage Node 01C40000 The Motor Controller and PLC are not communicating Ensure the Motor Controller is plugged in Check power supply and CAN Bus connections to the Motor...

Page 53: ...n Remove objects that are obstructing the trigger Replace the drive joystick 01D30000 The Chassis Inclination Sensor is at an angle side to side across the machine that is too great to allow zero to b...

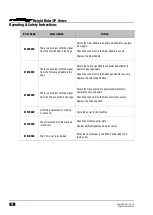
Page 54: ...attempt to operate Telescope again Check the connector to the Telescope Paddle is secure Replace the Telescope Paddle 01E60000 There is a problem with the signal from the Drive Joystick in the cage Re...

Page 55: ...y Stop BS EN ISO 13850 1 2015 PLd c A9 SiOPS BS EN ISO 13849 1 2015 PLd A1 PREVENT TRAVEL ABOVE INCLINATION LIMIT The inclination interlock or Tilt System is PL c in accordance to with BS EN ISO 13849...

Page 56: ...ess of angle of inclination If the drive forward or backwards functions are selected when not stowed the output from the inclination sensor not being present will deny drive functions 5 Response time...

Page 57: ...irectly boards transducers and boxes with flushing or degreaser fluids under pressure Do not make holes in the board box Seal the box and or the panel who contains the electronic board to reveal any n...

Page 58: ...ion e g for modification maintenance and repair shall be given to ensure the continued justification of the fault exclusion s Do not alter modify or disable in any way the controls safety devices inte...

Page 59: ...e complete item such as Safety Switch PLC or Hydraulic valve block Do not attempt to open the sensors Do not attempt maintenance of hydraulic components i e replace seals or internal components Only N...

Page 60: ...cant than if the machine were stowed Reasonably foreseeable misuse 2 The limits of the SRP CS and any fault exclusion for which when essential for maintaining the selected category or categories and s...

Page 61: ...g detected the alarm can be silenced by releasing the green button or footswitch Suspension of the function will continue until the overload has been safely removed 9 Control modes The load sensing sy...

Page 62: ...the base green button and observe that the machine is ready to function with no load in the cage Machine runs pump flow is available for machine functions drive functions 4 Select the Cage control pos...

Page 63: ...effects of deviations from the specified performance on the safety function s If the levelling system of the product does not function as intended the angle of the cage may not be maintained If the a...

Page 64: ...of air from the hydraulic system if the product is left unused for long periods of time 11 Ease of accessibility and replacing of internal parts Replacement of parts should only be carried out by app...

Page 65: ...ny way the controls safety devices interlocks or any other part of the machine Maintenance must only be carried on by appropriately trained and competent persons who are conversant with all modes of o...

Page 66: ...ation of the load sensor system 1 Power on the Niftylift and select the base control location 2 Allow the power circuits to cycle and ensure the machine is ready for the command signal 3 Press the bas...

Page 67: ...ly be carried on by appropriately trained and competent persons 3 The effects of deviations from the specified performance on the safety function s If the load holding system of the product does not f...

Page 68: ...om the hydraulic system if the product is left unused for long periods of time 11 Ease of accessibility and replacing of internal parts Replacement of parts should only be carried out by appropriately...

Page 69: ...achine Maintenance must only be carried out by appropriately trained and competent persons who are conversant with all modes of operation speeds and characteristics of this model 3 The effects of devi...

Page 70: ...ginal and supplied parts shall be used 12 Means for easy and safe trouble shooting To check the operation of the travel control interlock 1 Power on the Niftylift and select the cage control location...

Page 71: ...es of operation speeds and characteristics of this model 3 The effects of deviations from the specified performance on the safety function s If the Emergency stop system does not function as intended...

Page 72: ...er fluids under pressure Do not pierce the board box Seal the box and or the panel who contains the electronic board to reveal any not authorized access or tampering 11 Ease of accessibility and repla...

Page 73: ...been halted 7 Release the cage emergency stop button switch the controls to the base and repeat for the base emergency stop button 8 Power off the Niftylift 13 Information explaining the applications...

Page 74: ...ation speeds and characteristics of this model 3 The effects of deviations from the specified performance on the safety function s If the SiOPS does not function as intended it is possible that the op...

Page 75: ...or tampering 11 Ease of accessibility and replacing of internal parts Replacement of parts should only be carried out by appropriately trained and competent persons If parts require replacement only r...

Page 76: ...pressure on the cage console press base green button Machine functions will return Machine runs pump flow is available for machine operation 9 Remove the pressure from the cage console and observe th...

Page 77: ......
Reviews: