background image


OPERATION 

1. Turn on the wall switch to activate the light, the light is now under nighttime mode: light and alarm work at night 

only. 

NOTE

: Allow for approximately 30 seconds warm-up time before the sensor resumes normal activity. 

2. To test, walk through the sensor’s detection area. 

3. Movement  will  activate  the  sensor  and  turn  the  light  on,  the  light  will  turn  the  face  to  the  detected  zone  for 

approx. 3 minutes. 

4. After the light is activated, 

keep out of detection area

 and the light will switch off automatically after 3 minutes.   

The light will be activated again when detecting any movement.               


If  there  is  continuing  movement  in  the  detection  zone,  the  light  will  stay  on  until  movement  ceases.  (after  3 

minutes) 


LAMP REPLACEMENT  

To isolate the unit, first switch off the unit from the mains power.    Allow bulb to cool before attempting to remove it.   

Unscrew the lamp cover and take the old lamp out and replace with new one, close the lamp cover and tighten the 

screws. 

WARNING: 

This fitting will become hot when in use.    Allow bulb to cool before touching.    Never touch the bulbs 

with your bare hands.    Always use a clean cloth when handling the bulbs. 


NOTE:  THE I NTE LLIGE NT MOTI ON SE NSOR  TR ACKI NG  LI GHT I S  DE SI GNE D  TO I LLUMI N ATE  W HE N  THE  DE TE CTI ON 

ARE A  I S  E NTE RE D  BY  A  P E RSON  AND W I LL  DE TE CT MOV I NG  HE AT  S OURCE .    THE RE  IS  NO GU AR AN TE E  

IMP LIE D  TH AT  I T W ILL P ROVI DE  TOTAL  S E CURI TY  OR  P REVENT  ILLE G AL  E NTRY.  


CLEANING 


Before Cleaning make sure that the power is cut off and allow to cool before commencing. 


Care must be taken while cleaning to avoid scratching the fitting and glass. A soft cloth or a fine hair brush 

should be used with a non-abrasive cleaner. 

DO NOT use solvents or abrasive cleaners on any part of the Nightwatcher.


Summary of Contents for nw1010X

Page 1: ...1 Motion tracking sensor halogen light Installation operating manual NIGHTWATCHER alarm plus Model no nw1010X ...

Page 2: ...ll instructions carefully even if you feel you are quite familiar with the appliance Any alterations or additions to building wiring must be completed by a licensed electrical mechanic or person authorised by legislation to work on the fixed wiring of any electrical installation To prevent electric shock please ensure that power is disconnected before installing The appliance is not intended for u...

Page 3: ... at moving vehicles Within sight of reflection from moving water Where other lamps could shine onto the detector The maximum rating of this luminaire is 150 Watts Check that the total load of the circuit including this luminary does not exceed the rating of the circuit cable NOTE This highly responsive unit may occasionally activate due to rapid environmental changes Allow for approximately 30 sec...

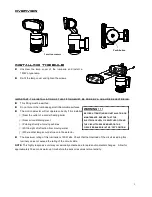
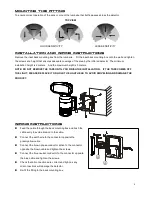
Page 4: ...ATION IF THE TAPE COMES OFF THE LIGHT PLEASE REPLACE IT OR HOLD THE LIGHT HEAD TO AVOID SWIVELING AND DAMAGE THE PRODUCT WIRING INSTRUCTIONS Feed the cable through the back mounting box and bush the cable entry to avoid abrasion to the cable Connect the earth wire to the connector opposite the green yellow cable Connect the brown phase conductor active to the connector opposite the brown cable and...

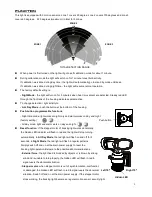
Page 5: ...ght only and alarm works on day and night factory setting All day mode light and alarm work on day and night Reset function If the stepper motor of tracking light works abnormally the hidden LED indicator will flash in red and the light will stop turning automatically In All Day Mode the red light will flash on and off for 5 seconds in Night Mode the red light will flash in regular patterns Simply...

Page 6: ...ch off the unit from the mains power Allow bulb to cool before attempting to remove it Unscrew the lamp cover and take the old lamp out and replace with new one close the lamp cover and tighten the screws WARNING This fitting will become hot when in use Allow bulb to cool before touching Never touch the bulbs with your bare hands Always use a clean cloth when handling the bulbs NOTE THE INTELLIGEN...

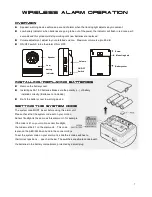
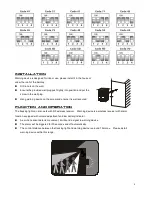
Page 7: ...attery installed correctly Batteries not included Re fit the battery cover to warning device SETTING THE SYSTEM CODE The system code MUST be set before using this alarm unit Please check that the system code set on your motion Sensor floodlight is the same as this alarm unit for example If the code is 41 on your motion sensor floodlight the code must be 41 on the alarm unit This code is also on th...

Page 8: ... is well secured FUNCTION AND OPERATION The tracking light can also work with RF wireless receiver Warning device is a wireless receiver with alarm function equipped with volume adjustment and low battery indicator As motion sensor detects movement it will send a signal to warning device The alarm will be triggered for 30 seconds and off automatically The control distance between the tracking ligh...

Page 9: ... abuse If the product ahs been disassembled or tempered with in any way If the product is not drilled mounted and used in accordance with the instructions Note Warranty excludes consumable parts such as tubes globes and batteries YOUR WARRANTY FORM SHOULD BE RETAINED BY YOU AT ALL TIMES SHOULD YOU HAVE ANY QUESTIONS PRIOR TO RETURNING YOUR PRODUCT FOR WARRANTY OR REPAIR PLEASE TELEPHONE OUR CUSTOM...

Reviews: